Team:MIT/Protocols


Protocols
C. hutchinsonii Media
This is the media used for C. hutchinsonii and co-cultures with E. coli. The media contains all the salts needed for both bacteria but not the carbon source (filter paper) due to the carbon source not being liquid. Cultures are made by adding the salt solution to a tube containing a piece of filter paper where the tube with the paper in it has been sterilized (usually by autoclave).
C. hutchinsonii ALONE in 1 L
Paper: 50 grams per liter of media, which is one 0.5g 9cm No. 1 filter paper disks per 100 mL.
| Component | Amount |
|---|---|
| KH2PO4 | 0.2 g |
| MgSO4*7H2O | 0.5 g |
| KCl | 0.5 g |
| NaNO3 | 0.5 g |
| FeSO4*7H2O | 20 mg |
| K2HPO4 | 0.8 g |
Autoclave 15 min.
E Coli ALONE (M9) in 1 L
- Make 5x M9 salts
- To make M9 Salts aliquot 800ml H2O and add
- 64g Na2HPO4-7H2O
- 15g KH2PO4
- 2.5g NaCl
- 5.0g NH4Cl
- Stir until dissolved
- Adjust to 1000ml with distilled H2O
- Sterilize by autoclaving
- To make M9 Salts aliquot 800ml H2O and add
- Measure ~700ml of distilled H2O (sterile)
- Add 200ml of M9 salts
- Add 2ml of 1M MgSO4 (sterile)
- Add 20 ml of 20% glucose (or other carbon source)
- Add 100ul of 1M CaCl2 (sterile)
- Adjust to 1000ml with distilled H2O
Stock Culture Preparation
C. hutchinsonii is slow to grow, so experiments will be much faster if large initial concentrations of C. hutchinsonii is used. This is achieved by having a continual stock of C. hutchinsonii in the incubator which is used to provide cells for experiments
Protocol:
Stripette:
- 10ml of current stock
- 90ml of DSM3T media
- 5g of autoclaved filter paper strips
into a 500ml flask, and place in shaker.
Transformation
- Make sure that the incubator (30/37C) and heat block (42C) are ON.
- Put water in the wells of the 42°C heat block.
- Make sure required antibiotic plates are present. Make sure you're using the right antibiotic plates for your plasmid's resistance!
- Warm plates to 37°C. Cold plates reduce transformation efficiency by an order of magnitude.
- Also warm 500 µl SOC per transformation to room temperature (if it was in the refrigerator.)
- Take the DNA out of --20 freezer, let it thaw.
- Vortex DNA to mix, then spin down. Make sure it is completely thawed out!
- Make sure that all of the required reagents/DNA etc are present at the site of transformation before you take the cells out of the -80.
- Thaw the competent cells on ice for 3-4 min.
- You want to add your DNA right as the last bit of cells' ice melts. Even if it's still a little slushy, that's okay.
- Add 1-2 µl of DNA into the comp cells. Stir with a pipette tip a few times, then put right back on ice.
- If you're transforming the result of a reaction (GG, LR, etc) add 1-2 µl of the reaction. Don't add more: many of these reactions have additives that screws up transformation.
- If you're transforming plasmid DNA (from a miniprep), either (a) dilute it out so you add only ~10 ng of DNA, or (b) plate only 10 µl of the outgrowth – else you'll get a lawn! Super-coiled DNA transforms super-efficiently. As an alternative, transform 1 ul of miniprep DNA and then streak the outgrowth instead of plating with beads.
- You can rescue DNA from an empty mini prep tube by gently pipetting the cells into the empty DNA tube, enough DNA will be stuck to the walls.
- Incubate the cells on ice for 30-40 min.
- Heat shock the cells for EXACTLY 30 sec at 42 C water bath.
- Place back on ice for 90 seconds.
- Add 250 ul of SOC (37° to RT) medium to each tube (S.O.C is made by dissolving 0.5 ml of 20% glucose in 25 ml of SOB. Make sure that the SOC is clear and not cloudy/ contaminated.)
- Shake the tubes at 37 C, 280 rpm for 60 min.
- Plate 100 µl for a reaction product, or 10 µl in a 100 µl puddle of water for a supercoiled plasmid.
- Incubate plates upside down overnight at 37 C or 16-18h at 30C.
Can leave the cells in the incubator for up to 18 hours but no more.
Gel Preparation, Running, and Extraction
Preparing the Gel
- Check to see if there is a gel waiting in the fridge.
- Dissolve UltraPure agarose to a final concentration of 1%(by mass) in TAE buffer in a glass bottle.
- Heat the solution in the microwave with frequent stirring to dissolve the agarose homogenously. ~1 minute/200ml solution
- Let sit until cool enough to handle.
- Add 10 µl SYBRSafe (1:10000) per 100 ml of the solution and mix well.
- Pour 50ml* of solution per small gel tray. The gel trays and combs should be pre-cleaned with water and wiped dry.
- Note for combs: 15-well combs hold about 6 ul liquid per well, 12-well combs hold about 15 ul per well, 8-well combs hold about 20 ul per well
- Taping two 8-well comb wells together results in a well that holds up to 100 ul
- Taping three 8-well comb wells together result in a well that holds up to 200 ul
- Note for combs: 15-well combs hold about 6 ul liquid per well, 12-well combs hold about 15 ul per well, 8-well combs hold about 20 ul per well
- Use 120 ml per large gel tray. [need to update amounts]
- For the small set: small trays hold 20 ml, large trays hold 50 ml
- Wait for the gels to solidify. ~15 mins
- Label and store at 4C.
*Most of the iGEM gel trays are the small trays that fit 50ml of solution for making the gel.
Running the Gel
When doing gel extraction, it is important to run both an analytical gel (to view under UV) and an extraction gel (from which bands are excised). UV damages DNA, and so we dont want to expose our extracted DNA.
Analytical Gel:
The analytical gel should have between 20 and 100 ng of DNA in each well. It should be an exact copy of the extraction gel with respect to position, voltage, and run time.
Extraction Gel:
This should be the rest of the digestion(s).
The analytical and extraction gels can technically be part of the same physical gel. Make sure to separate with a razor blade before imaging.
Refer to Gel Prep protocol above to determine the amounts of liquid to load for the specific well.
Appropriate Hyperladder to be used for PCR product which is linear. Usually Hyperladder I will be used.
- While casting gel, add two sets of lanes; use one set to load an analytical gel.
- Add 2ul gel loading buffer (Orange G 6X; it helps DNA sink into the bottom of the well) to DNA.
- Make sure there is enough 1xTAE in the plate holder.
- Load 5.0ul of appropriate hyperladder to one of the lanes.
- Load appropriate amount of DNA - As much as possible! Usually 15-18ul - (mixed with the buffer) in each well.
- Set the timer and voltage to 100V and 25 min.
Analytical Gel Annotation
The following things need to be added to the analytical gel image BEFORE it is posted to the wiki:
- Label each lane with part number and amount of DNA loaded
- Label each band with length and proposed identification
- Include wt% agarose, run time, and voltage
Gel Extraction Protocol using Zymo kit (preferred if available)
- Place the extraction gel on the blue light table.
- Cut out the appropriate bands. Place into 2mL microtube(s). Try to cut out as small a piece as possible while still getting all the DNA.
- Weigh gel slice (tare with empty microtube). Add 3 volumes of ADB buffer per mg of gel (so a 100mg gel gets 300 uL of ADB buffer).
- Incubate at 55C for 10 minutes. Make sure that the gel is completely dissolved.
- Add dissolved gel solution to Zymo column in collection tube. Max volume is 800 uL at a time.
- Spin 14000 rpm for 30 sec.
- Discard liquid in collection tube.
- Repeat step 5-7 if had more than 800 uL dissolve gel.
- Add 200 uL DNA wash buffer.
- Spin 14000 rpm 30 seconds.
- Discard liquid in collection tube.
- Add 200 uL DNA wash buffer
- Spin 14000 rpm 1 min.
- Discard liquid in collection tube.
- Spin 14000 rpm 1 min one more time (dry spin).
- Discard collection tube (but not the column).
- (Optional: 2nd dry spin into clean collection tube.)
- Place column in a clean labeled microtube.
- Add 10 uL (min 6 uL for higher DNA concentration) of sterile DDH2O to top of column. Water should be pipetted directly onto center of filter.
- Incubate at RT 1 min (or longer).
- Spin 1 min at 14000 rpm. Discard the column.
- Measure the concentration on the nanodrop. (You may recover the 1uL from the nanodrop if needed.)
Gel Extraction Protocol using QIAquick Gel Extraction Kit:
- Cut the gel to separate analytical and extraction gel; place analytical gel in UV illuminator.
- Look at the gel under low wavelength UV (high wavelengths will denature DNA). Quickly take a polaroid image and shut OFF the UV.
- Cut extraction gel under white light; avoid UV illuminating the extraction gel as this drastically decreases the DNA yield. If necessary, stain with Methyl Blue.
- Place the cut bands in 2ml Eppendorf tubes; Weigh slices; No more than 400mg per tube
- Add 3 volumes (6 volumes if you are afraid of getting a low yield) of Buffer QG to 1 volume of gel (100mg ~ 100ul)
- Incubate at 50C for 10min or until gel is dissolved; vortex every 2-3 min
- Confirm that color of mixture is yellow (if not, add 10ul of 3M NaAc, pH 5.0)
- Add 1 gel volume of isopropanol
- Add max of 770ul to QIAquick column and centrifuge for 1 min (max speed, ~13,000rpm, RT)
- Run flow-through over column one more time.
- After the second time, discard flow-through and place column back in tube.
- If needed, add rest of mixture to same tube (up to additional 770ul), spin, and discard flow-through
- Add 500uL of Buffer QG to column and centrifuge for 1 min (wash).
- Wash: add 0.75ml Buffer PE (make sure that the buffer has ethanol added to it) to column. Let stand for 2-5 minutes and then centrifuge for 1 min
- Discard flow-through & centrifuge for 1 min
- Place column into clean Eppendorf tube
- Add 50ul Buffer EB or water to center of membrane. Make sure to use warm EB (50C). (Use 30uL if worried about low concentration.)
- Let stand at RT for 4 min
- Centrifuge for 1 min
- Measure the concentration using the UV spectrophotometer.
Pro Tips
- You don't need 2 lanes if you aren't putting your gel under UV light (the blue light and SYBR safe is fine)
- You can up the IPA to 1/4 of the total volume
- Warm EB (50 mL conical filled w/ water, plop the tube inside, put it in the heat block)
- Don't let it stand at room temperature, you can do it at 5 degrees (heat block)
Gel Extraction Protocol using QIAgen MinElute Kit:
- Cut the gel to separate analytical and extraction gel; place analytical gel in UV illuminator.
- Look at the gel under low wavelength UV (high wavelengths will denature DNA). Quickly take a polaroid image and shut OFF the UV.
- Cut extraction gel under white light; avoid UV illuminating the extraction gel as this drastically decreases the DNA yield. If necessary, stain with Methyl Blue.
- Place the cut bands in 2ml Eppendorf tubes; Weigh slices; No more than 300mg per tube
- Add 3 volumes of Buffer QG to 1 volume of gel (100mg ~ 100ul)
- Incubate at 50C for 10min or until gel is dissolved; vortex every 2-3 min
- Confirm that color of mixture is yellow (if not, add 10ul of 3M NaAc, pH 5.0)
- Add 1 gel volume of isopropanol
- Add max of 800ul to MinElute column and centrifuge for 1 min (speed >= 10,000 G, RT)
- Discard flow-through and place column back in tube.
- If needed, add rest of mixture to same tube (up to additional 770ul), spin, and discard flow-through
- Add 500 uL of buffer QG and spin column for 1 min and discard flow-through
- Wash: add 0.75ml Buffer PE(make sure that the buffer has ethanol added to it) to column and centrifuge for 1 min
- Discard flow-through & centrifuge for 1 min
- Place column into clean Eppendorf tube
- Add 10ul Buffer EB (10 mM TrisCl,pH 8.5) or water to center of membrane
- Let stand at RT for 1 min
- Centrifuge for 1 min
- Measure the concentration using the UV spectrophotometer.
Golden Gate
50 ng of each piece of DNA being joined
Use nanodrop to find concentration in ng/ul, then divide 50 by that concentration to find the required volume of DNA: Conc: x ng/uL Vol: 50/x uL
NOTE: If GGDonr is too concentrated, dilute it with EB or water. NOTE: Ligase buffer does not like to be freeze-thawed, so use one-time-use aliquots.
x1 uL of DNA1 x2 uL of DNA2
y uL (100ng) Donor 2ul 10X T4 Ligase Buffer 2ul 10X BSA 1ul BsaI (enzyme) HC (high concentration) 1ul T4 Ligase (enzyme) HC (high concentration)
fill to 20uL with SDIH20 (put water in before the buffer and enzymes)
-------------
20ul total
(NOTE: Make sure that Buffer and Enzyme added last, enzyme after buffer)
Take a p20, set it to 10uL and then pipet up and down.
Example: Excel File
ADD |
CONC. |
VOLUME |
ORDER |
| DNA1 | c1 ng/ul | x1 = 50/c1 ul (50ng) | 2 |
| ... | ... | ... | ... |
| DNAn | cn ng/ul | xn = 50/cn ul (50ng) | 2 |
| GGDonr | d ng/ul | y = 50/d ul (100ng) | 2 |
| 10x T4 Ligase Buffer | 2ul | 3 | |
| 10x BSA | 2ul | 3 | |
| BsaI (enzyme) | 1ul | 4 | |
| T4 Ligase (enzyme) | 1ul | 3 | |
| H20 | 20 - (x1 + ... + xn + y) ul | 1 | |
| TOTAL | 20ul |
THERMOCYCLER:
(Protocol EBGG)
37C for 5min
Part 1 50X: 37C for 2.5min 4C for 0.5min 16C for 5.5min
Part 2 37C for 10 min 80C for 20 min
4C hold (for 8+ hours)
(Check protocol by looking up the paper or other online GG protocols)
Making Liquid Cultures
MINIPREP:
- Prepare culture in a 15 mL, round bottom tube.
- Add 5mL LB using a seriological pipette
- Add 5uL of 1000x antibiotic (Ampicillin, Kanamycin, etc.)
- Pick colony using a 10 ul pipette tip on a p2. Eject tip into tube (tip should remain in tube).
- if growing from another liquid culture, 100 uL should be plenty (replacing the 1 colony). Almost no amount is too small, just ensure that you get cells.
Polymerase Chain Reaction (PCR)
Appending Prefix and Suffix
Things to keep in mind!
- Annealing temperature of primers (Tm) should be around 60 C and both primers should be within 1-2C of each other
- Check the secondary structure of the primers before you order them!
- no individual secondary structures i.e. hairpins
- no heterostructure with the forward and reverse primers together
- free energy of primers should be greater than -4 kCal
- GC content should be around 50% (40-60% is okay)
- Dilute your DNA to the following concentrations:
| DNA | Concentrations | Template | 0.1 - 1 ng/ul |
|---|---|---|---|
| Forward Primer | 10 uM | ||
| Reverse Primer | 10 uM |
- Set up a small box (e.g. empty pipette tip box) with ice and water. Your DNA and polymerase mix will go into this box before going into the the thermocycler in order to limit endonucelase activity.
- Add the following DNA to a labeled 0.6ml PCR tube
| DNA | Volume | Template | 1 uL |
|---|---|---|---|
| Forward Primer | 500 nM | ||
| Reverse Primer | 500 nM |
- Program the thermocycler as follows
| Temperature | Time |
|---|---|
| 98 | 30s |
| PAUSE | |
| 98 | 5s |
| Tm | 15 |
| 72 | (15s)x(#kb) |
| 72 | 5m |
| 4 | forever |
- Wait for thermocycler to heat up
- Add 22.5uL of polymerase mix (Phusion Master Mix) to your DNA. Mix well and spin down. Transfer tubes to ice as soon as possible.
- Once the thermocycler has heated up to the right temperature (it should be paused at 98C), add tubes to thermocycler and resume PCR program.
Calculating Reaction Conditions
without common overhangs (base pairs 30 to end when read 5' to 3').
gene of interest and calculate time of elongation.
If you get the melting temperature of your primer from Genious, the annealing temperature will be that number minus 2. |
Assembling Reaction
|
Programming The ThermocyclerInitial Denaturation: 98C for 5min LOOP: 30-35 cycles CYCLE: Final Elongation: 72C for 10min Store: 4C |
Resuspending PCR Primers
From UTexas Protocol:
Materials:
- Buffer
- Primer
You will first make a 100 uM master stock:
- spin down primer tube in case there is some primer stuck in cap
- Calculate amount of buffer needed- multiply nmoles of primer by 10
- add this many uL of Buffer to dry DNA pellet
- vortex until DNA is dissolved
- spin down to recover drops from cap and sides of tube.
Restriction Digest
Digestion Protocol
- 20 uL Total
- 500-1000 ng DNA (volume depends on concentration determined by nanodrop)
- 1 uL enzyme (keep on ice, and add last!)
- 2 uL enzyme buffer (which buffer depends on the specific enzyme)
- fill rest with water
- Pipette up and down thoroughly to mix
- Incubate at 37 degrees for 1-3 hours
- 4-5 ul loading dye
- gel + ladder!
Tips:
Also run a non-digested construct as a control on the digestion itself.
Remember to upload gel to the wiki. Documenting your lab work is required (it is part of your lab notebook). Also remember to keep your page well organized. For ease of calculation (and for keeping track of what is where), use the digest template File:Template Digest.xlsx
From NEB:
One unit is defined as the amount of enzyme required to digest 1 µg of λ DNA in 1 hour at 37°C in a total reaction volume of 50 µl.
So check calculate how much DNA you have and use the right amount of enzyme. Or more.
QIAquick PCR Purification Kit Protocol
using a microcentrifuge
This protocol is designed to purify single- or double-stranded DNA fragments from PCR and other enzymatic reactions (see page 8). For cleanup of other enzymatic reactions, follow the protocol as described for PCR samples or use the MinElute Reaction Cleanup Kit. Fragments ranging from 100 bp to 10 kb are purified from primers, nucleotides, polymerases, and salts using QIAquick spin columns in a microcentrifuge.
Important points before starting
- Add ethanol (96–100%) to Buffer PE before use (see bottle label for volume).
- All centrifugation steps are carried out at 17,900 x g (13,000 rpm) in a conventional tabletop microcentrifuge at room temperature.
- Add 1:250 volume pH indicator I to Buffer PB (i.e., add 120 µl pH indicator I to 30 ml Buffer PB or add 600 µl pH indicator I to 150 ml Buffer PB). The yellow color of Buffer PB with pH indicator I indicates a pH of ≤ 7.5.
- Add pH indicator I to entire buffer contents. Do not add pH indicator I to buffer aliquots.
- If the purified PCR product is to be used in sensitive microarray applications, it may be beneficial to use Buffer PB without the addition of pH indicator I.
Procedure
Add 5 volumes of Buffer PB to 1 volume of the PCR sample and mix. It is not necessary to remove mineral oil or kerosene.
For example, add 500 µl of Buffer PB to 100 µl PCR sample (not including oil).
If pH indicator I has beein added to Buffer PB, check that the color of the mixture is yellow.
If the color of the mixture is orange or violet, add 10 µl of 3 M sodium acetate, pH 5.0, and mix. The color of the mixture will turn to yellow.
- Place a QIAquick spin column in a provided 2 ml collection tube.
- To bind DNA, apply the sample to the QIAquick column and centrifuge for 30–60 s.
Discard flow-through. Place the QIAquick column back into the same tube.
Collection tubes are re-used to reduce plastic waste.
- To wash, add 0.75 ml Buffer PE to the QIAquick column and centrifuge for 30–60 s.
Discard flow-through and place the QIAquick column back in the same tube. Centrifuge the column for an additional 1 min.
IMPORTANT: Residual ethanol from Buffer PE will not be completely removed unless the flow-through is discarded before this additional centrifugation.
- Place QIAquick column in a clean 1.5 ml microcentrifuge tube.
To elute DNA, add 50 µl Buffer EB (10 mM Tris·Cl, pH 8.5) or water (pH 7.0–8.5) to the center of the QIAquick membrane and centrifuge the column for 1 min. Alternatively, for increased DNA concentration, add 30 µl elution buffer to the center of the QIAquick membrane, let the column stand for 1 min, and then centrifuge.
IMPORTANT: Ensure that the elution buffer is dispensed directly onto the QIAquick membrane for complete elution of bound DNA. The average eluate volume is 48 µl from 50 µl elution buffer volume, and 28 µl from 30 µl elution buffer.
Elution efficiency is dependent on pH. The maximum elution efficiency is achieved between pH 7.0 and 8.5. When using water, make sure that the pH value is within this range, and store DNA at –20°C as DNA may degrade in the absence of a buffering agent. The purified DNA can also be eluted in TE buffer (10 mM Tris·Cl, 1 mM EDTA, pH 8.0), but the EDTA may inhibit subsequent enzymatic reactions.
If the purified DNA is to be analyzed on a gel, add 1 volume of Loading Dye to 5 volumes of purified DNA. Mix the solution by pipetting up and down before loading the gel.
Loading dye contains 3 marker dyes (bromophenol blue, xylene cyanol, and orange G) that facilitate estimation of DNA migration distance and optimization of agarose gel run time. Refer to Table 2 (page 15) to identify the dyes according to migration distance and agarose gel percentage and type.
Designing and Ordering Primers
For PCR Primers in Geneious:
- Highlight the gene that you want to amplify
- Select "Primers" from the top banner and "design new primers" from the drop down tab
- Make sure you have checked "Forward Primer" and "Reverse Primer"
- Set task to "precise" if you are doing this for a cloning reaction
- check "Target Region"
- Modify characteristics as needed - see checking Tm and other primer design tips in the protocols page
- Hit OK and pick the best primer generated - hovering your mouse over the primer will give you Tm and GC content
- Check your PCR reaction coditions, Geneious may not have an accurate model for predicting Tm, check the NEB website.
For Sequencing Primers:
- You will get some amount of good read from a primer, look this up. Some primers are standard, they normally read from the ends of the insert. Check the backbone to see what sequencing primers are in place. These may be available from the sequencing shop, or they should at least be in the fridge.
- If your gene is less than whatever length you can sequence it using back bone primers and do not need to design your own
- If your gene is larger then what can be read by the back bone primers, you will need to sequence part way through with custom primers.
- Highlight a 50-100 bp region that you want the primer to bind in
- Select "Primers" from the top banner and "design new primers" from the drop down tab
- Set task to "Generic"
- Check forward primer and DO NOT check reverse primer
- Check "Included Region"
- Set "Tm Min" to 50 optimal to 55 and "Tm Max" to 60
- Set "GC Min" to 45 optimal to 50 and "GC Max to 55
- Set "GC Clamp" to 1
- Hit OK and pick the best primer generated - hovering your mouse over the primer will give you Tm and GC content
General tips for sequencing:
Reads are only clear about 30 bp after the primer to 600 bp after the primer.
The easiest way to pick primers is to start with one in a 50 bp region in front of the gene and then measure out 500 bp from that primer then place the next one in the following 100 bp region then measure out 500 bp and place one in the next 100 bp region and so on.
If you are planning on doing additional cloning with this part try to make some of the primers usable for future constructs
For Both:
- Once your primers are designed. right click on the primer annotation and select "Extract Regions" this will make a primer file in the same folder
- Select all of your primers and then click File => Export
- Export the documents as a .csv
- Highlight only name and sequence
- Email the csv to your supervisor to be ordered
Miniprep (using a microcentrifuge)
This protocol is designed for purification of up to 20 µg of high-copy plasmid DNA from 1–5 ml overnight cultures of E. coli in LB (Luria-Bertani) medium. For purification of low-copy plasmids and cosmids, large plasmids (>10 kb), and DNA prepared using other methods, refer to the recommendations on page 35.
Note: All protocol steps should be carried out at room temperature.
Procedure
Resuspend pelleted bacterial cells in 250 µl Buffer P1 and transfer to a microcentrifuge tube.
Ensure that RNase A has been added to Buffer P1. No cell clumps should be visible after resuspension of the pellet.
Add 250 µl Buffer P2 and gently invert the tube 4–6 times to mix.
Mix gently by inverting the tube. Do not vortex, as this will result in shearing of genomic DNA. If necessary, continue inverting the tube until the solution becomes viscous and slightly clear. Do not allow the lysis reaction to proceed for more than 5 min.
Add 350 µl Buffer N3 and invert the tube immediately but gently 4–6 times.
To avoid localized precipitation, mix the solution gently but thoroughly, immediately after addition of Buffer N3. The solution should become cloudy.
Centrifuge for 10 min at 13,000 rpm (~17,900 x g) in a table-top microcentrifuge.
A compact white pellet will form.
Apply the supernatants from step 4 to the QIAprep Spin Column by decanting or pipetting.
Centrifuge for 30–60 s. Discard the flow-through.
(Optional): Wash the QIAprep Spin Column by adding 0.5 ml Buffer PB and centrifuging for 30–60 s. Discard the flow-through.
This step is necessary to remove trace nuclease activity when using endA+ strains such as the JM series, HB101 and its derivatives, or any wild-type strain, which have high levels of nuclease activity or high carbohydrate content. Host strains such as XL-1 Blue and DH5α™ do not require this additional wash step.
Wash QIAprep Spin Column by adding 0.75 ml Buffer PE and centrifuging for 30–60 s.
Discard the flow-through, and centrifuge for an additional 1 min to remove residual wash buffer.
IMPORTANTResidual wash buffer will not be completely removed unless the flow-through is discarded before this additional centrifugation. Residual ethanol from Buffer PE may inhibit subsequent enzymatic reactions
Place the QIAprep column in a clean 1.5 ml microcentrifuge tube. To elute DNA, add 50 µl Buffer EB (10 mM Tris·Cl, pH 8.5) or water to the center of each QIAprep Spin Column, let stand for 1 min, and centrifuge for 1 min.
Miniprep (using 5ml collection tubes)
The QIAprep Spin Miniprep procedure can be performed using 5 ml centrifuge tubes (e.g., Greiner, Cat. No. 115101 or 115261) as collection tubes to decrease handling.
Note: All protocol steps should be carried out at room temperature.
Procedure
Resuspend pelleted bacterial cells in 250 µl Buffer P1 and transfer to a microcentrifuge tube.
Ensure that RNase A has been added to Buffer P1. No cell clumps should be visible after resuspension of the pellet.
Add 250 µl Buffer P2 and gently invert the tube 4–6 times to mix.
Mix gently by inverting the tube. Do not vortex, as this will result in shearing of genomic DNA. If necessary, continue inverting the tube until the solution becomes viscous and slightly clear. Do not allow the lysis reaction to proceed for more than 5 min.
Add 350 µl Buffer N3 and invert the tube immediately but gently 4–6 times.
To avoid localized precipitation, mix the solution gently but thoroughly, immediately after addition of Buffer N3. The solution should become cloudy.
Place a QIAprep Spin Column in a 5 ml centrifuge tube instead of a 2 ml collection tube.
Apply the supernatants from step 4 to the QIAprep Spin Column by decanting or pipetting.
Centrifuge at 3000 x g for 1 min using a suitable rotor (e.g., Beckman® GS-6KR centrifuge at ~4000 rpm). (The flow-through does not need to be discarded.)
(Optional): Wash the QIAprep Spin Column by adding 0.5 ml Buffer PB and centrifuging for 30–60 s. Discard the flow-through.
For washing steps, centrifugation should be performed at 3000 x g for 1 min. (The flow-through does not need to be discarded.)
Wash QIAprep Spin Column by adding 0.75 ml Buffer PE and centrifuging for 30–60 s.
For washing steps, centrifugation should be performed at 3000 x g for 1 min. (The flow-through does not need to be discarded.)
Transfer the QIAprep Spin Column to a microcentrifuge tube. Centrifuge at maximum speed for 1 min. Continue with step 10 of the protocol.
Place the QIAprep column in a clean 1.5 ml microcentrifuge tube. To elute DNA, add 50 µl Buffer EB (10 mM Tris·Cl, pH 8.5) or water to the center of each QIAprep Spin Column, let stand for 1 min, and centrifuge for 1 min.
Miniprep (using vacuum manifold)
This protocol is designed for purification of up to 20 µg high-copy plasmid DNA from 1–5 ml overnight cultures of E. coli grown in LB (Luria-Bertani) medium, using QIAprep spin columns on QIAvac 24, QIAvac 6S, or other vacuum manifolds with luer connectors.
Note: All protocol steps should be carried out at room temperature.
Procedure
Resuspend pelleted bacterial cells in 250 µl Buffer P1 and transfer to a microcentrifuge tube.
Ensure that RNase A has been added to Buffer P1. No cell clumps should be visible after resuspension of the pellet.
Add 250 µl Buffer P2 and invert the tube gently 4–6 times to mix.
Do not vortex, as this will result in shearing of genomic DNA. If necessary, continue inverting the tube until the solution becomes viscous and slightly clear. Do not allow the lysis reaction to proceed for more than 5 min.
Add 350 µl Buffer N3 and invert the tube immediately but gently 4–6 times
To avoid localized precipitation, immediately after addition of Buffer N3 mix the solution gently but thoroughly. The solution should become cloudy.
Centrifuge for 10 min at 13,000 rpm (~17,900 x g) in a table-top microcentrifuge.
A compact white pellet will form.
During centrifugation, prepare the vacuum manifold and QIAprep Spin Columns: QIAvac 24
- Place the QIAvac 24 lid on top of the QIAvac 24 base. Make sure that the gasket fits tightly in the groove of the QIAvac 24 lid.
- Insert up to 24 QIAprep spin columns into the luer extensions of the QIAvac 24. Close unused positions with luer caps and connect QIAvac 24 to a vacuum source.
QIAvac 6S manifold: (Note: The following procedure applies to the manifold with a hinged lid and spring lock.
- Open QIAvac 6S lid. Place QIAvac Luer Adapter(s), or blanks to seal unused slots, into the slots of the QIAvac top plate. Close the QIAvac 6S lid. Place the waste tray inside the QIAvac base, and place the top plate squarely over the base. Attach the QIAvac 6S to a vacuum source.
- Insert each QIAprep Spin Column into a luer connector on the Luer Adapter(s) in the vacuum manifold. Seal unused luer connectors with plugs provided with the QIAvac Luer Adapter Set
Other vacuum manifolds: Follow the supplier’s instructions. Insert each QIAprep column into a luer connector.,/p>
Apply the supernatant from step 4 to the QIAprep Spin Column by decanting or pipetting.
Switch on vacuum source to draw the solution through the QIAprep Spin Columns, and then switch off vacuum source.
If using the QIAvac 24 it may be necessary to press down on the lid after the vacuum is switched on in order to achieve a tight seal.
(Optional): Wash the QIAprep Spin Column by adding 0.5 ml Buffer PB. Switch on vacuum source. After the solution has moved through the column, switch off vacuum source.
This step is necessary to remove trace nuclease activity when using endA+ strains such as the JM series, HB101 and its derivatives, or any wild-type strain, which have high levels of nuclease activity or high carbohydrate content. Host strains such as XL-1 Blue and DH5α do not require this additional wash step
Wash the QIAprep Spin Column by adding 0.75 ml Buffer PE. Switch on vacuum source to draw the wash solution through the column, and then switch off vacuum source.
Transfer the QIAprep Spin Columns to a microcentrifuge tube. Centrifuge for 1 min.
IMPORTANT: This extra spin is necessary to remove residual Buffer PE. Residual ethanol from Buffer PE may inhibit subsequent enzymatic reactions.
Place the QIAprep column in a clean 1.5 ml microcentrifuge tube. To elute DNA, add 50 µl Buffer EB (10 mM Tris·Cl, pH 8.5) or water to the center of the QIAprep Spin Column, let stand for 1 min, and centrifuge for 1 min.
CIDAR MoClo Golden Gate
Reaction Conditions
Basic Part or Device
10 fmol each part
1x Promega ligase bufer
20 U/rxn T4 ligase (NEB or Promega)
10 U/rxn BbsI
Total volume: 10-20 µl
Note: T4 Ligase buffer cannot be refrozen. Throw away anything left from the tube you thawed.
Transcriptional Unit
10 fmol each part (Make enough for 20fmol or however much makes a usable amount and then dilute with water) (Take 500fmol out so we have 50µl at 10fmol per µl) (1µl of each part after dilution at 10fmol)
1x Promega ligase buffer (NEB or Promega) in -20 in a box that used to have tips. In 5µl tubes. Just take 1 and do not freeze again. Throw away. P on top
20 U/rxn T4 ligase (should be stored at 20 U/uL)
10 U/rxn BsaI (Bbs1 for L2) get from -20 and put on ice - not just enzyme box
Total volume: 10-20 µl (10µl)
Thermocycler programs
Standard protocol
Named: .CIDARGG
| Step | Temp (°C) | Time (min) |
|---|---|---|
| 1 | 37 | 1.5 |
| 2 | 16 | 3 |
| Cycle 1-2 15X | ||
| 3 | 50 | 5 |
| 4 | 80 | 10 |
| Total time: 82.5 minutes | ||
Troubleshooting protocol
Named: .CIDAR TROUBLE GG
| Step | Temp (°C) | Time (min) |
|---|---|---|
| 1 | 37 | 1.5 |
| 2 | 16 | 3 |
| Cycle 1-2 25X | ||
| 3 | 50 | 5 |
| 4 | 80 | 10 |
| Total time: 127.5 minutes | ||
Rapid protocol
(good for new basic parts where you're only putting one piece in a backbone)
| Step | Temp (°C) | Time (min) |
|---|---|---|
| 1 | 37 | 20 |
| 2 | 37 | 1.5 |
| 3 | 16 | 3 |
| Cycle 2-3 5-10X | ||
| 4 | 50 | 5 |
| 5 | 80 | 10 |
| Total time: 57.5 - 80 minutes | ||
Genomic DNA extraction (Phenol Chloroform Extraction, Ethanol precipitate)
[Abstract] This protocol uses phenol/chloroform method to purify genomic DNA without using commercial kits.
Materials and Reagents
- Tris base (Calbiochem-Behring)
- Proteinase K (Sigma-Aldrich)
- Phenol\chloroform (1: 1) (EM Science)
- 200 proof ethanol (Pharmco-AAPER)
- RNAase (Life Technologies, Invitrogen™)
- Ethanol
- SDS
- EDTA
- Tryptone
- Yeast extract
- NaCl
- LB medium (see Recipes)
- TE buffer (see Recipes)
- Lysis buffer (see Recipes)
Equipment
- Tabletop centrifuge (Eppendorf)
- 1.5 ml Eppendorf tube
- Incubator
- Gloves
Procedure
- Transfer 1.5 ml of the overnight E. coli culture (grown in LB medium) to a 1.5 ml Eppendorf tube and centrifuge at max speed for 1min to pellet the cells.
- Discard the supernatant.
Note: Remove as much of the supernatant as you can without disturbing the cell pellet. - Resuspend the cell pellet in 600 μl lysis buffer and vortex to completely resuspend cell pellet.
- Incubate 1 h at 37 °C.
- Add an equal volume of phenol/chloroform and mix well by inverting the tube until the phases are completely mixed.
Note: Do not vertex the tube—it can shear the DNA.
- CAUTION: Phenol is a very strong acid that causes severe burns. Chloroform is a carcinogen. Wear gloves, goggles and lab coat, and keep tubes capped tightly. To be safe, work in the hood if possible.
- Spin at max speed for 5 min at RT (all spins are performed at RT, unless indicated otherwise). There is a white layer (protein layer) in the aqueous: phenol/chloroform interface.
- Carefully transfer the upper aqueous phase to a new tube by using 1 ml pipetman (to avoid sucking the interface, use 1 ml tip with wider mouth-cut 1 ml tip-mouth about ~2 mm shorter).
- Steps 4-6 can be repeated until the white protein layer disappears.
- To remove phenol, add an equal volume of chloroform to the aqueous layer. Again, mix well by inverting the tube.
- Spin at max speed for 5 min.
- Remove aqueous layer to new tube.
- To precipitate the DNA, add 2.5 or 3 volume of cold 200 proof ethanol (store ethanol at -20 °C freezer) and mix gently (DNA precipitation can be visible).
- Incubate the tube at -20 °C for 30 min or more.
- Spin at max speed for 15 min at 4 °C.
- Discard the supernatant and rinse the DNA pellet with 1 ml 70% ethanol (stored at RT).
- Spin at max speed for 2 min. Carefully discard the supernatant and air-dry the DNA pellet (tilt the tube a little bit on paper towel). To be faster, dry the tube at 37 °C incubator.
- Resuspend DNA in TE buffer.
Note: Large amounts of RNA will be present in the DNA sample. So, for subsequent reactions, for example, to digest plasmid DNA, add 1-5 μl (1 mg ml-1) RNAase to the digestion solution to completely remove RNA. Or, add RNAase directly to lysis buffer with a final concentration of 1 mg ml-1.
Recipes
- LB medium
1% tryptone
0.5% yeast extract
200 mM NaCl - TE buffer
10 mM Tris-Cl (pH 8.0)
1 mM EDTA (pH 8.0) - Lysis buffer (10 ml)
9.34 ml TE buffer
600 ul of 10% SDS
60 μl of proteinase K (20 mg ml-1)
How to cite this protocol: (2011). E. coli Genomic DNA Extraction. Bio-protocol Bio101: e97. http://www.bio-protocol.org/e97
In-Fusion cloning procedure for Spin-Column purified PCR fragments
In general, good cloning efficiency is achieved when using 50-200 ng of vector and inserts respectively, regardless of their length. More is not better. If the size of the PCR fragment is shorter than 0.5kb, maximum cloning efficiency can be achieved by using less than 50 ng of fragment.
Table: Recommended In-Fusion reactions for Purified Fragments
| Rxn Component | Cloning Rxn | Negative Control Rxn | Positive Control Rxn |
| Purified PCR Fragment | 10-200 ng* | - | 2ul of 2kb control insert |
| Linearized Vector | 50-200 ng** | 1ul | 1ul of pUC19 control vector |
| 5X In-Fusion HD Enzyme Premix | 2ul | 2ul | 2ul |
| Deionized Water | to 10ul | to 10ul | to 10ul |
* < 0.5kb: 10-50 ng, 0.5 to 10kb; 50-100 ng, > 10kb: 50-200ng
** < 10kb: 50-100ng, > 10kb: 50-200 ng
Set up the In-Fusion cloning reaction
| 2ul | 5X In-Fusion HD Enzyme Premix |
| xul | Linearized vector |
| xul | Purified PCR Fragment |
| xul | dH2O (as needed) |
| 10 ul | Total volume |
Gibson Assembly Master Mix - Assembly (E2611)
Protocols.io also provides an interactive version of this protocol where you can discover and share optimizations with the research community.
Optimal Quantities
NEB recommends a total of 0.02–0.5 pmols of DNA fragments when 1 or 2 fragments are being assembled into a vector and 0.2–1.0 pmoles of DNA fragments when 4–6 fragments are being assembled. Efficiency of assembly decreases as the number or length of fragments increases. To calculate the number of pmols of each fragment for optimal assembly, based on fragment length and weight, we recommend using NEB's online tool, NEBioCalculator , or using the following formula:pmols = (weight in ng) x 1,000 / (base pairs x 650 daltons)
50 ng of 5000 bp dsDNA is about 0.015 pmols.
50 ng of 500 bp dsDNA is about 0.15 pmols.
The mass of each fragment can be measured using the NanoDrop instrument, absorbance at 260 nm or estimated from agarose gel electrophoresis followed by ethidium bromide staining.
Assembly Protocol:
-
Set up the following reaction on ice:
Recommended Amount of Fragments Used for Assembly 2-3 Fragment Assembly 4-6 Fragment Assembly Positive Control** Total Amount of Fragments 0.02–0.5 pmols*
X μl0.2–1 pmols*
X μl10 μl Gibson Assembly Master Mix (2X) 10 μl 10 μl 10 μl Deionized H2O 10-X μl 10-X μl 0 Total Volume 20 μl*** 20 μl*** 20 μl
* Optimized cloning efficiency is 50–100 ng of vectors with 2–3 fold of excess inserts. Use 5 times more of inserts if size is less than 200 bps. Total volume of unpurified PCR fragments in Gibson Assembly reaction should not exceed 20%.
** Control reagents are provided for 5 experiments.
*** If greater numbers of fragments are assembled, additional Gibson Assembly Master Mix may
be required.
- Incubate samples in a thermocycler at 50°C for 15 minutes when 2 or 3 fragments are being assembled or 60 minutes when 4-6 fragments are being assembled. Following incubation, store samples on ice or at -20°C for subsequent transformation.
HPLC Resources Library
Summary of Information
There are two main ways to measure FAEEs. One method used HPLC with a UV module. The other method used TLC to purify/isolate the FAEEs and GC to quantify it. This could be useful if we chose to simply show that we produced FAEEs. Silica gel plates are required to use TLC and possibly a fluorescent to identify the FAEE.
- UV
- TLC/GC
- TLC
- GC
- Solid Phase Extraction (SPE)
- ends in GC
Resources
Separation of Fatty Acids by HPLC [1]
This paper describes using a UV module to measure fatty acids.
Analysis of Fatty Acids by High-Performance Liquid Chromatography [2]
William W. Christie (1997?)
This paper briefly mentions different ways to use an HPLC to measure fatty acids.
- Adsorption Chromatography
- Using silica gel columns with HPLC
- Chiral Chromatography - Not going to work
- Silver-Ion Chromatography
- Reversed-Phase Chromatography (UV)
Microdiesel: Escherichia coli engineered for fuel production [3]
This is the paper we got the biodiesel genes from and they used TLC to isolate and GC to measure.
Purification of fatty acid ethyl esters by solid-phase extraction and high-performance liquid chromatography [4]
Thomas G. Bernhardt, Paul A. Cannistraro, David A. Bird, Kathleen M. Doyle, Michael Laposata (September 1995)
This paper mainly discusses using gas-chromatography to measure FAEE, but it also describes a way to use HPLC to identify different species of FAEE. The sample is analyzed in a Rainin HPLC with "a Spherisorb C6 250X4.6 mm I.D. column, with sorbent size 5 mm". A Knauer variable wavelength detector detects FAEE.
Liquid Chromatography in Biomedical Analysis [5]
T. Hanai (1991). Print (Hayden Library)
Ch. 7: Fatty Acids
- Short Chain Extraction
- Deprotonize with Sodium Tungstate
- Steam Distillation (can't be used for "numerous specimens"
Analysis of Fatty Acids [6]
TLC Separation of Acylglycerols [7]
- Need:
- UV lamp
- fluorescent scanner
Fatty acid ethyl esters are present in human serum after ethanol ingestion [8]
Kathleen M. Doyle, David A. Bird, Salih Al-Salihi, Youseff Hallaq, Joanne E. Cluette-Brown, Kendrick A. Goss, and Michael Laposata (August 1993)
Page 429
They used TLC to isolate the FAEEs and then took the FAEEs off the silica gel and ran it through a GC.
Two-step synthesis of fatty acid ethyl ester from soybean oil catalyzed by Yarrow lipolytic lipase [9]
This paper also uses TLC to identify and GC to measure.
Rhodococcus opacus strain PD630 as a new source of high-value single-cell oil? Isolation and characterization of triacylclycerols and other storage lipids [10]
"Lipid extraction and TLC.
Crude oil of R. opacus PD630 was obtained from lyophilized cell material (15 g), which was stirred twice each with 500 ml chloroform/methanol (2:1, v/v) at room temperature for 3 h. The solvents were evaporated from the combined extracts, and the residual material, 5·2 g, was dissolved in light petroleum (b.p. 30–40 °C) and applied to a column packed with 20 g silica gel 60 (mesh 50–200 μm, Merck) equilibrated with light petroleum. The column was eluted with 500 ml light petroleum; the total eluate was collected and evaporated to dryness to obtain 4·4 g of a yellowish crude oil fraction, which consisted of 90% fatty acids in total.
To determine the identity of the lipids, TLC was carried out on silica gel 60 F254 plates (0·2 mm, Merck). For this, samples of lyophilized cell material were extracted with chloroform/methanol (2:1, v/v), and light petroleum (b.p. 30–40 °C)/diethyl ether/acetic acid (70:30:1) was used as solvent. In some experiments, a double solvent system, benzene/acetic acid (85:15, v/v) followed by light petroleum (b.p. 30–40 °C) applied in the same direction, was used. Preparative TLC was carried out on silica gel plates of 2 mm thickness (Merck). Plates impregnated with methanolic silver nitrate or boric acid (each 5%, w/v) were also used. Lipid fractions were visualized by heating the plates over a Bunsen flame after spraying with 40% sulfuric acid. Components on preparative plates were visualized after brief exposure to iodine vapour. Quinone compounds were detected on silica gel TLC plates by specific staining with a leukomethylene blue spray reagent (Krebs et al., 1967⇓ ). Quinones appeared immediately as dark blue spots on a faint blue background. Osmium tetroxide vapour was used to visualize unsaturated compounds. 2-Monopalmitoylglycerol, tripalmitoylglycerol, 1,2-dipalmitoylglycerol, 1,3-dipalmitoylglycerol, cetylpalmitate, 1,2-dipalmitoyl-3-myristoyl-rac-glycerol, hexadecanol, tetradecene and oleic acid obtained from Sigma were used as reference substances.
Analysis of fatty acids.
To determine the fatty acid content of the cells and the composition of the lipids, these compounds were treated to yield fatty acid methyl esters (Brandl et al., 1988⇓ ; Timm et al., 1990⇓ ), which were analysed by GC with a Perkin Elmer model 8420 gas chromatograph equipped with a Permaphase PEG 25Mx capillary column (25 m × 0·32 mm) and a flame ionization detector. A 2 μl portion of the organic phase was analysed after split injection (split ratio, 1:40); helium (32 ml min–1) was used as carrier gas. The temperatures of the injector and detector were 230 °C and 275 °C, respectively, and a temperature programme was used for the separation of methyl esters (120 °C for 5 min; temperature increase of 8 °C min−1; 180 °C for 37 min) on the column. The fatty acids were identified by comparison of their retention times with those of standard fatty acid methyl esters.
Reversed-phase HPLC.
Reversed-phase HPLC was performed on an RP-18 Merck LiChroSphere 100 column (5 μm, 250 × 4·6 mm i.d.) using a Kontron HPLC apparatus equipped with a series 522 chromatographic pump. Elution of the compounds was monitored at 210 nm using a Kontron DAD 540 diode array detector (DAD) or an Alltech ELSD 500 evaporative light-scattering detector (ELSD) connected to a KromaSystem 2000 integrator system. The ELSD temperature was set to 55 °C. Acetonitrile/acetone (38:62, v/v) at a flow rate of 1 ml min−1 was used as solvent system. To characterize TAG mixtures further, a partition number (PN) variable was used: PN=CN−2ND, where CN and ND represent the total carbon number and the total number of double bonds in the fatty acids in the TAG molecule, respectively (Ruiz-Gutiérrez & Barron, 1995⇓ )."
Highly sensitive and simple method for sugar 101 analysis using HPLC-ECD
HPLC for Carbohydrate Measurement
1. System Overview
The Dionex ICS-3000 Ion Chromatography (IC) system has 4 main components: Auto sampler (AS); Detector/ Chromatography (DC); Dual Pump (DP); Eluent Generator (EG). Chromeleon Tablet Station (we have a computer instead of this which also runs Chromeleon). Please be familiar with these components before starting.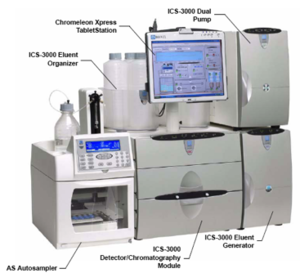
2. IC System Startup
*only applicable if system power is off for maintenance or for long term vacancy.
Before you can operate the system through Chromeleon software, you should make sure all IC components have been properly started and are in good working status. The steps to startup IC system are shown as follows:
1) Make sure enough eluent is in the eluent reservoir (for sugar analysis, mili-Q water is used as eluent)
2) Press the power switches (1-2 seconds) to turn on each component in sequence of: Auto sampler (AS)-> Dual Pump (DP)->Detector/ Chromatography (DC)->Eluent Generator (EG);
3) Wait for 1 minute for heat-up;
4) Make sure all components are in good working status (If there is red alarm light on or flashing, please contact Responsible User or Barbara for assistance).
5) Turn on computer next to device and open Chromeleon;
6) Click ‘view’ then‘Default Panel Tabset’ button on toolbar then select ‘my computer’ – >’ Chromeleon Server’ ->’OK’ to initialize the Panel Tabset7) Click ‘view’ then‘Default Panel Tabset’ button on toolbar then select ‘my computer’ – >’ my computer’ ->’OK’ to initialize the Panel Tabset ,8) Click on the ‘expand icon’ to enlarge the window;
9) The panel tabset opens to the ‘Home’ panel by default. This panel displays basic status information for each instrument in the system.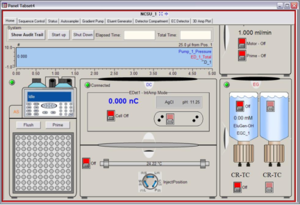
3. Prime Pump
The pump must be primed each time after refilling eluent reservoir OR if the components are off OR the system is idle for more than 2 days. It is suggested you prime the pump every time you start a new sequence run.
1) On panel tabset switch to ‘Gradient Pump’ panel;
2) Click ‘Prime’ button, you will be instructed to open ‘Prime Valve’ before continuing;
3) Open ‘Prime Valve’ on PUMP 1 by turning it one-half turn counter-clockwise;
4) Click ‘OK’ to start priming, by default it will take 5 min @ a flow rate of 6 ml/min;
5) Prime twice if air bubbles still exist in inlet tubing.
6) Close ‘Prime Valve’ by finger tightening.
4. Baseline Stabilization to stabilize
Before running samples, please allow baseline to stabilize.
1) Switch back to ‘Home’ panel;
2) Click ‘Start up’ button, wait for 30 seconds or until pump pressure is stablized;
3) Click ‘Start up’ again to ensure the status of EG component is ‘On’ (the eluent generate will not start if pump pressure is below 1000 psi)
4) Make sure all components are working properly;
5) Please check eluent concentration on eluent generator ‘EluGen-OH’ display, for Aplication I (non-woody material sugar analysis, by default), 18mM should be used. Please check required eloquent concentration in table 1. Click ‘Eluent Generator’ panel, and manually set to your desired concentration;
Table 1. Eluent concentration for different applications
6) Click ‘Control’ menu -> ‘Acquisition on’-> ‘OK’;
7) Switch to ‘Status’ panel, allow to run for 30 min to ensure flat baseline;
8) Click ‘Control’ menu -> ‘Acquisition off’ to stop acquisition before starting your sample run.
5. Sugar Calibration Standard Preparation:
1) Prepare sugar stock solution: a) weigh out ~0.5g of each sugar (fucose, arabinose, rahmnose, galactose, glucose, and xylose) and dry at 45C overnight using vacuum oven; b) accurately weigh 0.1±0.001 g of each OD sugar sample and transfer into 100 ml volumetric flasks separately (record the weights); c) add mili-Q water up to 100 ml to make 10 mg/ml sugar stock solution for each sugar;
d) keep @ 4C for short term or freeze @-20C for long term storage.
2) Prepare 4 levels of calibration standards by following the dilutions in Table 1, dilute with 50 ml volumetric flasks;
Table 1. Recipe for 4 level calibration standards
|
100mg/ml stock solution |
Level #1 |
Level #2 |
Level #3 |
Level #4 |
Note: final concentration level 1 – 4 (ug/ml) |
|
Fucose |
1000 ul |
1000 ul |
1000 ul |
1000 ul |
200 ug/ml for all levels |
|
Arabinose |
125 ul |
250 ul |
375 ul |
500 ul |
25, 50, 75, 100 ug/ml |
|
Rahmnose |
50 ul |
100 ul |
150 ul |
200 ul |
10, 20, 30, 40 ug/ml |
|
Glactose |
125 ul |
250 ul |
375 ul |
500 ul |
25, 50, 75, 100 ug/ml |
|
Glucose |
250 ul |
500 ul |
750 ul |
1000 ul |
50, 100, 150, 200 ug/ml |
|
Xylose |
250 ul |
500 ul |
750 ul |
1000 ul |
50, 100, 150, 200 ug/ml |
|
Mini-Q water |
to 50 ml |
to 50 ml |
to 50 ml |
to 50 ml |
In 50 ml volumetric flasks |
3) Filter calibration standards through 0.2 um nylon filter into 1ml autosampler vial and then cap with a pre-slit septum;
4) Store prepared samples @ 4C in refrigerator before loading into auto-sampler (the sugar samples may be stable @ 4C for less than 1 week, for long term storage the samples should be stored in a freezer @-20C and remove when needed. Thaw and vortex frozen samples prior to use )
6. Sample Run
1. Please follow Startup Procedures to prepare Dionex system to be ready for sample running.
2. Switch to ‘project browser’ by clicking ‘Windows’ -> ‘Toshiba_user…’;
3. On the left, find your desired directory (you may create your own directory to manage all your data);
4. Copy ‘non_wood’ from ‘application_backup’ directory to your own directory;
5. Select ‘non_wood’ from your own directory, you may rename it;
6. Edit the sequence and save it;
7. Click ‘Batch’ -> ‘Start’, on the popup window, click ‘verify’, make sure there are no alarm messages, then click ‘OK’ to start sample run.
Folch Method
The most popular extraction procedure is that of Folch (Folch et al., J Biol Chem 1957, 226,
497):
-
The tissue is homogenized with chloroform/methanol (2/1) to a final volume 20 times the volume of the tissue sample (1 g in 20 ml of solvent mixture). After dispersion, the whole mixture is agitated during 15-20 min in an orbital shaker at room temperature.
-
The homogenate is either filtrated (funnel with a folded filter paper) or centrifuged to recover the liquid phase.
-
The solvent is washed with 0.2 volume (4 ml for 20 ml) of water or better 0.9% NaCl solution. After vortexing some seconds, the mixture is centrifuged at low speed (2000 rpm) to separate the two phases. Remove the upper phase by siphoning and kept it to analyze gangliosides or small organic polar molecules. If necessary (need of removing labelled molecules...), rinse the interface one or two times with methanol/water (1/1) without mixing the whole preparation.
-
After centrifugation and siphoning of the upper phase, the lower chloroform phase containing lipids is evaporated under vacuum in a rotary evaporator or under a nitrogen stream if the volume is under 2-3 ml.
COMMENTS :
It must be emphasized that the method of tissue disruption affects
the concentrations of extracted lipids. Therefore, for poorly explored tissues,
the analyst must be careful in comparing various methods of tissue disruption.
As an example, it was demonstrated that better recoveries of liver lipids are
obtained extracting 150 mg of liver tissue with 30 second sonication (or a 2
min homogenization), followed by a 2h shaking in chloroform/methanol reagent
and a 12h incubation in chloroform. A drying time of 6h must be observed before
weighing to get reliable lipid amounts (Ametaj BN et al. J Agric Food Chem
2003, 51, 2105).
The use of dichloromethane instead of chloroform has been evaluated in extracting
lipids from samples of different natures (Cequiez-Sanchez E et al., J Agric
Food Chem 2008, 56, 4297). The results indicate that dichloromethane/methanol
can replace the commonly employed chloroform/methanol, thus avoiding the major
health, security, and regulatory problems associated with the use of chloroform.
It has been determined that the Folch method is most effective for the extraction
of a broad range of lipid classes in human lipoproteins (Reis
A et al., J Lipid Res 2013, 54, 1824). Furthremore, their results revealed
that while for major lipid classes there are negligible differences in the solvent
system chosen, the same is not true for minor lipid classes.
TLC Protocol
Doering Protocol
Hexose Assay
Anthrone-sulfuric acid method for total hexose quantification
The procedure for the anthrone method was modified from published
procedures [Loewus 1952, Ludwig & Goldberg 1956, Morris 1948]. The advantages
of this revised procedure are to reduce the usage volume of sulfuric acid and to use
no ethyl acetate. Each test tube was prepared with 0.5 ml of diluted sample or
glucose standard (0, 2, 10, 20, 50, 100 !g/mL) and then gently loaded with 1 ml of
2 % (w/v) anthrone-sulfuric acid reagent. After vigorous swirling, the test tube was
placed into an ice bath immediately to cool down. A range of colors were produced,
from bright yellow at low concentration of sugar to dark green at high concentration.
The absorbance was measured at 620 nm against de-ionized water. Data for the
glucose standard regression equation was determined in triplicate at each
concentration
Pentose Assay
Pentose assay protocols and standard curve construction
The pentose assay used in this research was the method of Bial [Dische 1962,
Fry 1988]. This assay is widely used for determinations of D-ribose nucleotides and
D-ribose nucleic acids [Dische 1962]. The test was performed by conversion of
pentose into furfural in the presence of hot acid, which then reacts with orcinol to
give green colors [Nigam and Ayyagari 2007].
The sample volume for Bial’s pentose assay was 0.5 ml and this was prepared
in the test tube. Orcinol was prepared as 6 % (w/v) solution in ethanol and 67 !l was
added into the test tube. Another 1.0 ml of ferric chloride [0.1 % (w/v) in
concentrated hydrochloric acid] was also added into the test tube and mixed well
with swirling. The mixture was heated in a 100 ºC water bath for 20 min and then
cooled down to room temperature. The resulting green color was measured at
665 nm. Xylose was used for the pentose standard and was prepared at five
concentrations: 2, 4, 8, 16 and 20 !g/ml. Each concentration was tested in triplicate
and the regression equation was calculated from these triplicate data
Total carbohydrate assay (sulfuric acid-phenol method)
Phenol-Sulfuric acid method
We are using a method similar to this paper http://www.sciencedirect.com/science/article/pii/S0003269704009522 but a heat block is used instead of a heat bath and the plate is put on ice afterwords. The method is thus:
- Put 50uL of each sample into the wells of the 96 well plate
- Place the plate on ice and pipet 150uL of sulfuric acid into each of the wells with sample in it. (The ice is because the sulfuric acid will make the sample hot)
- Pipet 30uL of phenol into each of the wells and mix with pipet
- Incubate the plate on the 90C heat block for 5 minutes with the plate cover off and the fume hood closed
- Put the plate on ice with the lid off for 5 minutes
- Measure the absorbance of the plate using the plate reader
Making a Glycerol Stock
Instructions
- Acquire 500 uL of freshly grown cells in liquid culture. This usually comes from the leftover culture that was grown for the miniprep. Fresh Culture can also be grown by inoculating a single colony in TB with appropriate antibiotic marker.
- Add 500 uL of culture to microtube.
- Add glycerol to a final concentration of 25% (usually by mixing 1:1 with 50% glycerol in water)
- Label the tube and the cap in compliance with local protocols.
- Document the tube on the wiki
- Place in appropriate box in -80C freezer.
- For anything important, make two cell stocks (by splitting or by doing the above twice) and store one in the backup cell stock box (Starting 6/28).
Making S.O.C
S.O.C is made by dissolving 0.5 ml of 20% glucose in 25 ml of SOB
Preparing GGDonr
Follow the normal plate making protocol, add kan and X-Gal, label with black stripe to indicate an additive was used, put in a well labeled sleeve
Preparing LB Agar Plates
The media should be autoclaved. This must be done by someone not in iGEM (sorry, but its a big scary machine).
- Make sure you don't already have a bunch of the plates already in the fridge
- figure out what you need and how many you need
- Follow the directions on the bottle of LB Agar powder, this includes weighing, mixing, dissolving, and autoclaving
- Use when melted, it will be melted after autoclaving or you may need to microwave it
- (microwave with the cap loose to avoid explosions, shake frequently with the cap tight to avoid leaks)
- when the media is cool enough to hold (around 60C) add antibiotic and X-Gal (if you don't know how much, ask an instructor about X notation)
- Pour all of the media you add these too. Refreezing and thawing has unpredictable results on the amount of antibiotic destroyed by the heat, so to avoid over/under dosing don't refreeze. 500 ml makes a sleeve of plates.
- Add 2 uL of 20 mg/mL X-gal per 1 mL of agar
- tighten the lid to avoid spills and swirl the bottle to mix
- Use a seriological pipette to add 20ml to each plate
- use sterile practices
- if you get bubbles, use the pipette to try and suck the air out of the bubbles, this removes them
- 20ml is a rough estimate, what is important is that you get a solid layer with no holes.
- Use the current marking conventions to mark the plates
- Label the Sleeve with the media, the add ins, your initials, and the date of manufacture
Autoclave
iGEMers do not use the autoclave, real humans only.
- Make sure that jacket steam pressure is not at 0. If at 0, press the jacket steam reset button (red, in the middle).
- Make sure that autoclave is turned off. On/Off button is the red square in the center.
- Open door. Outer lock tightens/loosens door. Inner lock opens/closes door.
- Make sure all things can be autoclaved safely
- Loosen all caps, add autoclave tape, put samples in bins
- Put samples inside
- Close door and tighten. Make sure to not over tighten or the handle will break.
- Set the time.
- Make sure the cycle is set to correct cycle (liquid or dry).
- Press the "On" button.
- Make sure that the temperature and pressure are rising.
- After the autoclave is done, make sure that temperature is below 100C before oppening.
- Turn off the autoclave.
- Open the door carefully, 95C steam can cause major burns
- Take out your sample.
- Reset the jacket steam.
- Transport bottles with caps tight to prevent spills (both to and from)
- Remember things are really hot after autoclaving
Generalized E. coli flow cytometry protocol
- Grow an overnight in rich media with appropriate antibiotic from a single colony
- Subculture 125 uL of saturated culture into 5 mL of M9 Minimal Media (below) supplemented with Glycerol, add appropriate antibiotic
- Grow with shaking at desired temperature until desired OD (0.3 for exponential phase, 1.0ish for steady phase)
- Dilute 10 uL into 990 uL 1X PBS
- Interrogate by flow cytometry
M9 Min w/ Glycerol
- 20 mL 5X m9
- 3.4 mL 10mg/mL thiamine
- 0.8 mL 50% glycerol
- 2 mL 10% cas AA
- 0.2 mL 1 M MgSO4
- 10 uL 1 M CaCl2
Mix, and then add DI water until the total volume is 100 mL (for a total of 100 mL)
Reagents:
Measure OD (Optical Density)
Use the nanodrop to measure optical density - this is useful for determining the concentration of a sample (e.g. size of culture population). The cuvettes are located in a box on the top shelf opposite the nanodrop (either a white styrofoam box or a larger cardboard one containing the styrofoam boxes if there isn't one opened). Use 1 ml samples. The cuvettes are disposable. Make sure that the arrow on the cuvette lines up with the arrow on the nanodrop.
- If the nanodrop program isn't already open on the computer, you can open it by clicking the icon furthest to the right on the task bar.
- Set up for measuring OD by pressing Home on the bottom left of the nanodrop program, then selecting Cell Culture. Make sure Use Cuvette is checked on the left side.
- Blank the nanodrop using whatever media/buffer your sample is in (i.e. if you're growing bacteria in LB, blank using just LB without bacteria). Make sure to click Blank not Measure for this.
- Mix your sample well before measuring it and make sure you get a representative sample of cells (eg not a pellet from the bottom).
- Put 1 ml of each sample into a separate cuvette then place appropriately in the nanodrop, close, and click Measure. Make note of the reading at 600 nm on the table in the protocol page=- this is the OD600 reading that you want.
- If the reading is greater than 1.5 then dilute 1:10 (and make a note of this) and try again. Repeat until reading is within 0.008-1.5 range.
Making Antibiotic Stocks
Tetracycline
Co-culture Protocol
For Our Use
INSTRUCTIONS
This takes an hour to an hour and a half. Do not rush.
- All samples with cells or media separate, pipette them up and down
- Two of the flasks (5.1 and 5.2, keep this the same) are in Brian's shaker and the rest are in the normal one.
1. Pipette 0.5 ml out of each flask into 2 ml centrifuge tubes. When there is a lot of filter paper gunk, use the cut pipette tips. Do this twice for each flask. You should now have 18 tubes (labeled 1.1a, 1.1b, 2.1a, 2.1b, etc). Take a picture of each flask and email them to mollyb@mit.edu.
- Shake the flasks well immediately before pipetting and pipette up and down when drawing your sample.
- Look at the tip and make sure there are no air bubbles or filter paper you will get an inaccurate measurement later.
- When there is a lot of filter paper gunk, use the cut pipette tips.
- Close the lids of the centrifuge tubs fully.
- Close the lids on the flasks but make sure the little top thing is off.
- Immediately put the flasks back into the shaker.
2. Vortex the centrifuge tubes and then immediately pipette (Do not let them sit between.) the 0.5ml of liquid through the mesh on the caps of cytometer tubes (5 mL Falcon polysterene round bottom tube with cell-strainer cap).
*****alternative method (replaces steps 2 - 4) - use scissors and cut off the lids of the labeled centrifuge tubes (save the lids, don't bother labeling the lids because they were cut off before any liquid was in any centrifuge tube, so they can go on any centrifuge tube). Take the mesh caps off the cytometer tubes and cap them on the lidless centrifuge tubes (throw away capless cytometer tubes). Now pipette the .5ml of liquid through the mesh caps directly into the centrifuge tubes. When done pipetting, throw out mesh caps and re-cap the centrifuge tubes with the saved, cut-off lids. Now centrifuge with the 18-slot centrifuge 10 min at 8800 rpm.
- Make sure to close the centrifuge tube before vortexing
- Press tip of pipette pretty firmly down on the mesh and pipette up and down in quick short movements.
- Be careful of stuff splashing out though and watch for bubbles.
- The goal is to get all of the fluid on the inside of the tube, if any ends up on top of the mesh, aspirate it up and try again.
- If its not going through, pipette up and down and try twisting the tube or try a different spot on the mesh.
3. After you pipette through the mesh, hand centrifuge the liquid to the bottom, a lot tends to stick to the sides.
4. Pipette up and down right before decanting the filtered contents of each cytometer tube into another centrifuge tube (label 1.1a-5.2b), centrifuge at 6000x rcf at 4 °C for 10 mins. ***best use 18-slot centrifuge by Todd's bench, 6000x rcf converts to 8800 rpm.
5. Label two sets of 18 cryotubes each with numbers 1.1a-5.2b, 1 set with "s" for supernatant and 1 set with "c" for cells, the time (hour of day), and "a" or "p" for am or pm, and the day of the month for the 4 pm samples with your initials beneath. Label the lid the same way except without your initials.
- Examples
- Supernatant from tube 1.2a at 2am on the first day -> 1.2a s2a
- Cells from tube 4.1b at 8pm on first day -> 4.1b c8p
- Supernatant from tube 5.2a at 4pm on July 6 -> 5.2a s4p6
6. Pipette supernatant into the corresponding cryotube you labelled in step 5 (DON'T throw the pellet away!!!) and place in -20°C iGEM freezer (labeled 2nd naive coculture "s" box 1).
- TIP: Hold the tip against the side of the tube to minimize any instability in your hands, then get the tip within around a millimeter of the pellet and aspirate slowly.
7. Resuspend pellet from centrifuge tubes in 1ml PBS. Remember to pipette up and down.
8. Pipette up and down while transferring 1ml into a cryotube.
9. Add 1ml 50% glycerol to each cryotube from step 8, vortex FOR 1 MINUTE to thoroughly mix, and place in iGEM box in the -80 degree freezer (It is in the stack of boxes where the rest of our boxes always are, however it is 2nd from the bottom).
- If box 1 is full then put in box 2, filling from top left corner; make sure lid is lined up with box using the black corner markings.
- Wear latex gloves; don't mess with freezer bare-handed.
- DO NOT OPEN THE -80 UNLESS IT IS BELOW -75C. SERIOUSLY. Minimize time in the -80.
- Again, ADO NOT OPEN THE -80 UNLESS IT IS BELOW -75C. We are not getting blamed again.
10. Mark down on the table below that you have completed this measurement. Make sure to replenish any materials that ran out so that the next group doesn't have to go looking. Also leave out things like test tube racks.
For the Public Wiki
Taking Samples
1. Pipette 0.5 ml out of each flask into 2 ml centrifuge tubes. When there is a lot of filter paper gunk, use the cut pipette tips. Do this twice for each flask. You should now have 18 tubes (labeled 1.1a, 1.1b, 2.1a, 2.1b, etc). Shake the flasks well immediately before pipetting and pipette up and down when drawing your sample. Immediately put the flasks back into the shaker. 2. Use scissors and cut off the lids of the labeled 2ml centrifuge tubes. Save the lids. Take the mesh caps off the 5 mL Falcon polysterene round bottom tube with cell-strainer cap cytometer tubes and cap them on the lidless centrifuge tubes. Throw away capless cytometer tubes. Vortex the centrifuge tubes and then immediately pipette the 0.5ml of liquid through the mesh caps directly into the centrifuge tubes. Press tip of pipette pretty firmly down on the mesh and pipette up and down in quick short movements. The goal is to get all of the fluid on the inside of the tube, if any ends up on top of the mesh, especially in the form of bubbles, aspirate it up and try again.
3. When done pipetting, throw out mesh caps and re-cap the centrifuge tubes with the saved, cut-off lids.
4. Centrifuge with the 18-slot centrifuge 10 min at 8800 rpm.
5. Label two sets of 18 cryotubes each with numbers 1.1a-5.2b, 1 set with "s" for supernatant and 1 set with "c" for cells, the time (hour of day), and "a" or "p" for am or pm, and the day of the month for the 4 pm samples with your initials beneath. Label the lid the same way except without your initials.
- Examples
- Supernatant from tube 1.2a at 2am on the first day -> 1.2a s2a
- Cells from tube 4.1b at 8pm on first day -> 4.1b c8p
- Supernatant from tube 5.2a at 4pm on July 6 -> 5.2a s4p6
6. Pipette supernatant into the corresponding cryotube you labelled in step 5 and place in -20°C freezer. Do not throw away the pellet.
7. Resuspend pellet from centrifuge tubes in 1ml PBS. Remember to pipette up and down.
8. Pipette up and down while transferring 1ml into a cryotube.
9. Add 1ml 50% glycerol to each cryotube from step 8, vortex to thoroughly mix, and place in a -80 degree freezer.


