Difference between revisions of "Team:Cambridge-JIC/3D Printing"
Simonhkswan (Talk | contribs) |
KaterinaMN (Talk | contribs) |
||
| (6 intermediate revisions by 2 users not shown) | |||
| Line 4: | Line 4: | ||
<style> | <style> | ||
h1.guide{ | h1.guide{ | ||
| − | font-family: 'Hiragino Sans GB', 'Open Sans'; text-align: center; font-size: 32px; padding-bottom: | + | font-family: 'Hiragino Sans GB', 'Open Sans', sans-serif; text-align: center; font-size: 32px; padding-bottom: 5px; |
} | } | ||
h2.guide{ | h2.guide{ | ||
| − | font-family: 'Hiragino Sans GB', 'Open Sans'; background-color: #ddd; margin-bottom: 6px; padding-bottom: 5px; | + | font-family: 'Hiragino Sans GB', 'Open Sans', sans-serif; background-color: #ddd; margin-bottom: 6px; padding-bottom: 5px; |
} | } | ||
h3.guide{ | h3.guide{ | ||
| − | font-family: 'Open Sans'; background-color: #eee; margin-bottom: 6px; padding: 5px; | + | font-family: 'Open Sans', sans-serif; background-color: #eee; margin-bottom: 6px; padding: 5px; |
} | } | ||
p.intro{ | p.intro{ | ||
| − | font-family: 'Open Sans'; | + | font-family: 'Open Sans', sans-serif; |
} | } | ||
p.guide{ | p.guide{ | ||
| − | font-family: 'Open Sans'; | + | font-family: 'Open Sans', sans-serif; |
} | } | ||
section.guide-section a:link, section.guide-section a:visited{ | section.guide-section a:link, section.guide-section a:visited{ | ||
color:#1b4f18 !important; | color:#1b4f18 !important; | ||
| + | } | ||
| + | b { | ||
| + | font-weight: 600; | ||
} | } | ||
</style> | </style> | ||
| Line 49: | Line 52: | ||
<p class="guide">ABS has a glass transition temperature around 105°C. As it can withstand higher temperatures than PLA (65°C) it is often used in industry.</p> | <p class="guide">ABS has a glass transition temperature around 105°C. As it can withstand higher temperatures than PLA (65°C) it is often used in industry.</p> | ||
<p class="guide">At high enough temperatures ABS breaks down into its constituent chemicals, one being butadiene which is carcinogenic to humans. (Note: The breakdown temperature is above 400°C, which is much higher than the operating temperature for 3D printing. Therefore, normally the use of ABS does not impose a safety hazard.)</p> | <p class="guide">At high enough temperatures ABS breaks down into its constituent chemicals, one being butadiene which is carcinogenic to humans. (Note: The breakdown temperature is above 400°C, which is much higher than the operating temperature for 3D printing. Therefore, normally the use of ABS does not impose a safety hazard.)</p> | ||
| − | <p class="guide">PLA is a biodegradable plastic, derived from plants as opposed to petroleum and natural gas, which makes it a green alternative to ABS. The chassis of the OpenScope is made of PLA, it is biodegradable and recyclable.</p> | + | <p class="guide">PLA is a <b>biodegradable plastic</b>, derived from plants as opposed to petroleum and natural gas, which makes it a green alternative to ABS. The chassis of the OpenScope is made of PLA, it is biodegradable and recyclable.</p> |
| − | <p class="guide">We found that PLA was able to handle bridging much more reliably than ABS. It is also less brittle than ABS, which our microscope takes advantage of in its flexure mechanism. PLA also sticks to the base of the 3D printer more easily and warps less than ABS. Therefore, we recommend avoiding the hassle and sticking with PLA as your choice of filament – it also comes in a huge variety of colours! Bear in mind that different colours imply slightly different chemical constitution of the filament and so print quality may vary between colours.</p> | + | <p class="guide">We found that <b>PLA was able to handle bridging much more reliably than ABS</b>. It is also less brittle than ABS, which our microscope takes advantage of in its flexure mechanism. PLA also sticks to the base of the 3D printer more easily and warps less than ABS. Therefore, <b>we recommend avoiding the hassle and sticking with PLA as your choice of filament</b> – it also comes in a huge variety of colours! Bear in mind that different colours imply slightly different chemical constitution of the filament and so print quality may vary between colours.</p> |
<h3 class="guide">Software</h3> | <h3 class="guide">Software</h3> | ||
<p class="guide">To make the design of OpenScope easily modifiable to others, we used the program <a href="//www.openscad.org">OpenSCAD</a>, a free multiplatform CAD (computer aided design) program that is easy to learn. An hour of experimenting is all you need to start creating and there is a massive community based around OpenSCAD to inspire your own designs. We have made an effort to make the design of our creation as simple and modular as possible whilst still being functional as a microscope.</p> | <p class="guide">To make the design of OpenScope easily modifiable to others, we used the program <a href="//www.openscad.org">OpenSCAD</a>, a free multiplatform CAD (computer aided design) program that is easy to learn. An hour of experimenting is all you need to start creating and there is a massive community based around OpenSCAD to inspire your own designs. We have made an effort to make the design of our creation as simple and modular as possible whilst still being functional as a microscope.</p> | ||
| − | <p class="guide">OpenSCAD is not an interactive modeller, but rather a 3D-compiler which reads a script file that describes the object you wish to render in 3D. Each object is defined geometrically, with its characteristic sizes, and positioned in an [xyz] coordinate system. This different approach to CAD modelling makes it great for creating advanced 3D printing files (.stl). With a little bit of algebra, our script files describing each component on our website have been parametrically defined, so if you need a microscope that is slightly bigger, taller, or shorter, you can simply change a few numbers at the start of the file! We encourage anyone to edit the details of the code too, though, make sure you structure the code so that it is easy for other (and yourself!) to reedit it later.</p> | + | <p class="guide">OpenSCAD is not an interactive modeller, but rather a 3D-compiler which reads a script file that describes the object you wish to render in 3D. Each object is defined geometrically, with its characteristic sizes, and positioned in an [xyz] coordinate system. This different approach to CAD modelling makes it great for creating advanced 3D printing files (.stl). With a little bit of algebra, our script files describing each component on our website <b>have been parametrically defined</b>, so if you need a microscope that is slightly bigger, taller, or shorter, you can simply change a few numbers at the start of the file! We encourage anyone to edit the details of the code too, though, make sure you structure the code so that it is easy for other (and yourself!) to reedit it later.</p> |
</div> | </div> | ||
<div style="width:100%; padding: 0% 10%; color: #000"> | <div style="width:100%; padding: 0% 10%; color: #000"> | ||
<h2 class="guide">Design Process</h2> | <h2 class="guide">Design Process</h2> | ||
| − | <p class="guide">It is important to note that the object your design in your 3D CAD software and the object the 3D printer creates are two different things. 3D printers still have their limitations. Once you get designing, here are a few things to be aware of, they are common issues that people run into.</p> | + | <p class="guide">It is important to note that the object your design in your 3D CAD software and the object the 3D printer creates <b>are two different things</b>. 3D printers still have their limitations. Once you get designing, here are a few things to be aware of, they are common issues that people run into.</p> |
<h3 class="guide">Bridges & Overhangs</h3> | <h3 class="guide">Bridges & Overhangs</h3> | ||
<p class="guide">3D printers that use a thermoplastic filament work by printing layer upon layer. Therefore, a problem arises when the printer tries to print a layer over nothing. If your design has some sort of overhang one option is to print supports, the issue with this is cleanly removing the supports from the final print - it be hard or sometimes impossible to do. Most printers can cope well with overhangs that have an incline greater than 45 degrees as the plastic layer underneath is able to support the protruding plastic above. The alternative is to print a bridge. This is simply a flat overhang that is supported at both ends.</p> | <p class="guide">3D printers that use a thermoplastic filament work by printing layer upon layer. Therefore, a problem arises when the printer tries to print a layer over nothing. If your design has some sort of overhang one option is to print supports, the issue with this is cleanly removing the supports from the final print - it be hard or sometimes impossible to do. Most printers can cope well with overhangs that have an incline greater than 45 degrees as the plastic layer underneath is able to support the protruding plastic above. The alternative is to print a bridge. This is simply a flat overhang that is supported at both ends.</p> | ||
| − | <p class="guide">When printing bridges and overhangs, such as the ones in OpenScope, the cooling fans need to be on | + | <p class="guide">When printing bridges and overhangs, such as the ones in OpenScope, the <b>cooling fans need to be on</b> so that the plastic cools as it leaves the extruder (this can be at a compromise to prevent warping). Bridges are printed best when they simply go <b>from one support to another</b> with no holes or features in the way. We had to deal with problematic bridges when printing the CCD cube and the stage of our microscope. Particular shapes can always be made by stacking bridge upon bridge.</p> |
<h3 class="guide">Sticking to Base</h3> | <h3 class="guide">Sticking to Base</h3> | ||
<p class="guide"><img src="//2015.igem.org/wiki/images/f/fe/CamJIC-3DPrint-StageLow.jpeg" style="float:right;width:280px;margin:10px">The first issue we experienced when 3D printing was keeping our objects stuck to the bed of the printer. If the object slips mid-print it can often be dragged around resulting in a tangled mess of plastic. Those who choose PLA will have less problems with slipping than those using ABS. </p> | <p class="guide"><img src="//2015.igem.org/wiki/images/f/fe/CamJIC-3DPrint-StageLow.jpeg" style="float:right;width:280px;margin:10px">The first issue we experienced when 3D printing was keeping our objects stuck to the bed of the printer. If the object slips mid-print it can often be dragged around resulting in a tangled mess of plastic. Those who choose PLA will have less problems with slipping than those using ABS. </p> | ||
<p class="guide"> An unlevelled printer bed can be a common reason for misprints: when the print bed is too low, the thermoplastic is not pushed down enough and cannot stick; when it is too high, there is no room for filament to extrude, so the nozzle gets clogged and the feeding gear begins to grind into the plastic. If this happens, take the filament out and remove the worn out piece.</p> | <p class="guide"> An unlevelled printer bed can be a common reason for misprints: when the print bed is too low, the thermoplastic is not pushed down enough and cannot stick; when it is too high, there is no room for filament to extrude, so the nozzle gets clogged and the feeding gear begins to grind into the plastic. If this happens, take the filament out and remove the worn out piece.</p> | ||
<p class="guide">The Ultimaker 2 printing bed has 3 screws which are to be calibrated and the included manual suggests using paper. We have found that it is preferable to position the bed slightly lower than the manual advises though. Another useful feature of the Ultimaker 2 is the heated print bed (almost essential for ABS) to keep the base near its glass transition temperature, reducing the chance of warping and unsticking.</p> | <p class="guide">The Ultimaker 2 printing bed has 3 screws which are to be calibrated and the included manual suggests using paper. We have found that it is preferable to position the bed slightly lower than the manual advises though. Another useful feature of the Ultimaker 2 is the heated print bed (almost essential for ABS) to keep the base near its glass transition temperature, reducing the chance of warping and unsticking.</p> | ||
| − | <p class="guide">We found that an easier method of calibrating the bed was to print a large square (one layer high) and observe the filament on the bed. It is much easier to then fine tune the screws so that the filament is pressed onto the bed enough to stick, but the bed isn’t too high so that no filament can be extruded. </p> | + | <p class="guide">We found that <b>an easier method of calibrating the bed was to print a large square</b> (one layer high) and observe the filament on the bed. It is much easier to then fine tune the screws so that the filament is pressed onto the bed enough to stick, but the bed isn’t too high so that no filament can be extruded. </p> |
<p class="guide">Note that the higher the print bed is, the less likely the object will detach or warp, but the more likely that your print will develop elephant’s feet (see below).</p> | <p class="guide">Note that the higher the print bed is, the less likely the object will detach or warp, but the more likely that your print will develop elephant’s feet (see below).</p> | ||
<h3 class="guide">Warping</h3> | <h3 class="guide">Warping</h3> | ||
<p class="guide"><img src="//2015.igem.org/wiki/images/e/ea/CamJIC-3DPrint-Misprint2.jpeg" style="float:left;height:230px;margin:10px">Like most materials, PLA and ABS are subject to thermal expansion/contraction (ABS more so than PLA). As each layer of plastic is layed down hot and cools down, the uppermost layer of your print is constantly contracting. This can cause objects to warp upwards around their edges and corners and is a major problem with large flat prints in particular. There are some clever tactics to prevent warping by modifying your .stl files before printing (see <a href=" https://www.youtube.com/watch?v=YhfrHo53K18">this video</a> for an example), though, we have found that printing an object with a brim and keeping the print bed calibrated does the trick with PLA. A brim is simply a one layer outline that is printed around your object to keep it stuck down. Programs such as Cura (the official software for the Ultimaker) allow you to add this to your .stl files before they are to the printer. </p> | <p class="guide"><img src="//2015.igem.org/wiki/images/e/ea/CamJIC-3DPrint-Misprint2.jpeg" style="float:left;height:230px;margin:10px">Like most materials, PLA and ABS are subject to thermal expansion/contraction (ABS more so than PLA). As each layer of plastic is layed down hot and cools down, the uppermost layer of your print is constantly contracting. This can cause objects to warp upwards around their edges and corners and is a major problem with large flat prints in particular. There are some clever tactics to prevent warping by modifying your .stl files before printing (see <a href=" https://www.youtube.com/watch?v=YhfrHo53K18">this video</a> for an example), though, we have found that printing an object with a brim and keeping the print bed calibrated does the trick with PLA. A brim is simply a one layer outline that is printed around your object to keep it stuck down. Programs such as Cura (the official software for the Ultimaker) allow you to add this to your .stl files before they are to the printer. </p> | ||
| − | <p class="guide">Another option to combat warping is to turn the cooling fans off and keep the whole object warm until it is complete, although the printer then loses its ability to print overhangs and bridges properly. When printing the OpenScope stage, we used a brim and with the fans on as normal. The brim is very easy to pull/cut off the 3D printed piece when it has cooled down.</p> | + | <p class="guide">Another option to combat warping is to <b>turn the cooling fans off</b> and keep the whole object warm until it is complete, although the printer then <b>loses its ability to print overhangs and bridges properly</b>. When printing the OpenScope stage, we used a brim and with the fans on as normal. The brim is very easy to pull/cut off the 3D printed piece when it has cooled down.</p> |
<h3 class="guide">Elephant’s Feet</h3> | <h3 class="guide">Elephant’s Feet</h3> | ||
<p class="guide">'Elephant’s Feet' refers to the issue when base layers of 3D printed objects are wider than the layers above. This usually happens when the print bed is slightly too elevated, so the first layers are flatter and wider (by 0.2mm-0.8mm) than the layers above. Printing a cube usually demonstrates this problem. Most of our prints have this problem, but we did not aim to oppose it as we want to keep everything stuck to the print bed whilst printing. | <p class="guide">'Elephant’s Feet' refers to the issue when base layers of 3D printed objects are wider than the layers above. This usually happens when the print bed is slightly too elevated, so the first layers are flatter and wider (by 0.2mm-0.8mm) than the layers above. Printing a cube usually demonstrates this problem. Most of our prints have this problem, but we did not aim to oppose it as we want to keep everything stuck to the print bed whilst printing. | ||
| − | To fix the problem, you can edit your objects to have a chamfer around the base edges (a rough guide: at 45 degrees, 0.5mm and not curved). We have taken this into account for several parts. For objects that must slot into other parts, the holes are printed slightly larger than they should normally be – remember the values specified in your CAD model and the values printed are always slightly different. Generally, getting two 3D printed objects to fit together can be an iterative process.</p> | + | To fix the problem, you can <b>edit your objects to have a chamfer around the base edges</b> (a rough guide: at 45 degrees, 0.5mm and not curved). We have taken this into account for several parts. For objects that must slot into other parts, the holes are printed slightly larger than they should normally be – remember the values specified in your CAD model and the values printed <b>are always slightly different<b>. Generally, getting two 3D printed objects to fit together can be an iterative process.</p> |
<h3 class="guide">Stringing</h3> | <h3 class="guide">Stringing</h3> | ||
| − | <p class="guide"><img src="//2015.igem.org/wiki/images/0/00/CamJIC-3DPrint-Stringing.jpeg" style="float:right; width:420px; margin:10px">Sometimes, prints can come out with little pieces of plastic ‘stringing’ off the object. Increasing the travel speed reduces the time for molten plastic to leave little strings of plastic behind. The print speed, however, does not affect stringing. As a general rule, slower print speeds result in higher quality prints. It is always a compromise for the print time.</p> | + | <p class="guide"><img src="//2015.igem.org/wiki/images/0/00/CamJIC-3DPrint-Stringing.jpeg" style="float:right; width:420px; margin:10px">Sometimes, prints can come out with little pieces of plastic ‘stringing’ off the object. <b>Increasing the travel speed</b> reduces the time for molten plastic to leave little strings of plastic behind. The print speed, however, does not affect stringing. As a general rule, slower print speeds result in higher quality prints. It is always a compromise for the print time.</p> |
<h3 class="guide">The Message</h3> | <h3 class="guide">The Message</h3> | ||
<p class="guide">Finding the right settings to print high quality prints is a continuous process; adjusting the settings of your printer and being aware of how certain issues are caused will enable you to quickly improve your creations.</p> | <p class="guide">Finding the right settings to print high quality prints is a continuous process; adjusting the settings of your printer and being aware of how certain issues are caused will enable you to quickly improve your creations.</p> | ||
Latest revision as of 11:28, 17 September 2015

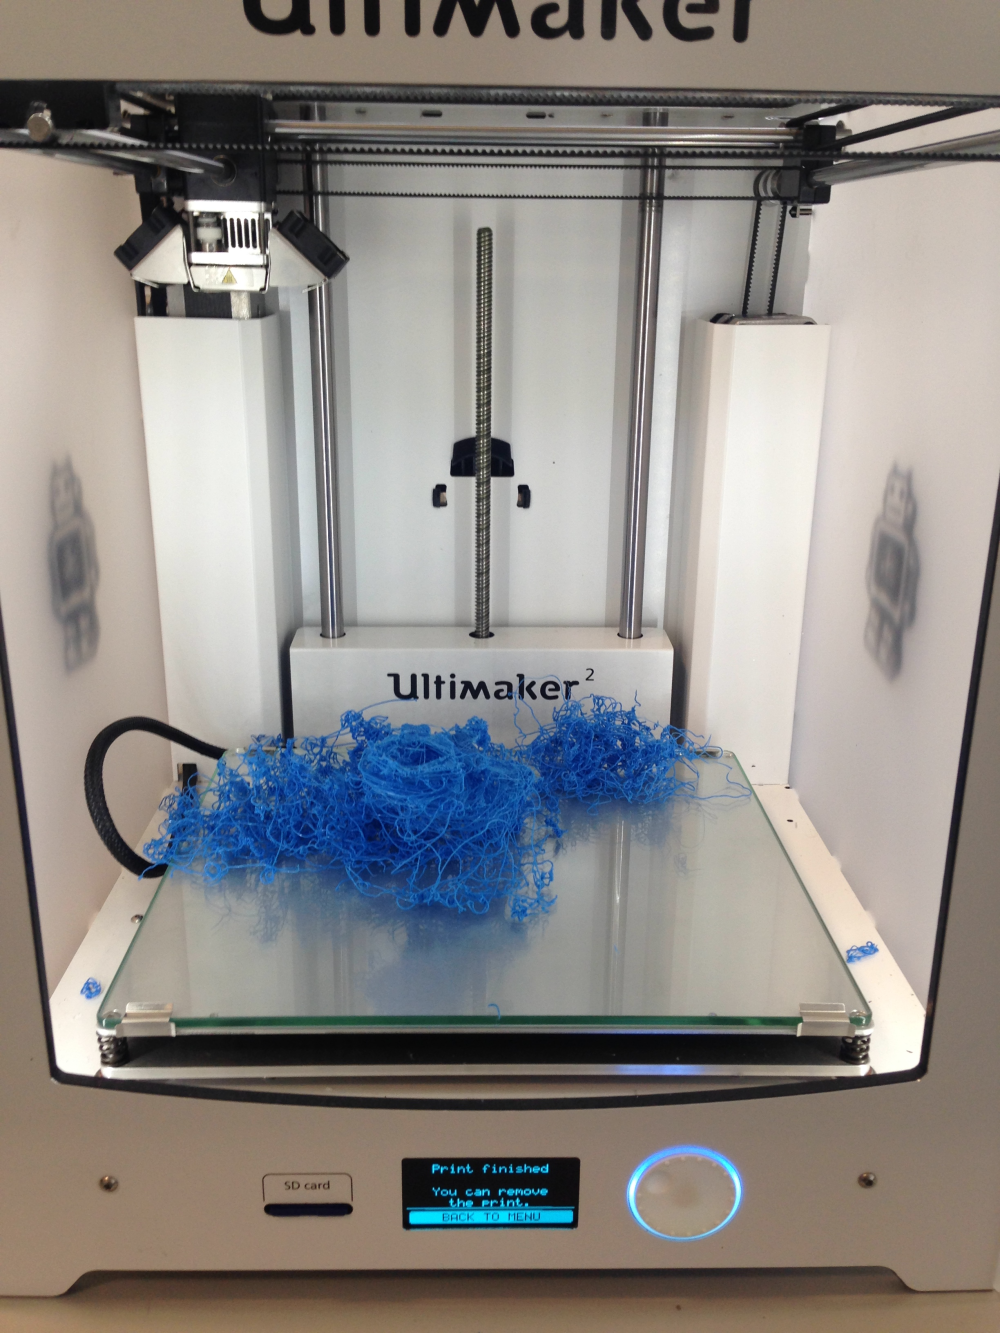 The first issue we experienced when 3D printing was keeping our objects stuck to the bed of the printer. If the object slips mid-print it can often be dragged around resulting in a tangled mess of plastic. Those who choose PLA will have less problems with slipping than those using ABS.
 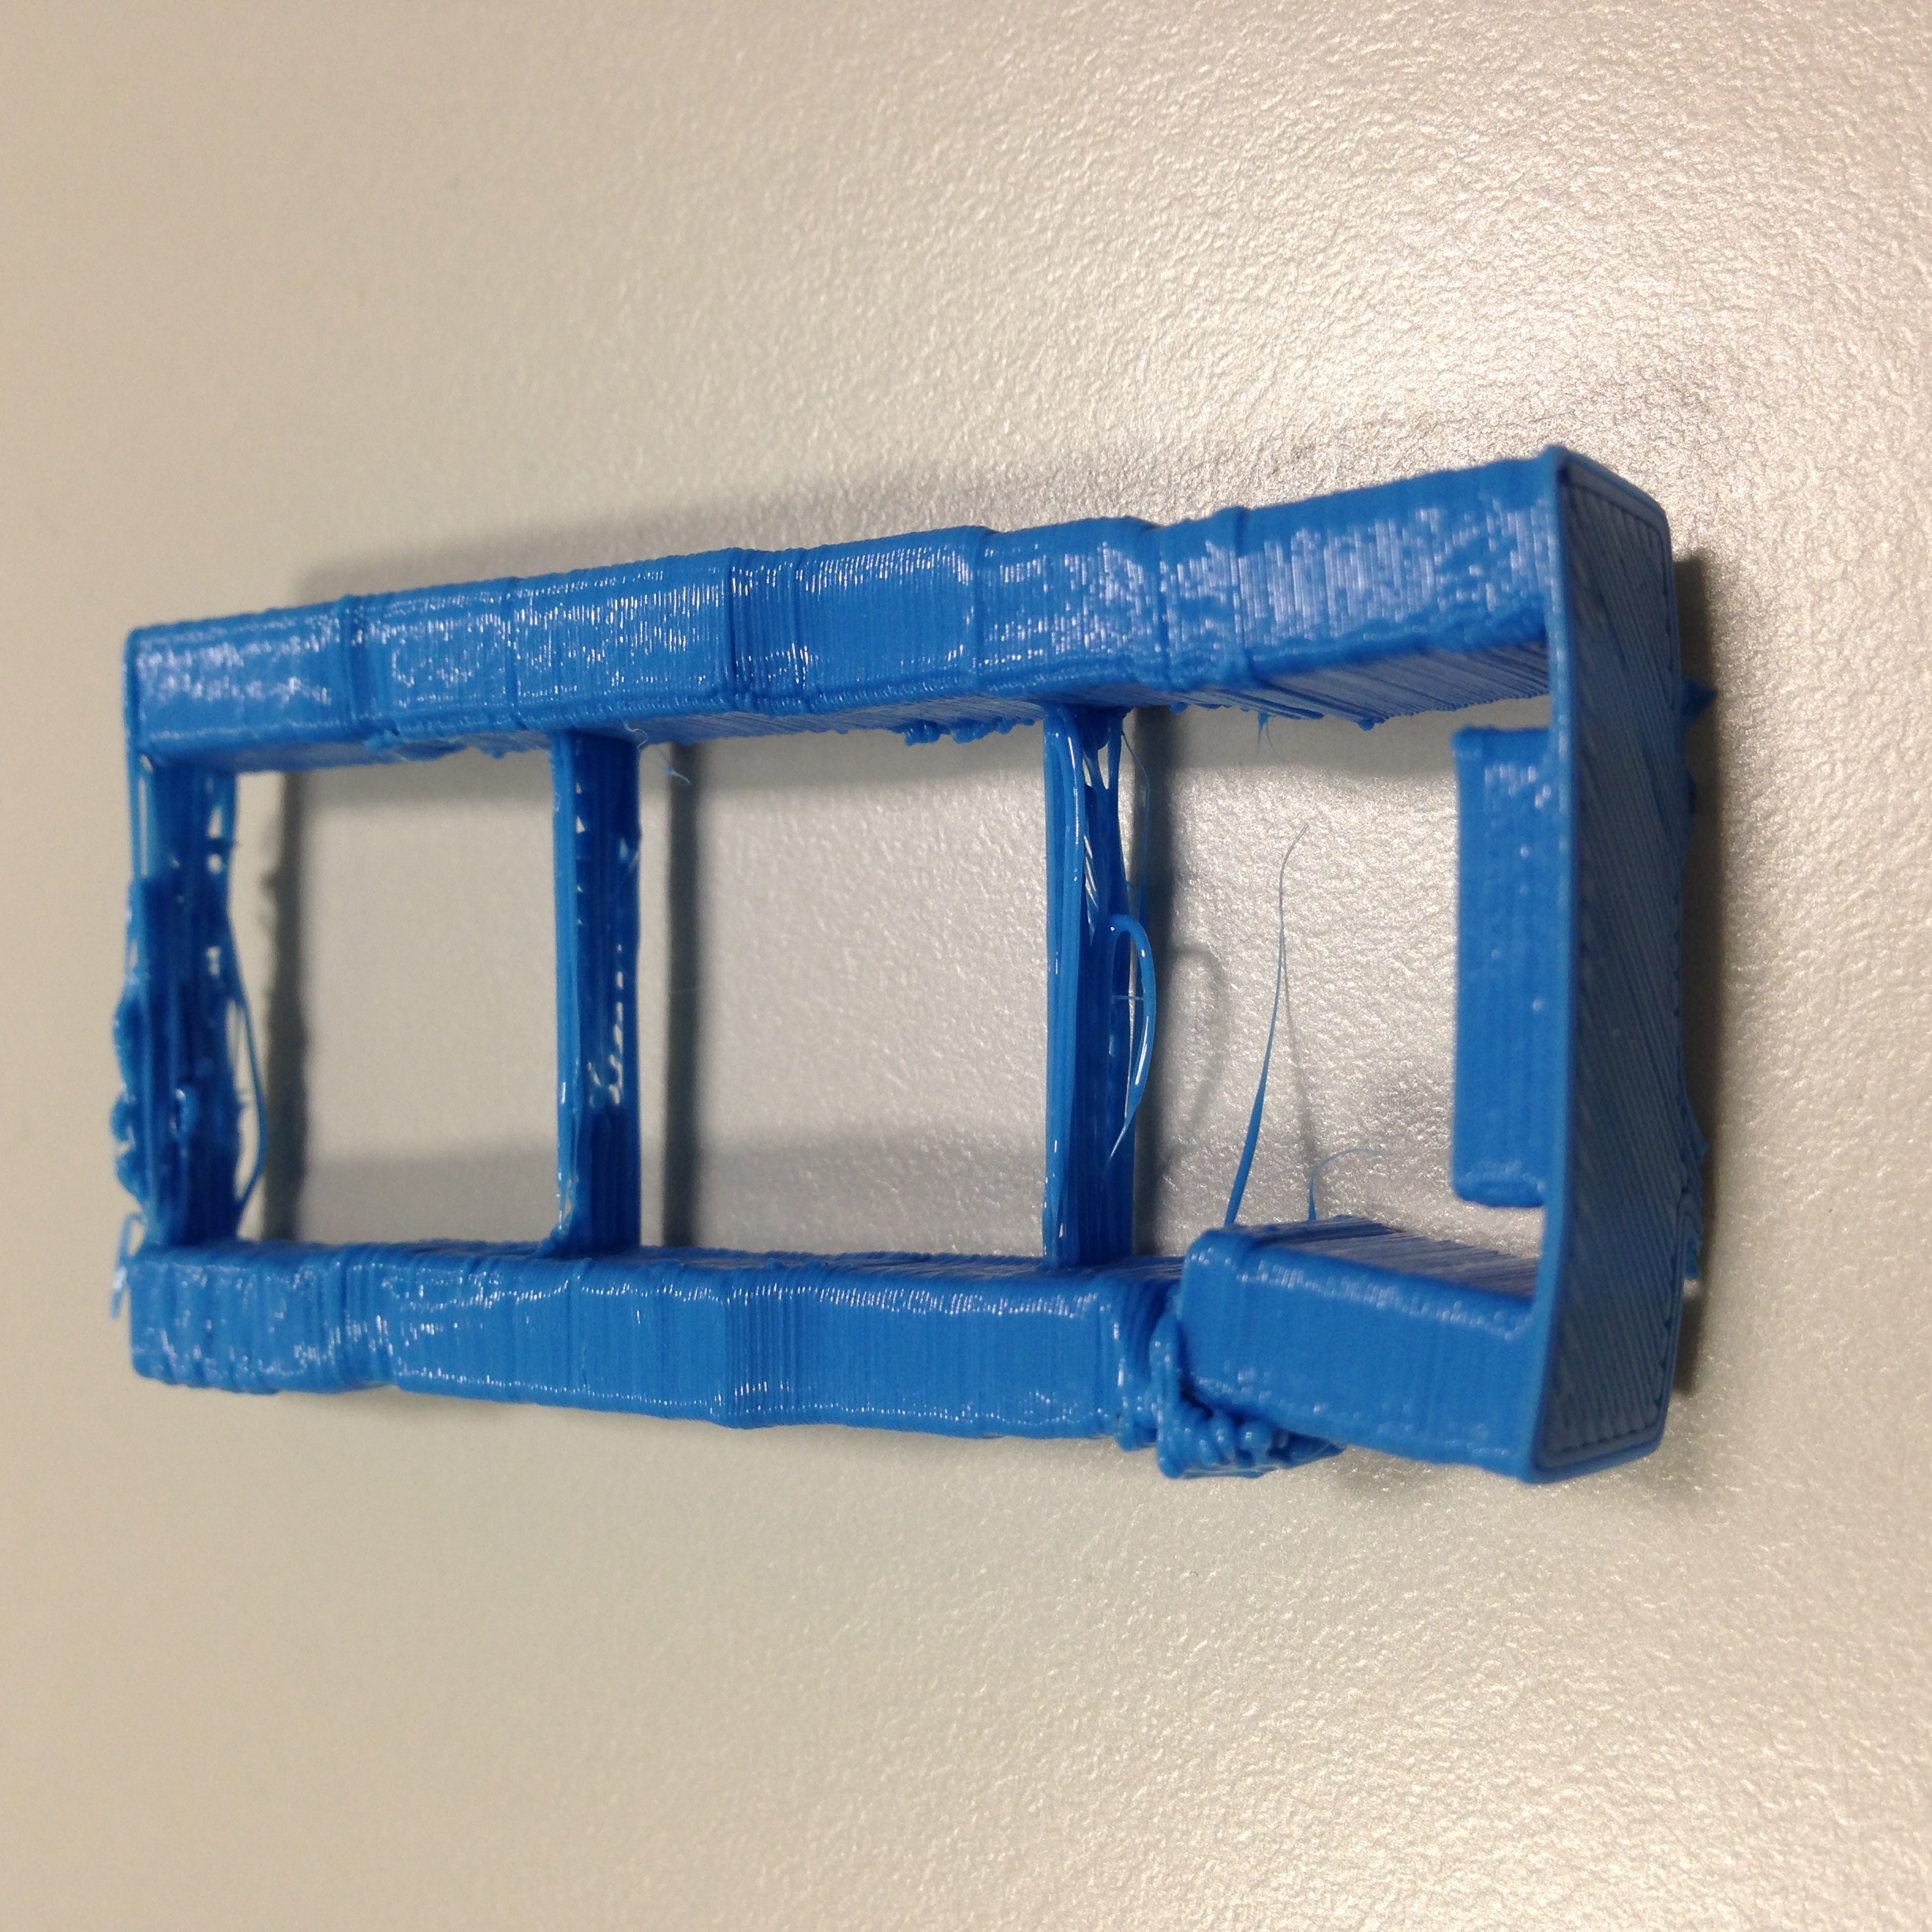 Like most materials, PLA and ABS are subject to thermal expansion/contraction (ABS more so than PLA). As each layer of plastic is layed down hot and cools down, the uppermost layer of your print is constantly contracting. This can cause objects to warp upwards around their edges and corners and is a major problem with large flat prints in particular. There are some clever tactics to prevent warping by modifying your .stl files before printing (see
 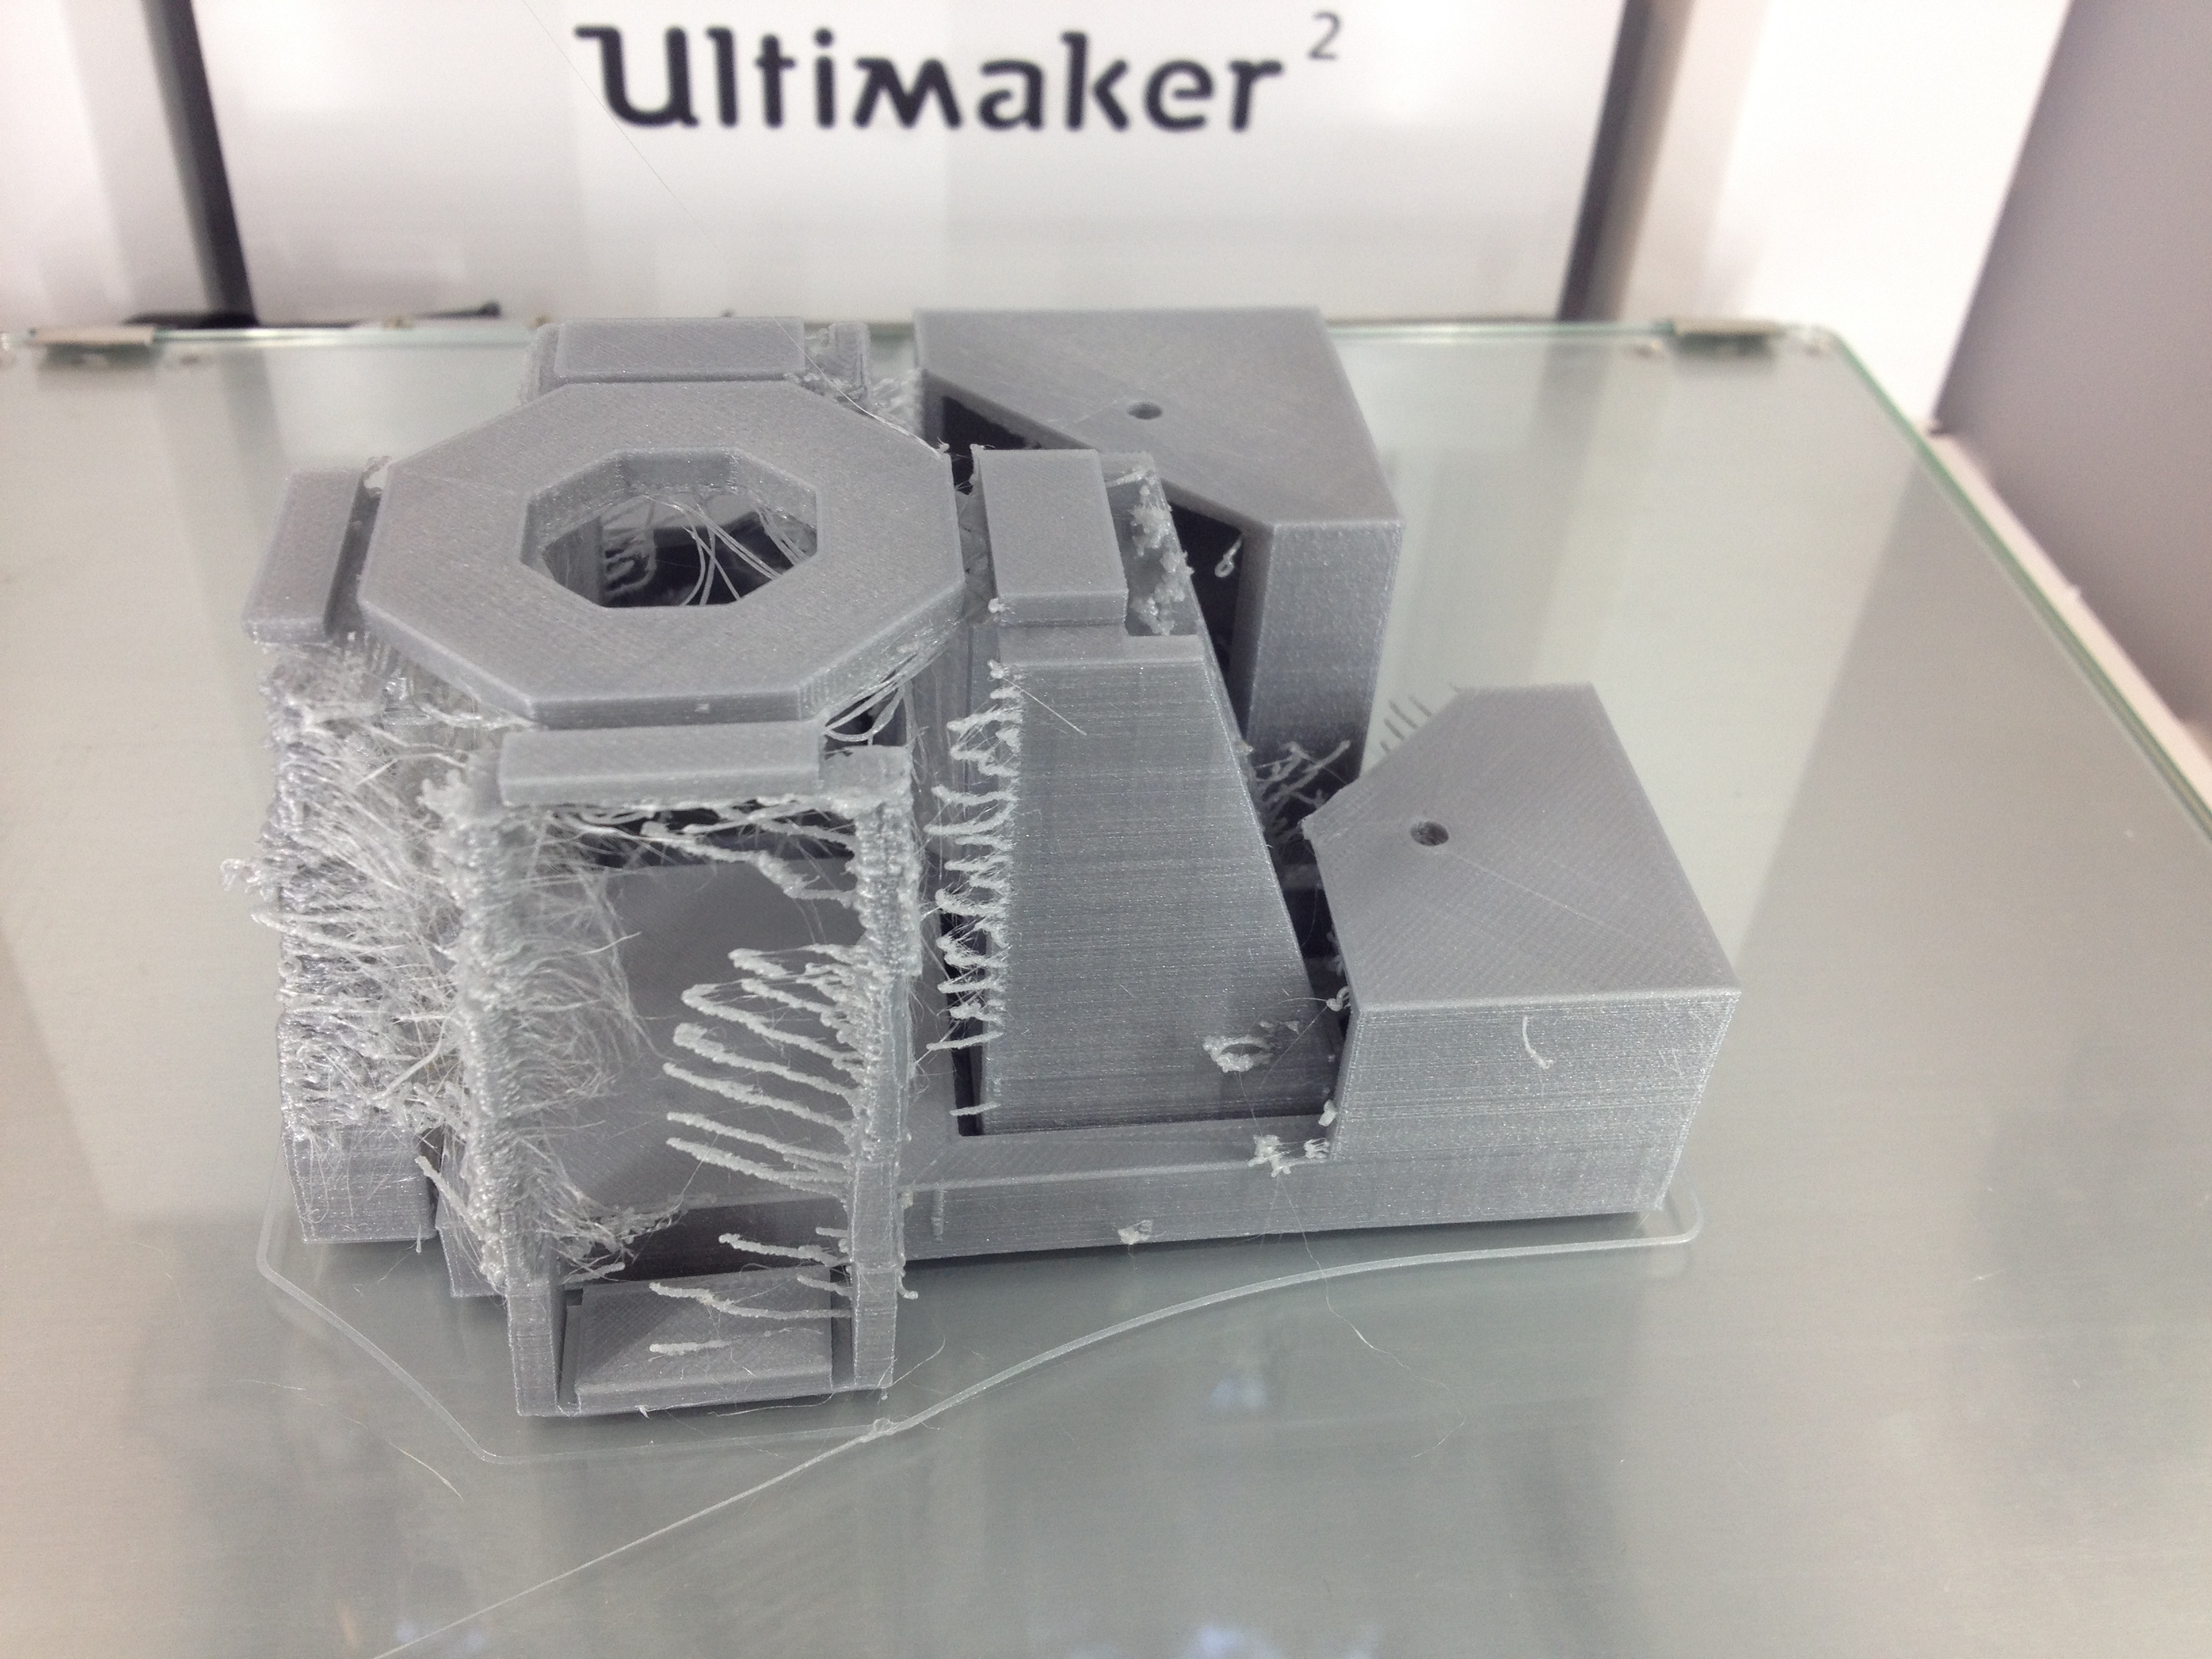 Sometimes, prints can come out with little pieces of plastic ‘stringing’ off the object. Increasing the travel speed reduces the time for molten plastic to leave little strings of plastic behind. The print speed, however, does not affect stringing. As a general rule, slower print speeds result in higher quality prints. It is always a compromise for the print time.


