Team:Hamilton McMaster/blog/2015-09-07

Streaking, Overnight Cultures, and Glycerol Stocks
Hello again, and welcome back to A Fledgling’s Guide to Cell Bio! It’s an odd week number, which means I’m back (if you’re a newcomer - ‘ello, my name’s Max, nice to meet you)!
Now that you’ve completed your transformations, it’s time to make use of our newly modified E. coli cells! We’re going to do some streaking, make some overnight cultures, as well as some glycerol stocks! Ready? Set? Let’s go!
0. Controls
Yaw, Pitch, & Roll
In this section I would like to lightly touch upon the topic of controls. When doing a new experiment, it can be hard to know what the outcome will be. It can also be hard to know whether it failed. Therefore, for scientific rigour, we use positive and negative controls.
Negative controls provide a baseline to which to compare your end results. Using a blank plate or bacteria that do not have the proper antibiotic (should also be a blank plate) will show what an unsuccessful transformation looks like. This can tell you whether the transformation failed.
Positive controls are used to validate an expected ‘the experiment was a success’ outcome. When looking for a successful transformation, using a bacterial colony you know was transformed successfully with the same antibiotic resistance is a good pick. If your end results look the same or similar to the positive control, the transformation (or procedure) was most likely a success!
Therefore, in all the procedures, assume that positive and negative controls have been performed. That’s all for now, continue!
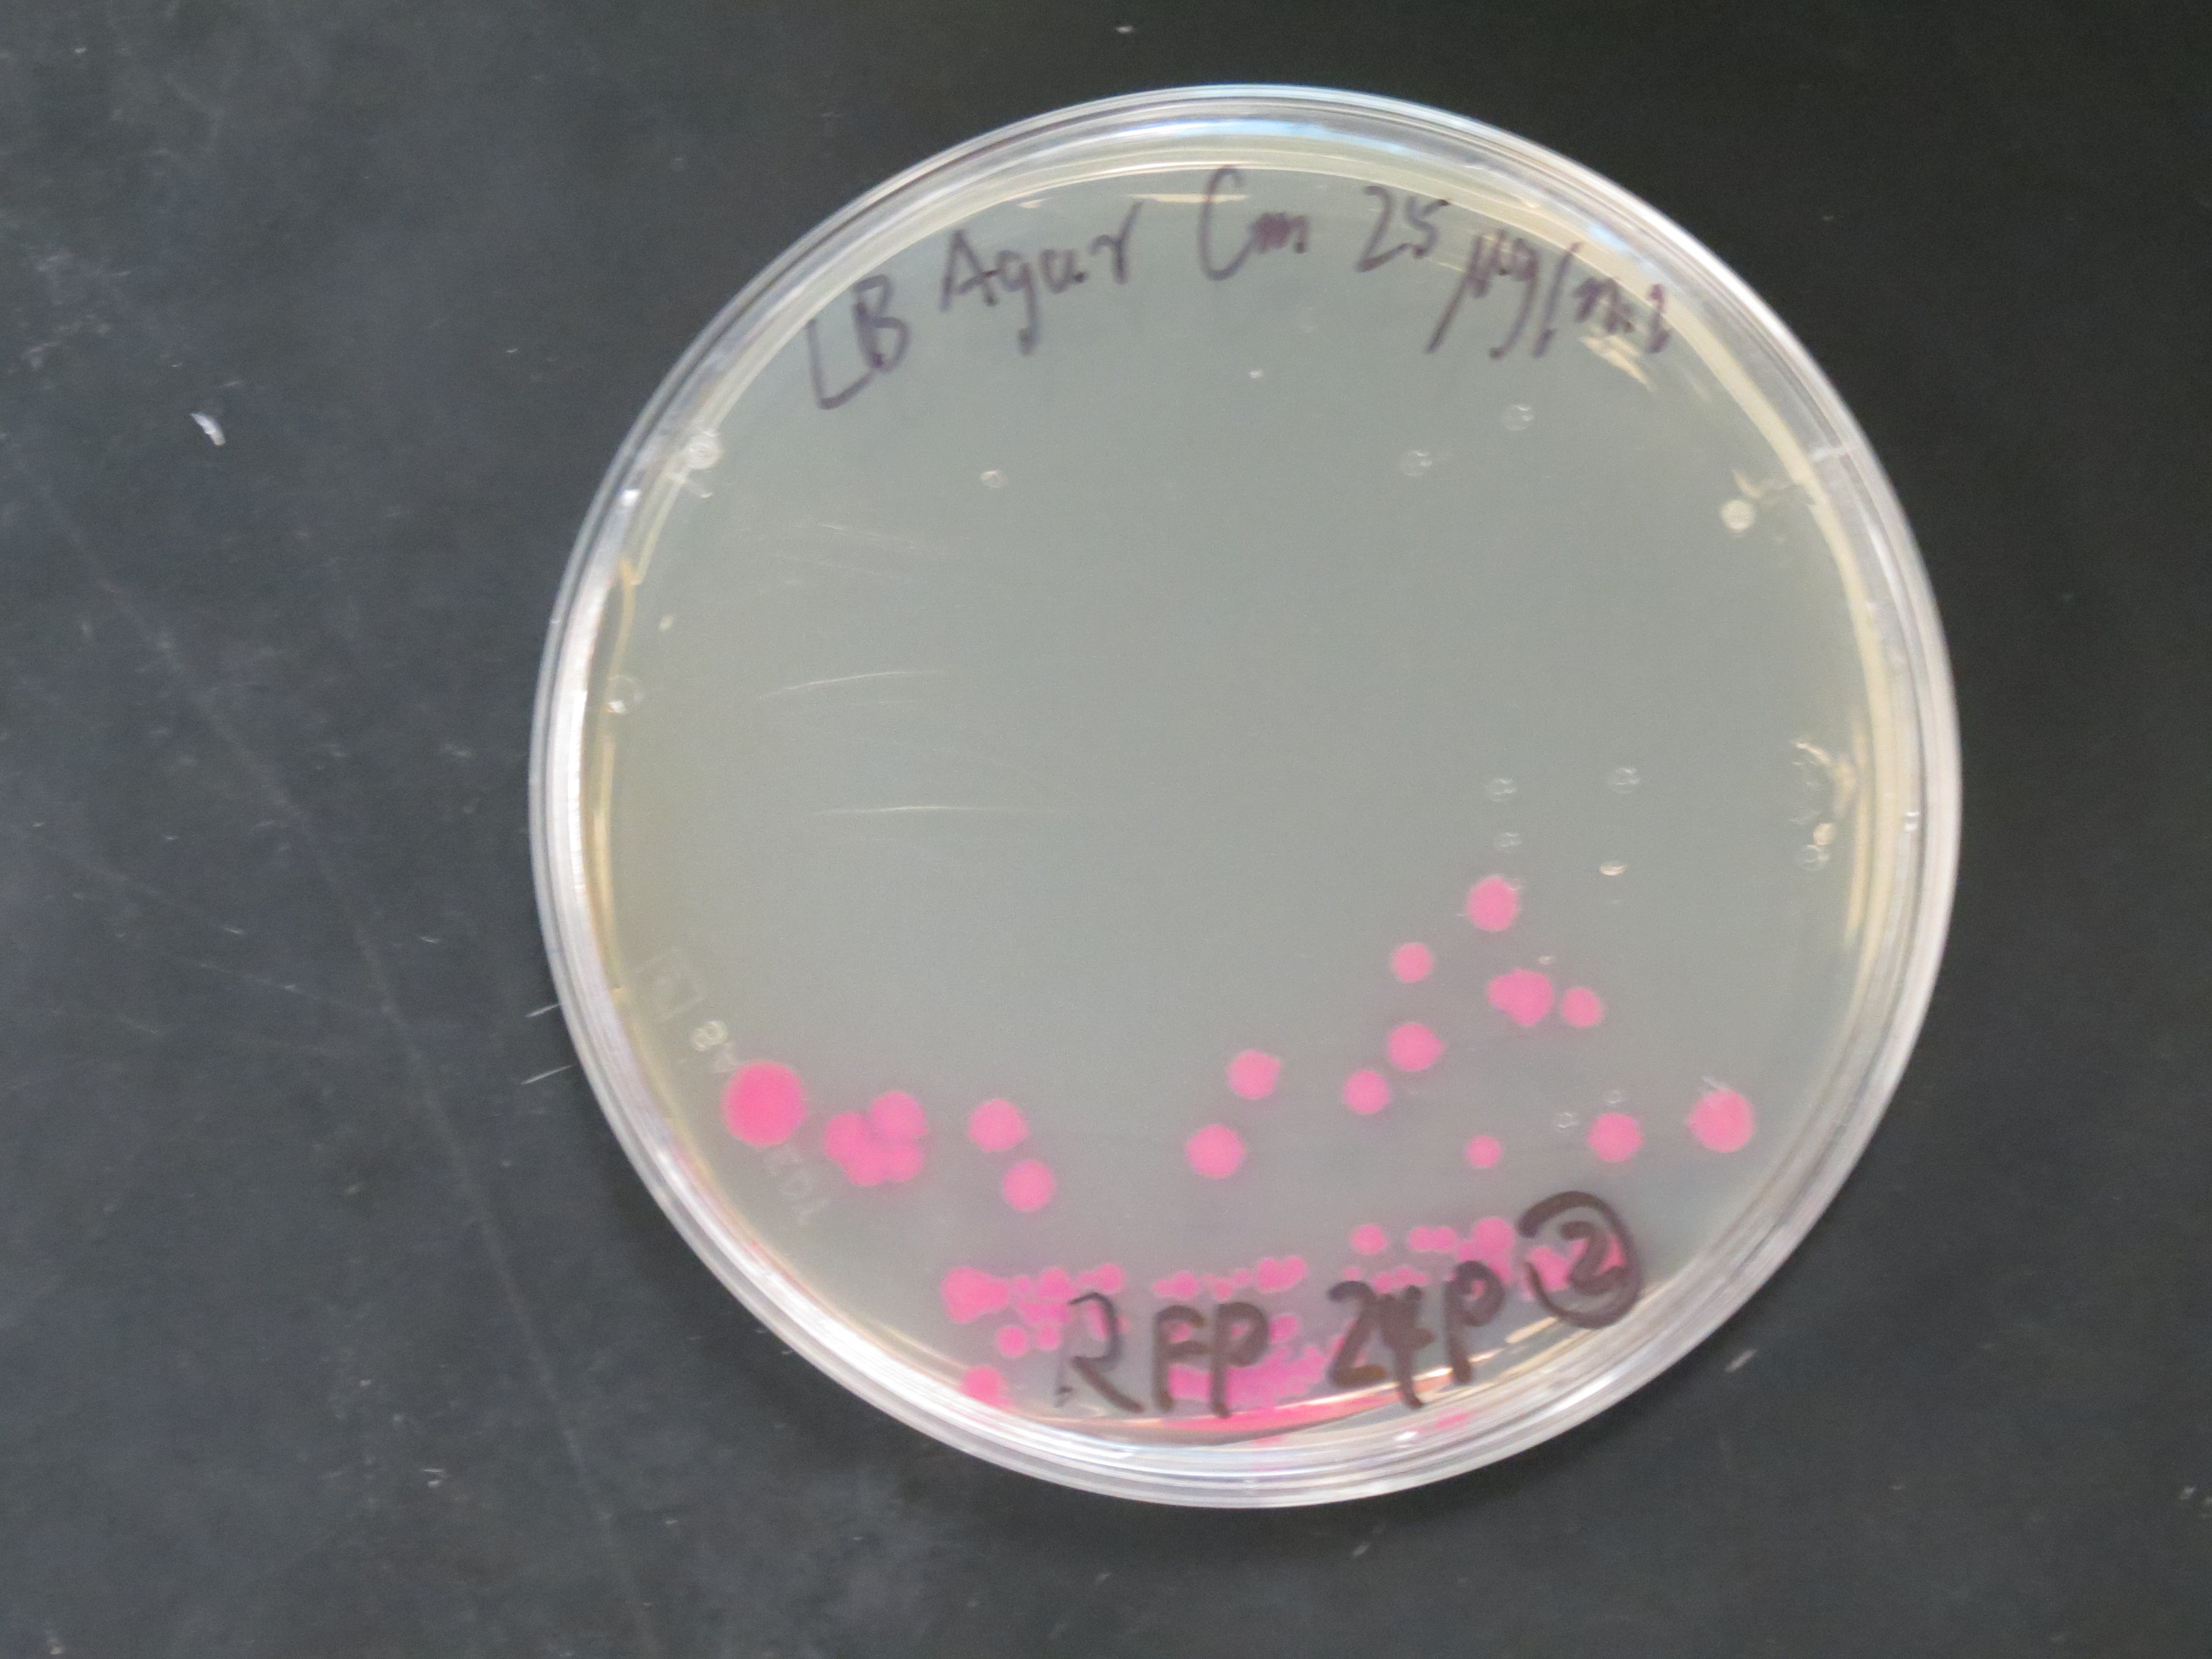
1. Streaking
No - not that kind of streaking
Presumably you’ve completed your transformations, as Fei Fei outlined [last week] (http://mcmastergem.com/blog/2015/08/31/the-magical-world-of-transformations/). Regardless of your procedure, you most likely have your cells now on some agar plates. The specks you see are the bacterial colonies - ideally, the ones with your desired plasmid now inside them. However, we want to work with single colonies instead of a single continuous batch. Therefore, we’re going to ‘dilute’ the bacterial sample. Of course, this is synbio, so something like ‘diluting a colony’ isn’t as simple as adding water to the sample! No, no - we’re going to have to perform streaking. In general, we will take a tool to take out a speck from this original agar plate and place it onto a new agar plate, and then make streaks using this speck on this new agar plate.
Here’s the procedure we at mGEM use (you might do a variation, so remember that this is just a guideline!). We also use a method involving a toothpick; however, for learning purposes, this variation is the simplest and most purpose-evident:
1. Create a zone of sterility Ideally we might want to work in the most pristine areas (full on shiny and bright white desks and walls with special suits and fresh filtered air ventilation). However, we don’t need such extreme measures, so we simply create a zone of sterility. To do this, light a Bunsen burner in your immediate proximity on your lab bench.
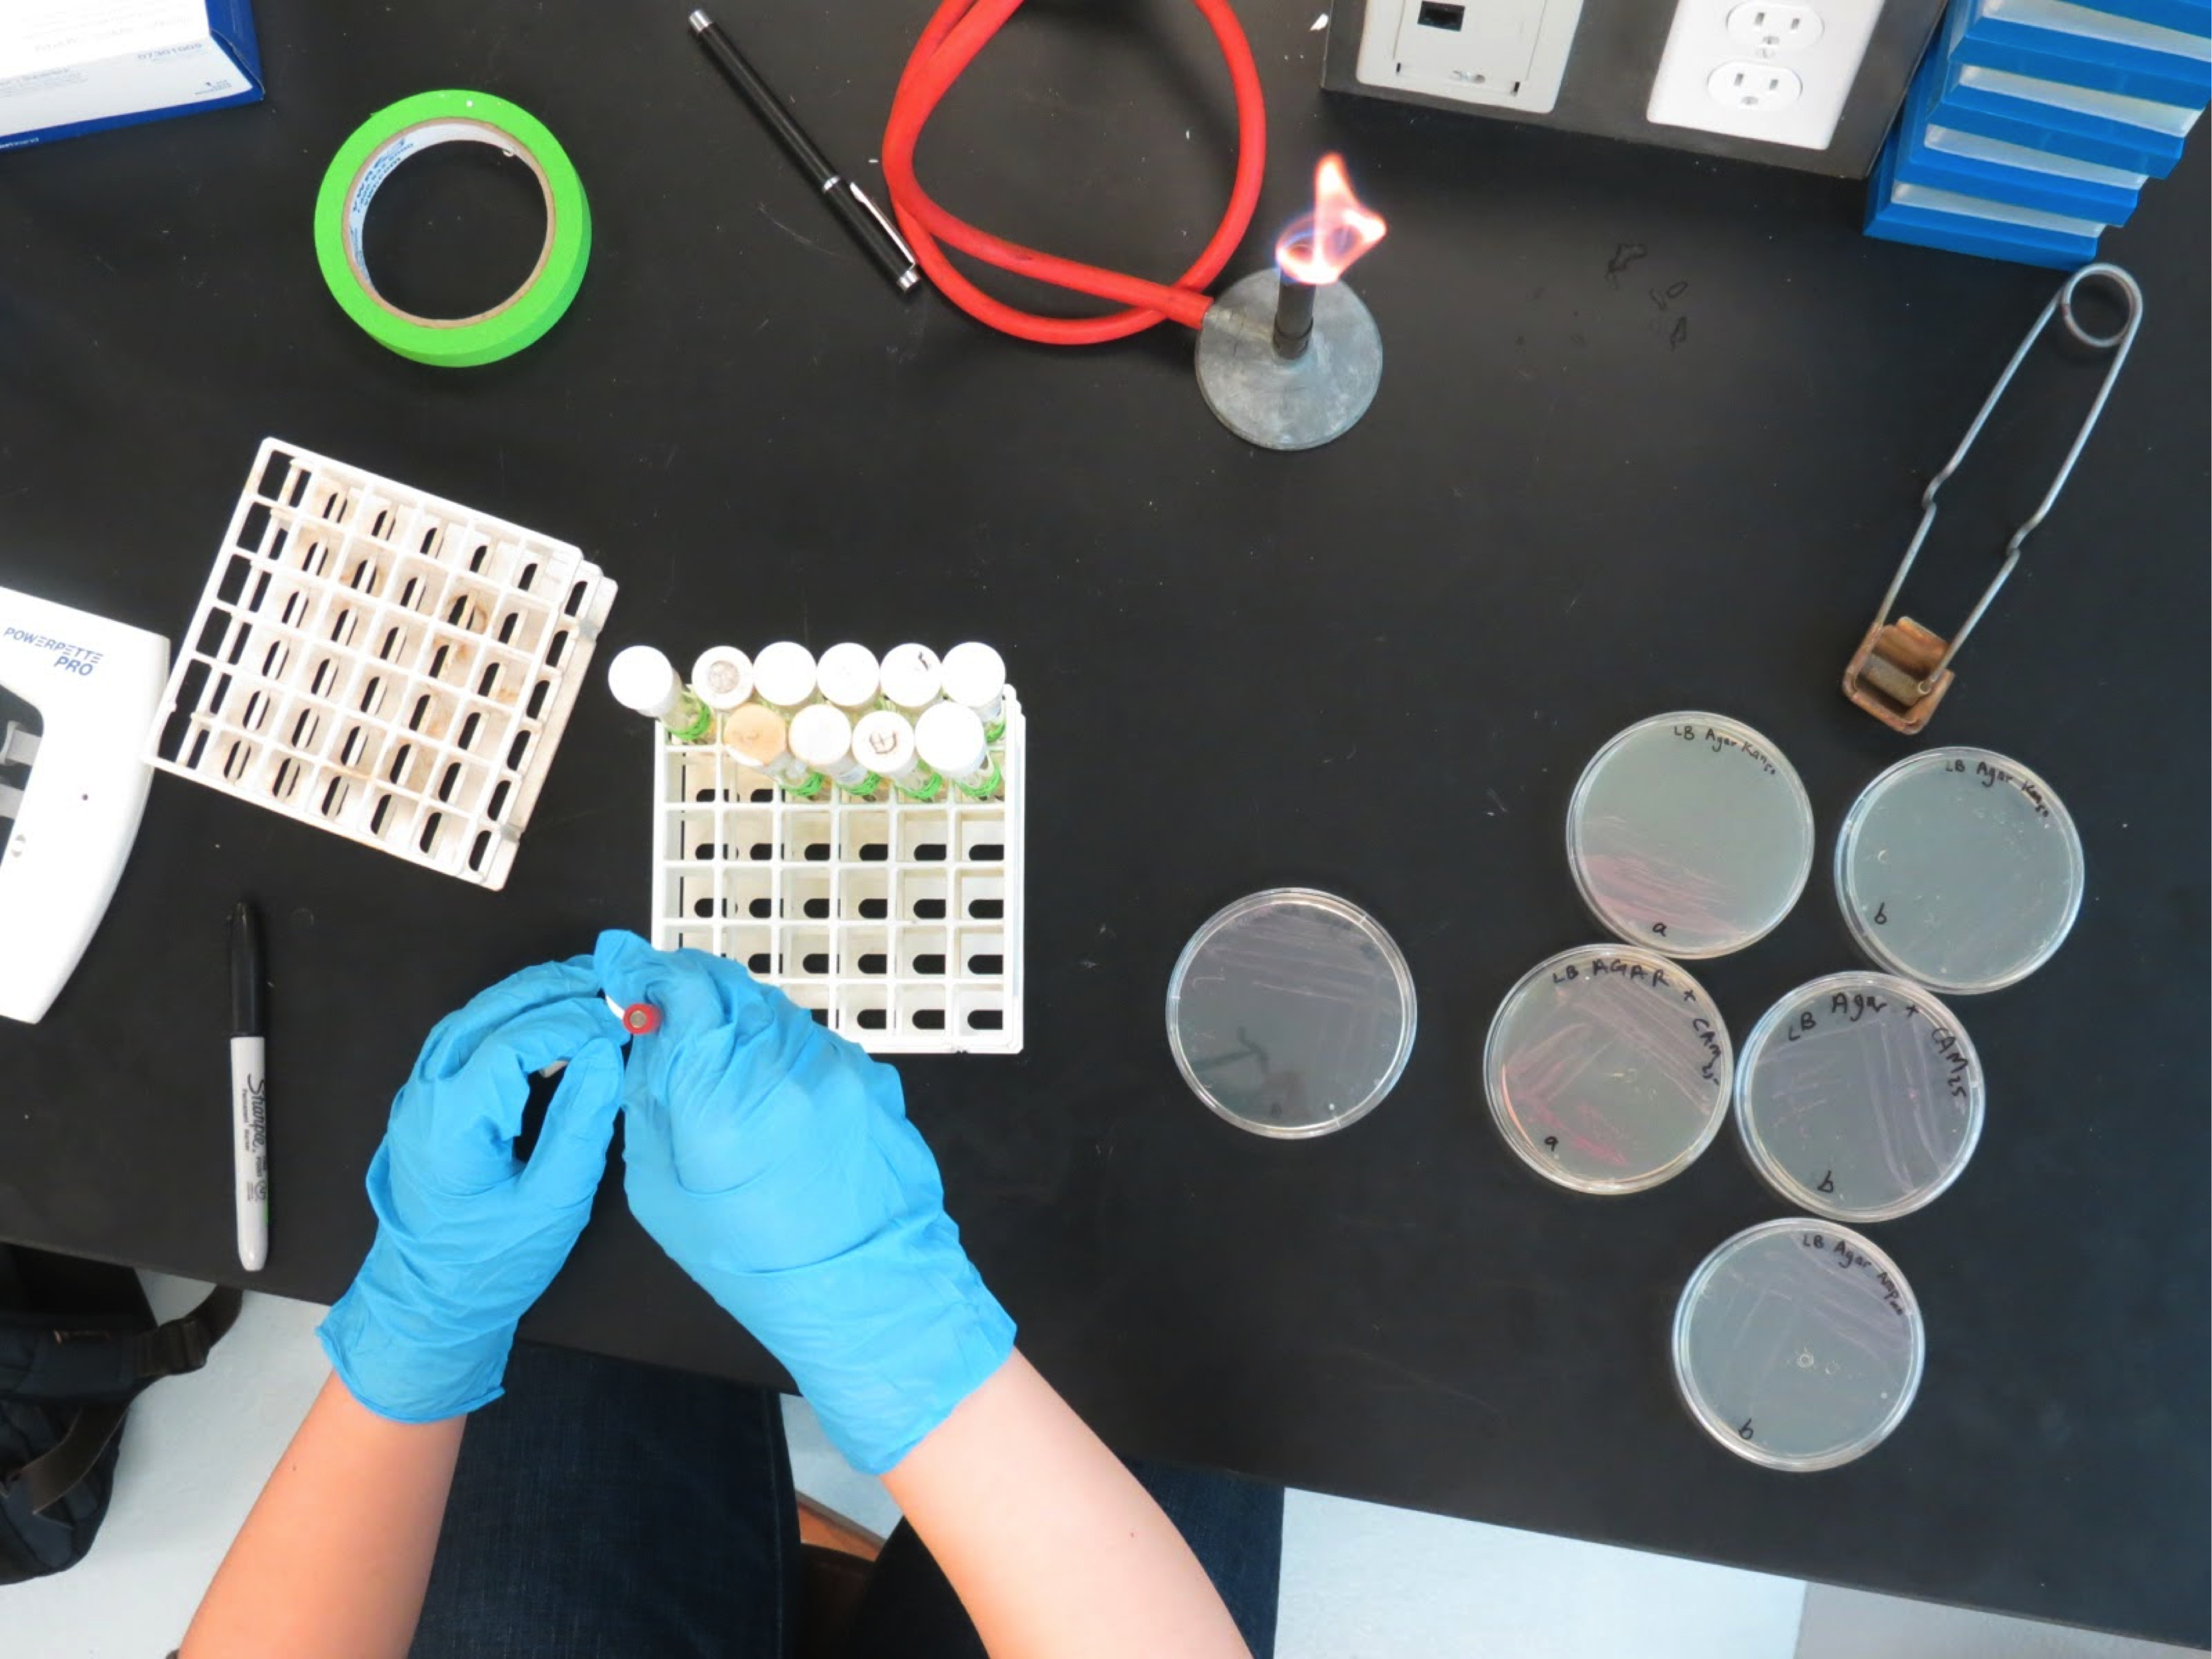
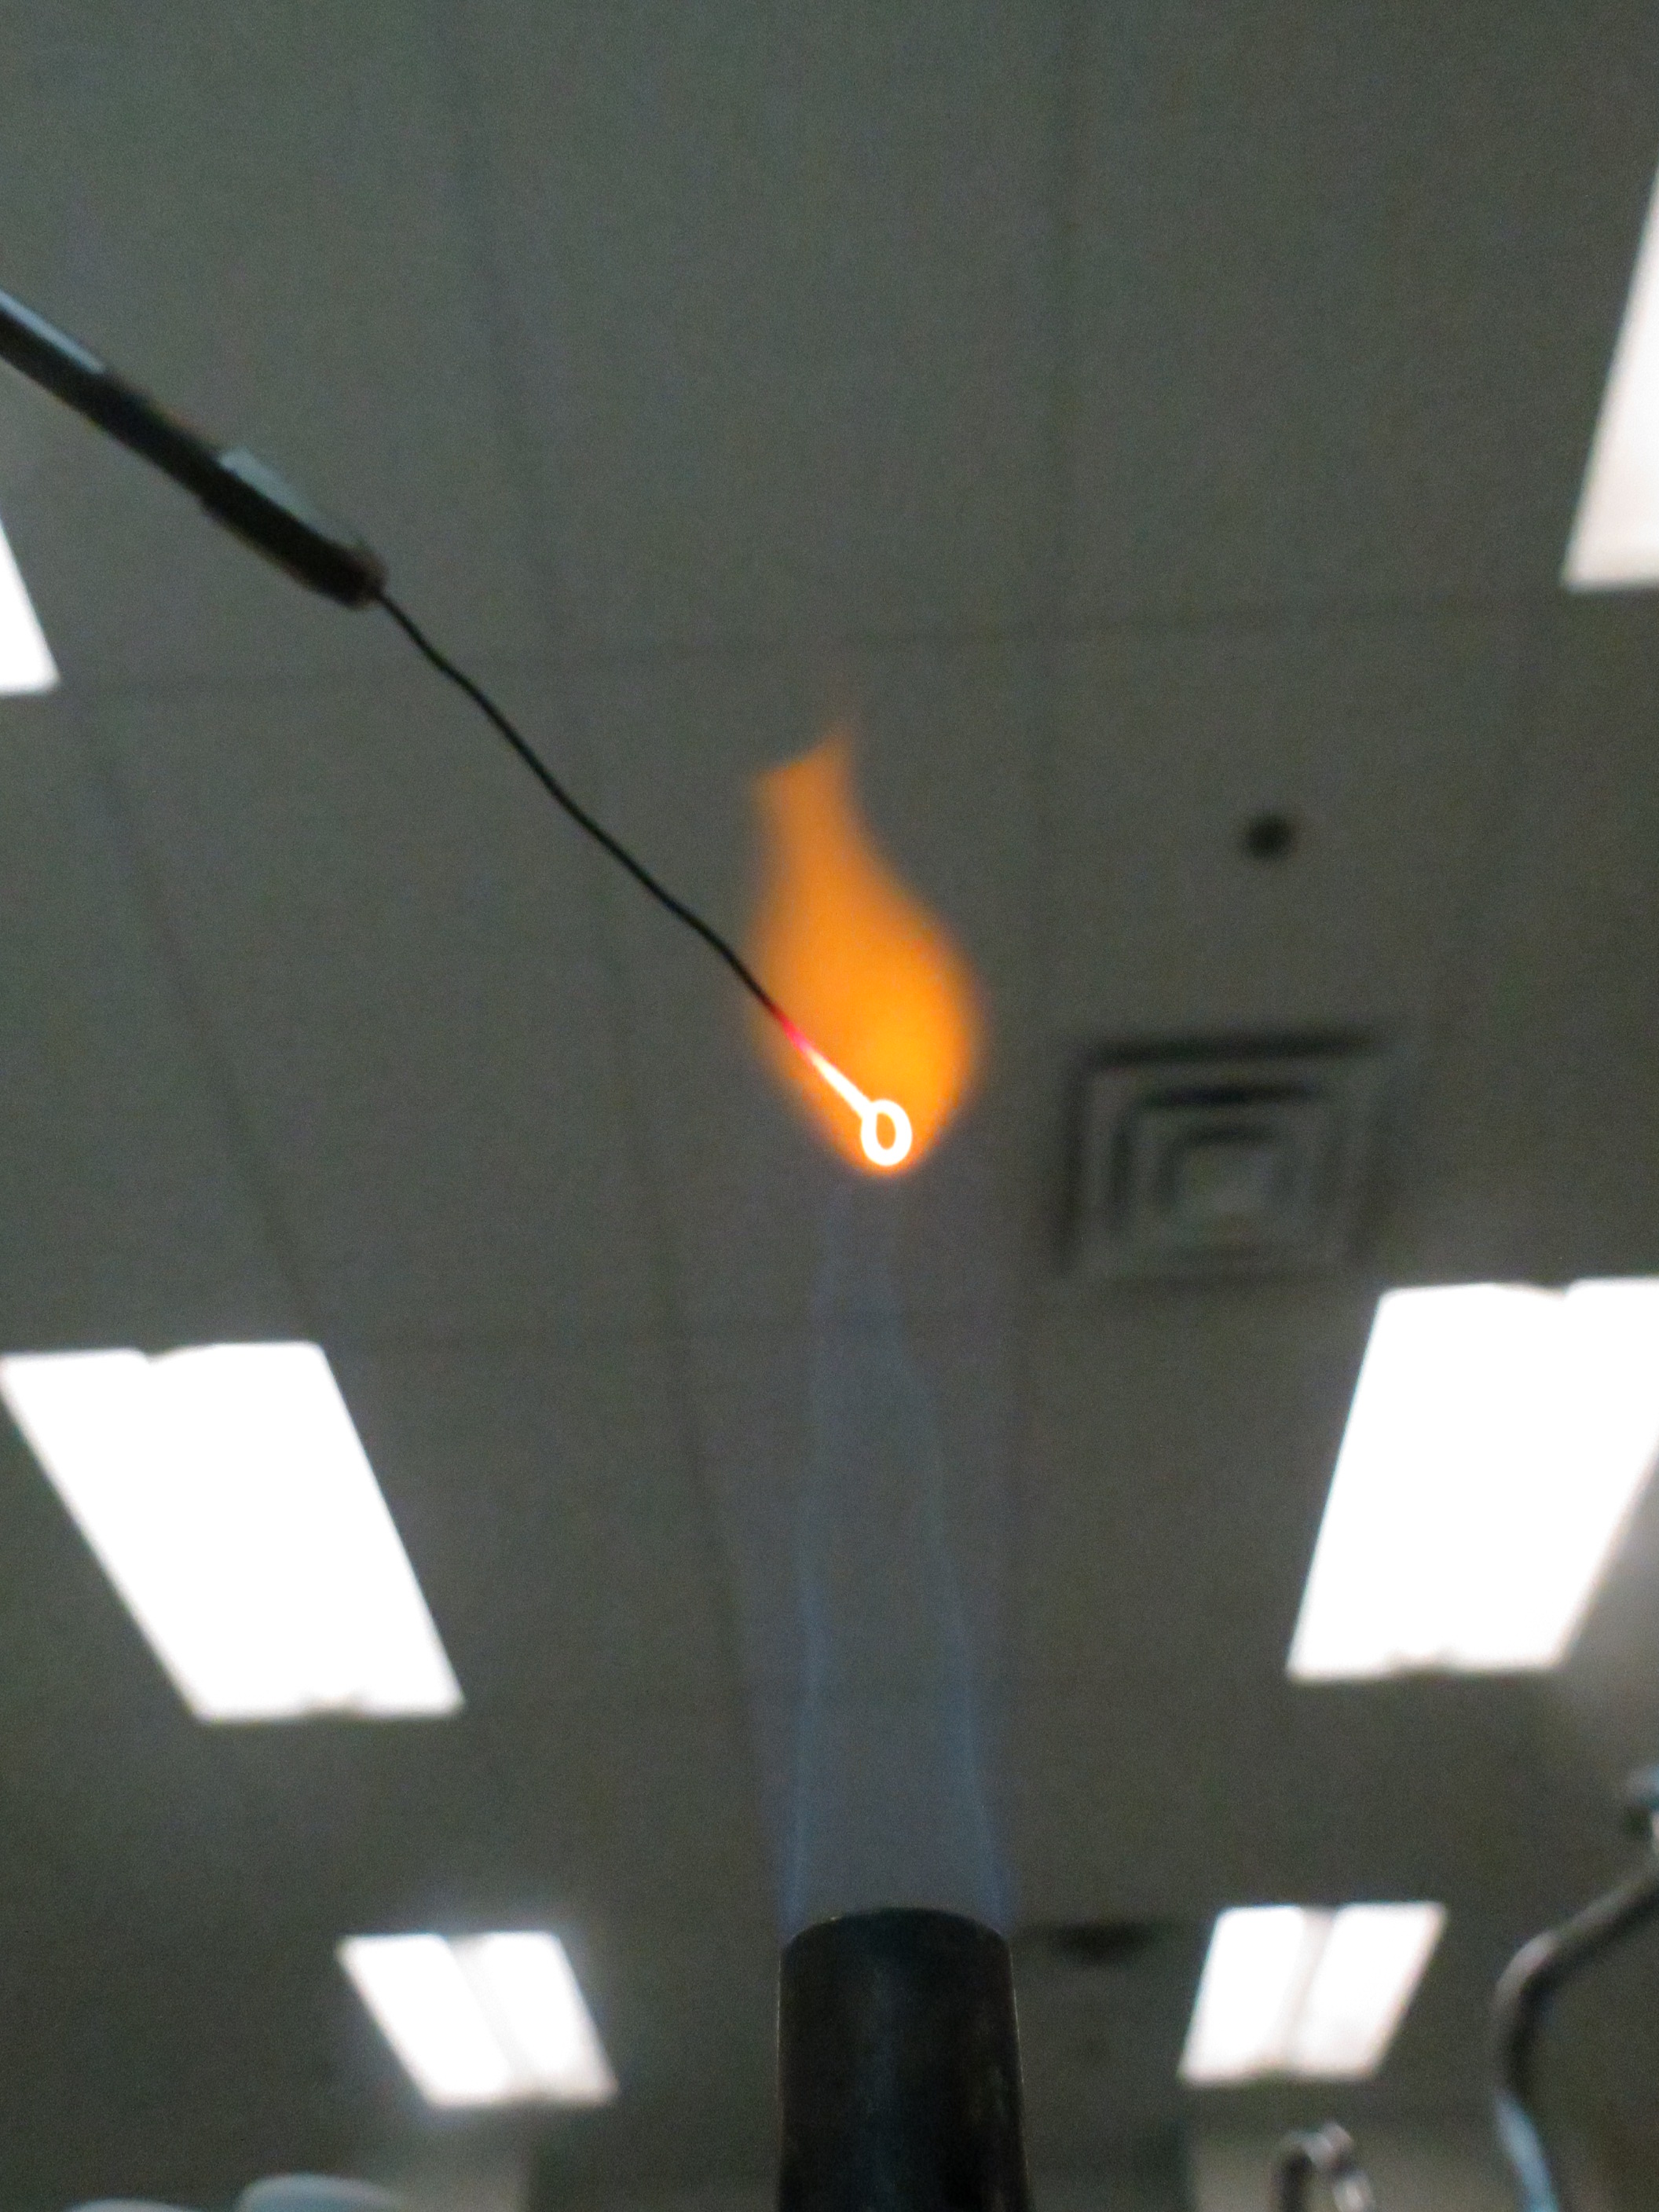
2. Sterilize the inoculation loop As shown in the image below, this is an inoculation loop and is the tool that we will use to streak the E. coli cells. To ensure we do not introduce new (biological or chemical) materials, we need sterilize the tool. We do this by placing the loop over an open flame, most easily the one ejected from the Bunsen burner.
The hottest place of the flame is at the tip of its inner cone (there’s an outer cone and an inner cone), as shown in the image below. Place the thin parts of the inoculating loop into this area (the thick part of the tool is the handle). Hold the tool at this position until it glows red-orange-white hot. Then progress along the tool by moving the tool through the heat. Repeat this process until you have sterilized the entire active portion of the tool (the thin portion).
3. Cool the inoculation loop on the edge of the agar Now that the tool has been sterilized, it is still incredibly hot! This would kill the bacteria if touched directly now; hence, we need to cool the loop. We can do this by simply touching the loop to the empty edges of the agar plate (or any empty area really, it just looks nicer when it’s off to the side). Dab a good portion of the end of the loop onto the agar. Once the sizzling sound has stopped for a while, flip the loop over and repeat. Once you hear no sizzling for a while, then you can be sure the loop is cooled sufficiently and you can move onto Step 4.
4. Picking the bacteria With the plate placed near the burner, open it and, using the tool, pick up a very tiny, barely visible speck of bacteria. Then close this original agar plate, and open a new plate that contains the same antibiotic as well as the [correct labelling] (http://mcmastergem.com/blog/2015/08/24/week-1-preparing-the-lab/). Label the area where you removed the bacteria by placing a (black permanent marker) marking around the pick-site on the base of the agar plate (not the lid). This may be helpful in the future in case you or someone else needs to check back on your work!
5. Streaking the bacteria Now we’ve finally reached the key part. It is important to keep everything as isolated as possible. Therefore, the transportation of the bacteria on the tool should be quick (no hang-time) and when performing the following streaking, keep the lid as closed as possible over the plate.
Continuing, on the new agar plate, we will streak the bacteria that is stuck on the inoculating loop. Do this by very gently touching the side of the tool with the speck of bacteria onto the agar. Then, streak the speck using the pattern below. Don’t worry if you can’t see the speck after a while - the bacteria are very small - they’ll be there. It’s important to touch the agar gently, so as not to break the surface of the agar. If you break the agar, it ruins the plate, so it’s best to restart with a new plate at this point.

You can use more than three streak patterns - some people use four or five. The essential is that you progressively separate colonies. From the diagram you can see that each new streak starts from the end of the old one. This is how the dilution of the bacteria occurs: with each new streak, the concentration of bacteria becomes less and less.
6. Incubate the plates Now, that the plates have been streaked, it’s time to incubate them. Place the new plate(s) into the 37°C incubator. Depending on your cells, in general you can let them grow for a day or two. This depends on the antibiotic as well - you cannot let Amp-resistant cells grow for over 24 hours (the Amp is destroyed and other beings will begin to grow, thereby ruining your plate)!
And that concludes streaking! Once you have successfully streaked and incubated the plates, they should look similar to this:
2. Overnight Cultures
Nope - not talking about sleeper hit movies.
Now that we have isolated the cell colony with the plasmid we want, we need to create a huge number of clones those cells. To do this, we’ll switch over from a solid phase into a liquid phase and create overnight cultures.
We can create these cultures from a single colony from the new streaked agar plates. The process is very straightforward:
1. Prepare the tube Using the necessary antibiotic, create an LB stock with the desired antibiotic concentration in a sterile glass or plastic tube. The glass tubes can be sterilized in an autoclave, while the plastic ones should be sealed in a bag and certified to be sterile by the producer.
To create the LB, follow the recipe on your specific brand of LB. It will most likely only involve the mixing of solid LB with a certain amount of water. Using some mathematics, you can then add in the amount of antibiotic appropriate to reach the desired antibiotic concentration. Although you will only need a small amount of this liquid for a single overnight culture, it is helpful to make a medium sized volume on-hand (100mL).
Here at mGEM we tend to add 5mL of the LB stock with the antibiotic into the culture tube. Having enough liquid is essential for miniprepping, in which you extract the DNA from the bacteria! But more on that later - one step at a time!
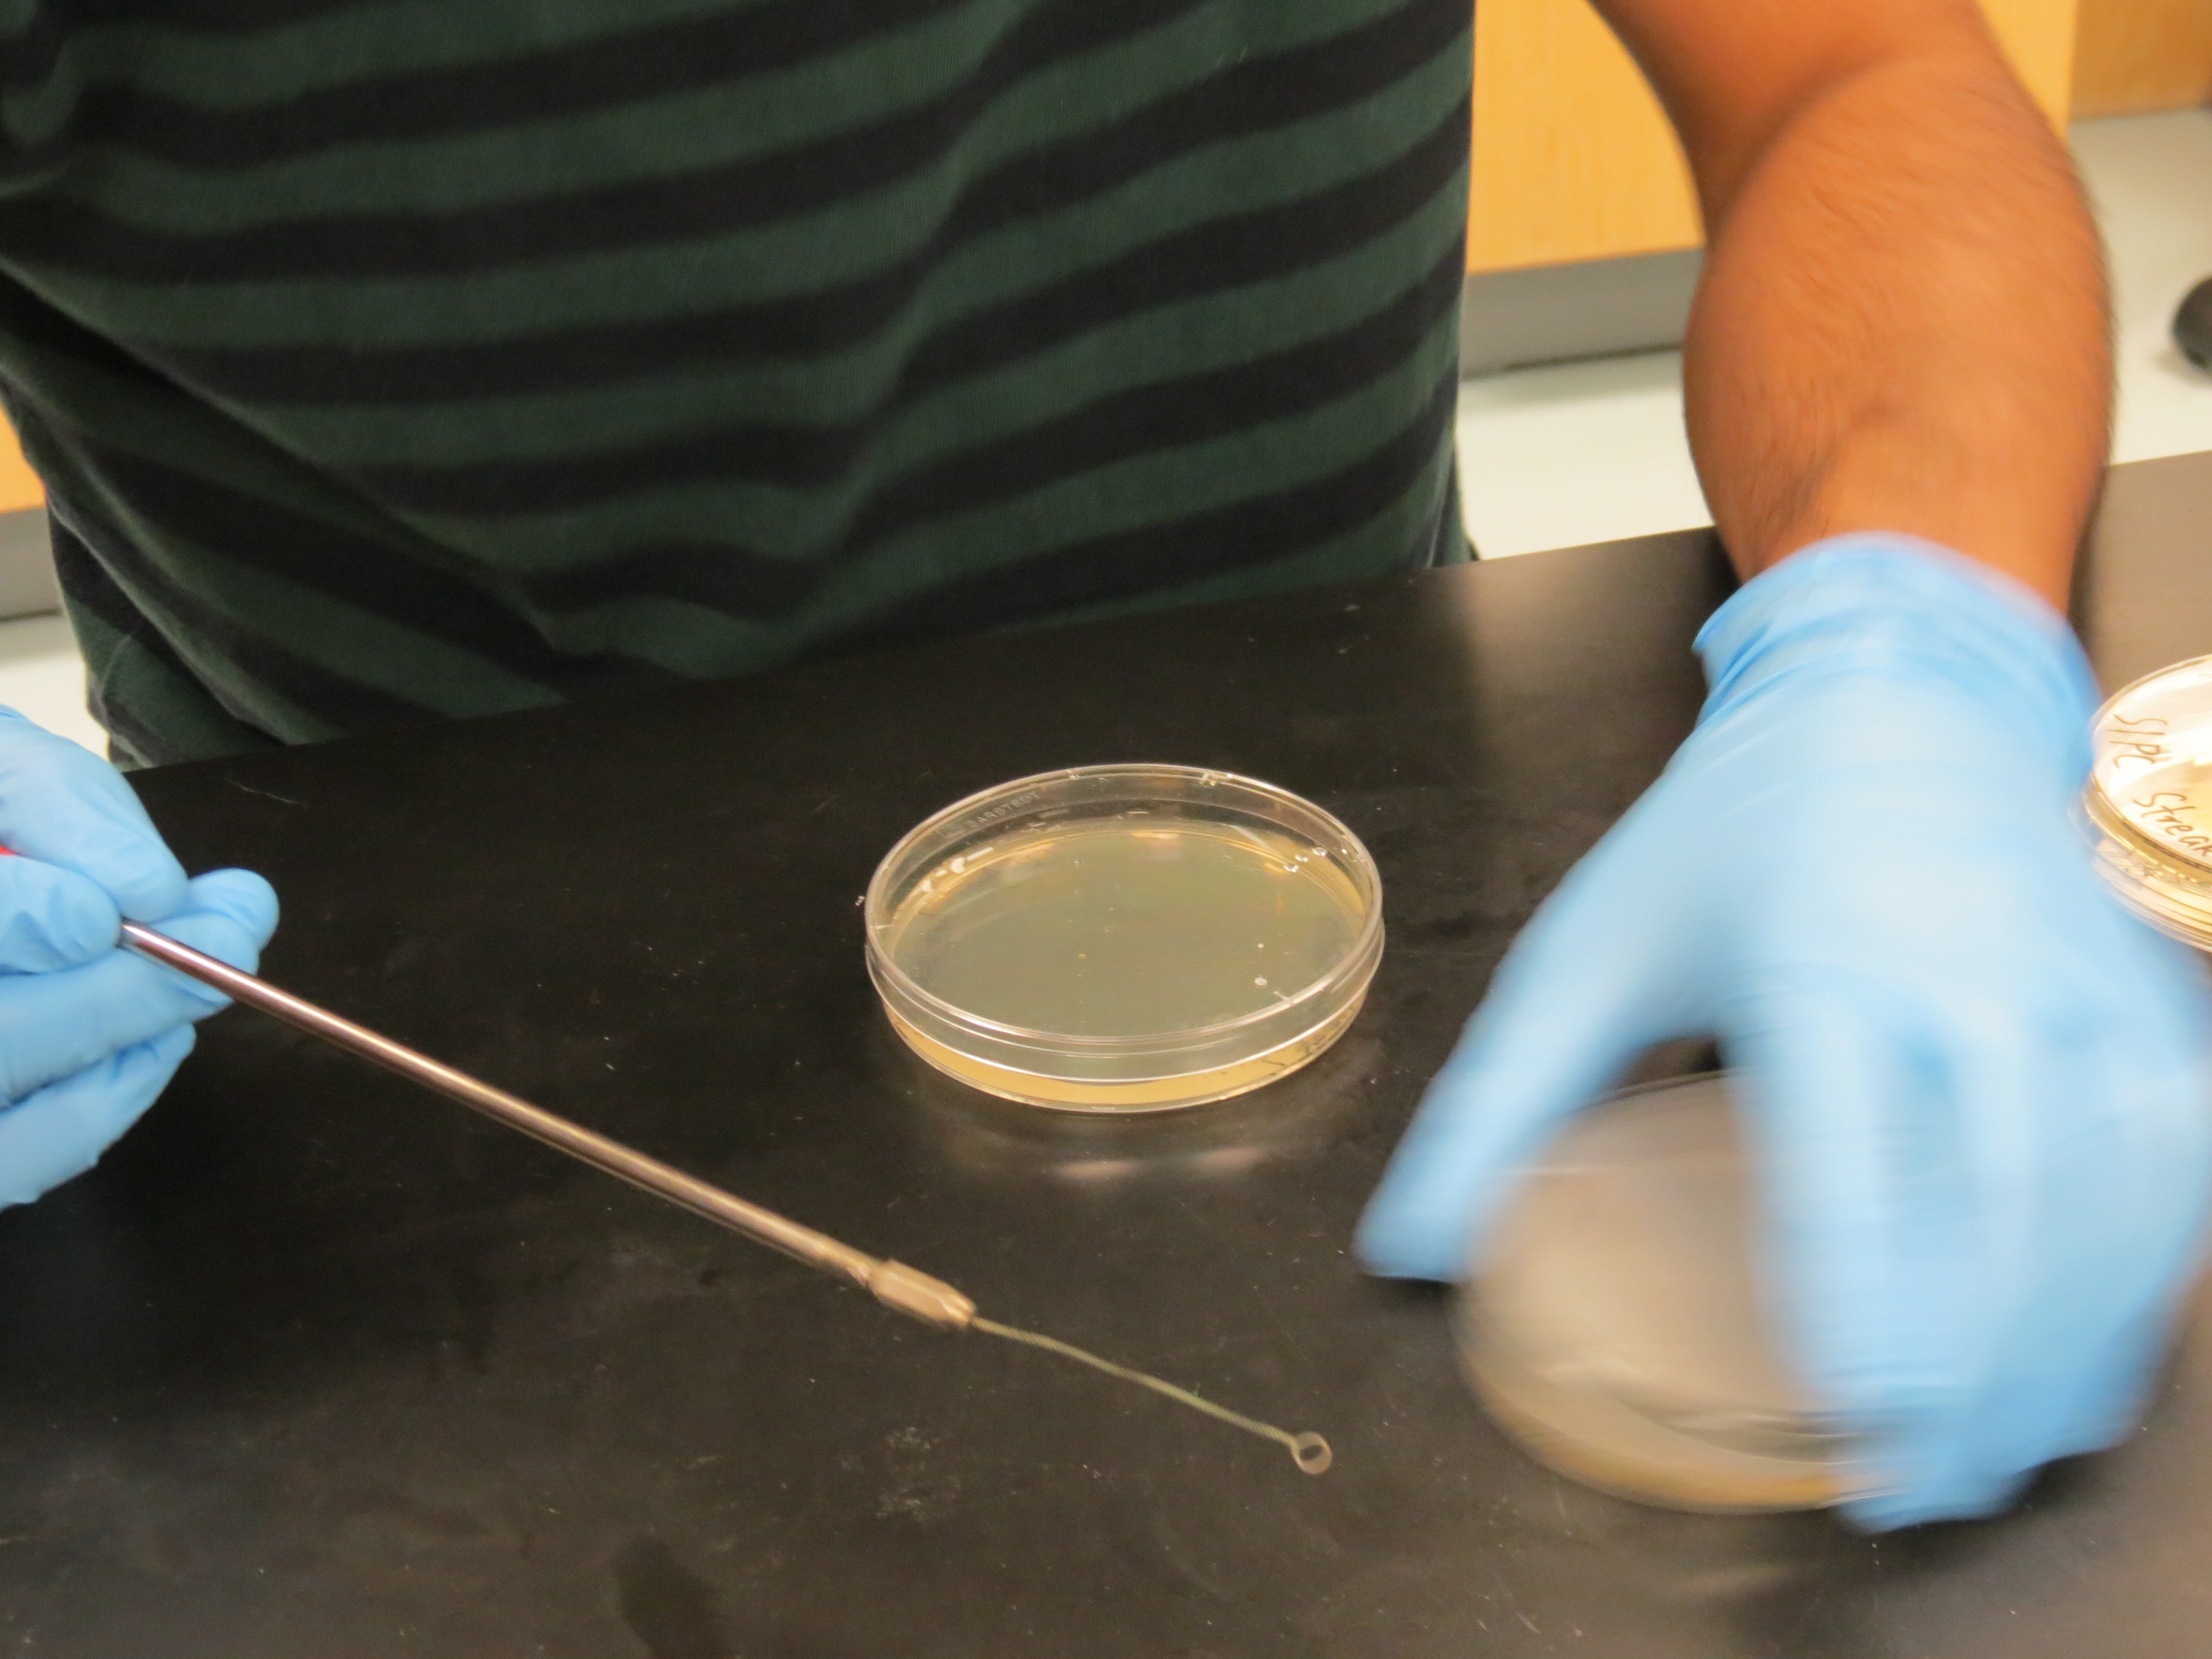
2. Select a single bacterial colony Using an inoculation loop, pick a single colony (a white or coloured speck) form the streaked agar plates. Once you’ve made sure a barely-visible speck is attached to the loop, insert the loop carefully into the tube and into the fluid. Take care to not touch the sides of the tube, as you might lose your bacteria on the sides!
Once inside the fluid, shake the loop around until the speck detaches from the loop. You can verify that the colony is now inside the fluid by seeing that the speck is no longer on the loop, or checking that the speck is in the solution. Sometimes it is difficult to see the latter, so knowing the former is generally good enough.
3. Incubate while shaking These tubes are left to incubate at 37°C in a shaker (to aerate the bacteria) ‘overnight’ (or about 24h). Our shaker rotates the bacteria in large concentric circles, although your shaker may be different.
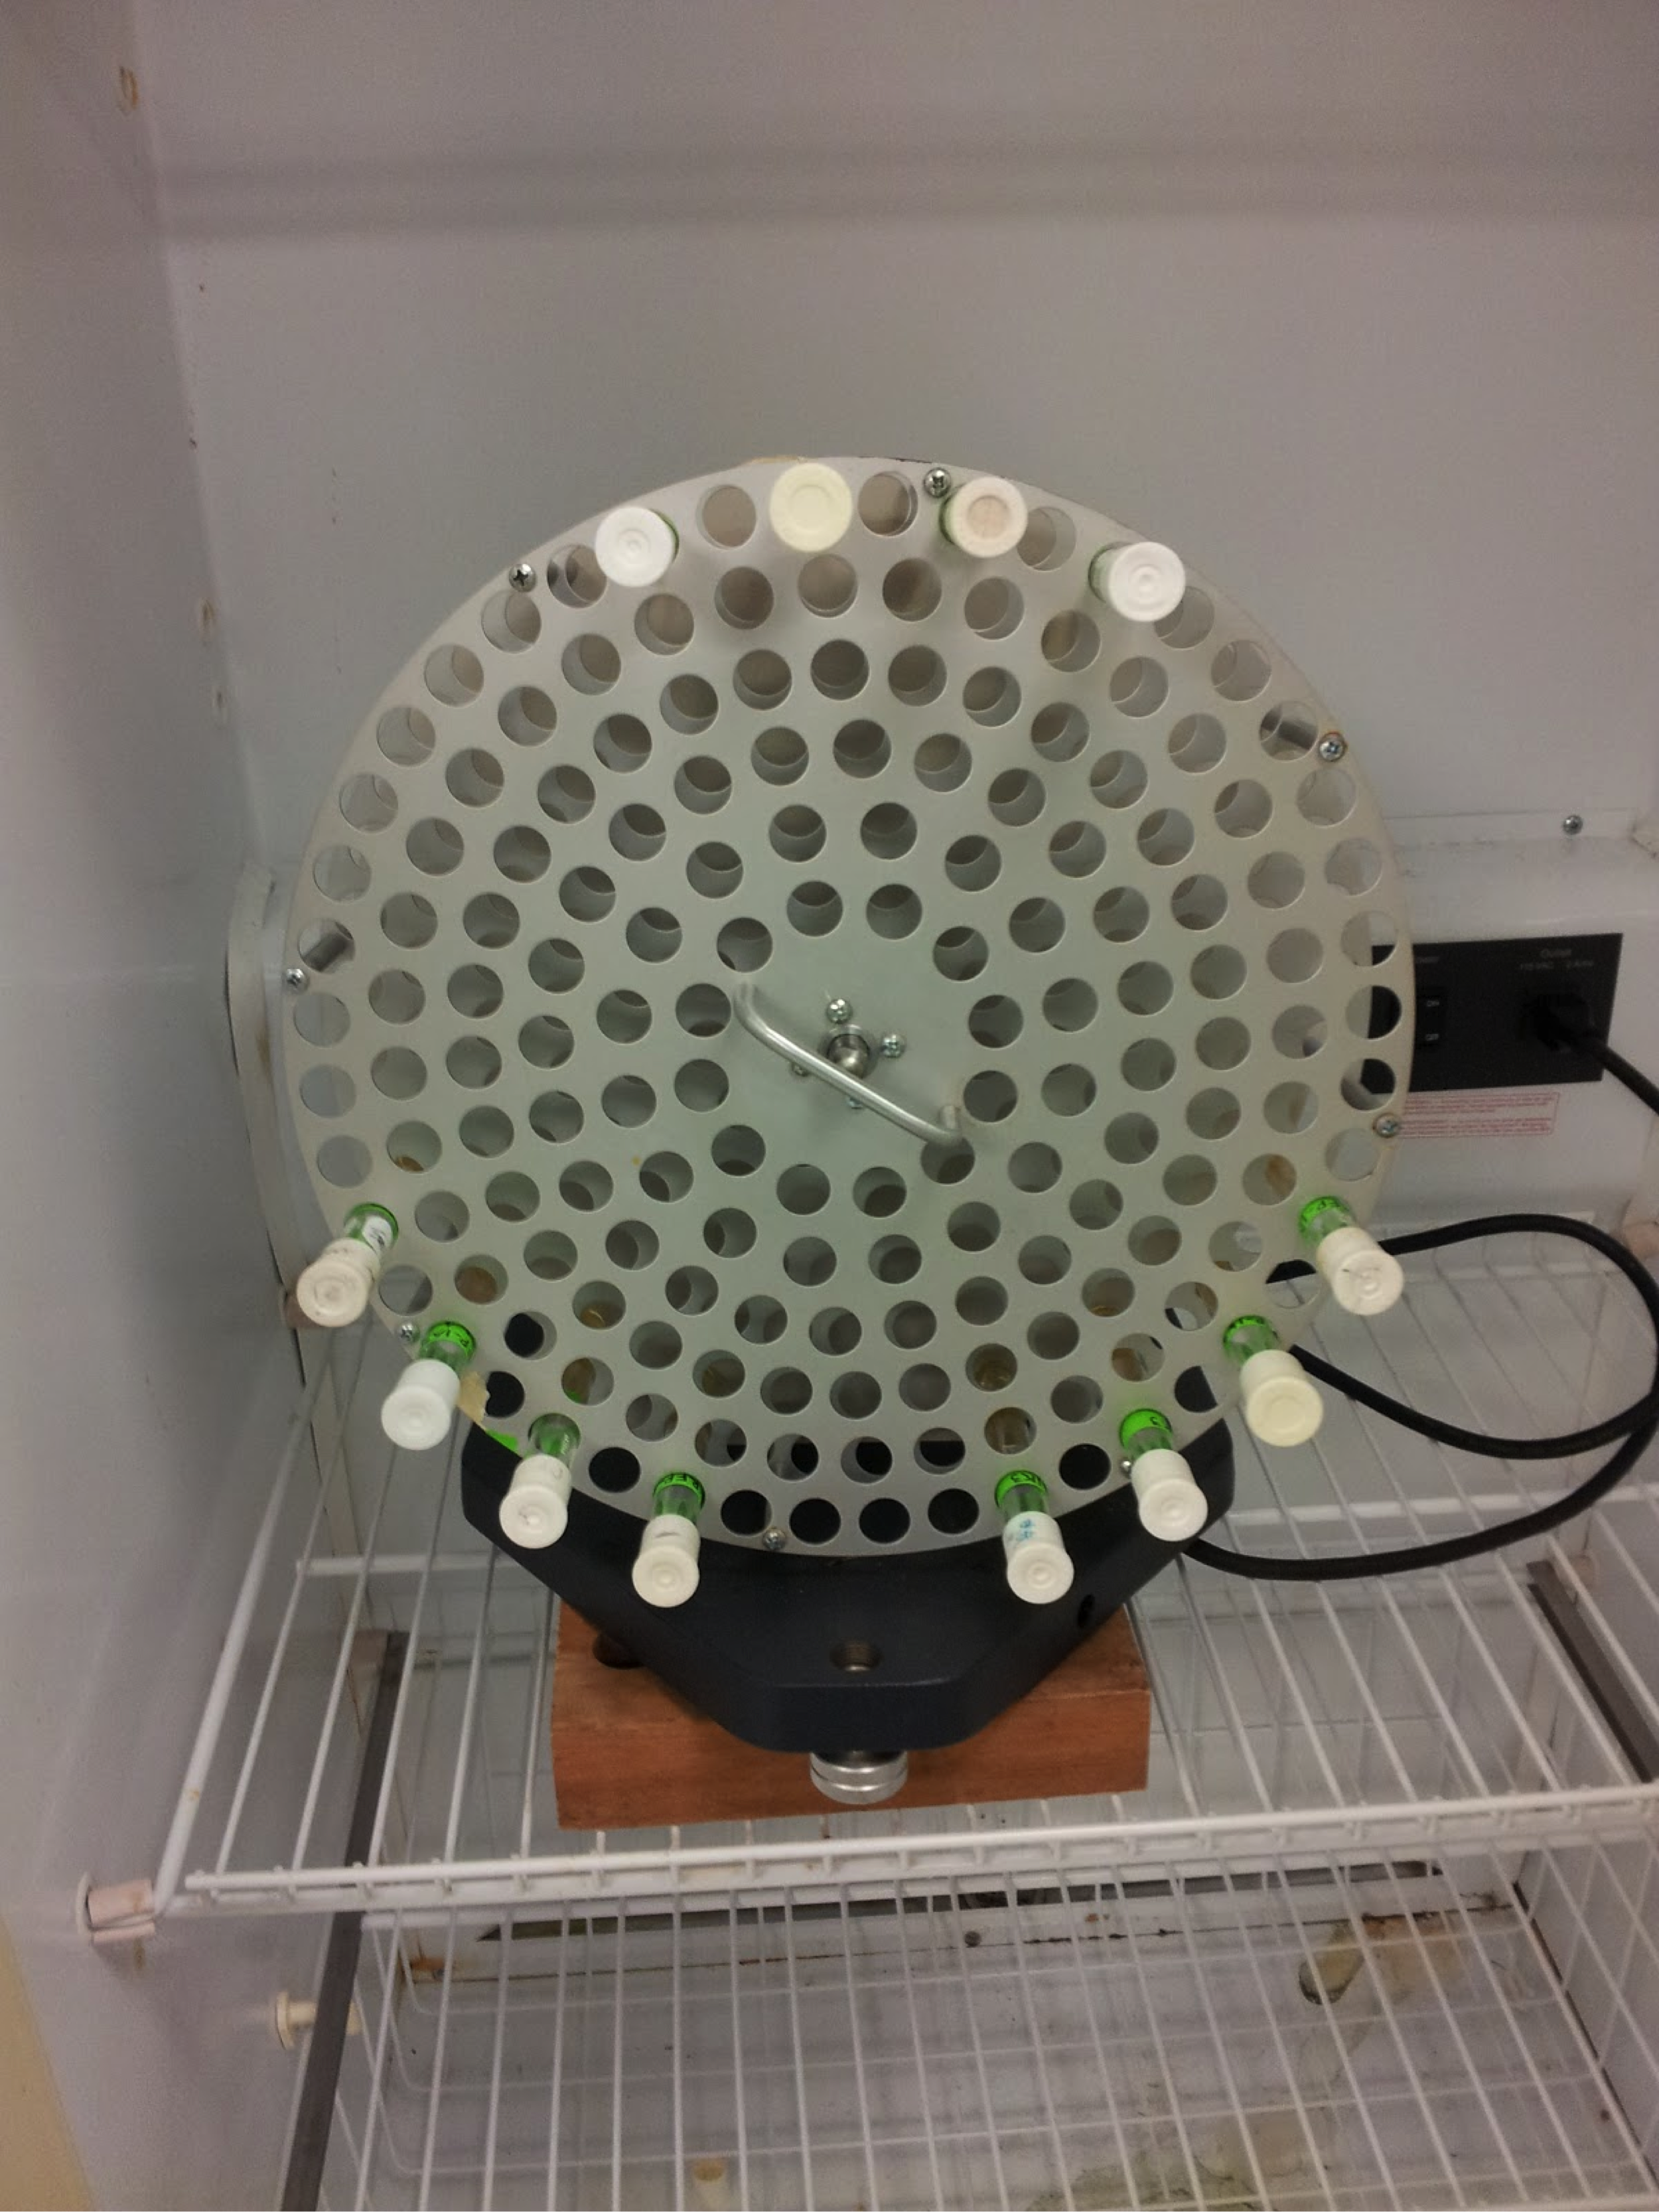
Below is an image showing an LB overnight culture tube that is full of bacteria, and is hence cloudy (the above portion is clear as it has no bacteria). Optical density is calculated based-off of this cloudiness. Because we re-use these tubes (after sterilization via auto-clave), we use green tape to label the tubes. Because we only use tubes for LB overnight cultures, we only label with the date and the plasmid (we know the antibiotic). However, because we don’t label it with everything, it is now more than ever extremely important to keep an up-to-date lab notebook (we have a snazzy black one with a nice iGEM sticker on the cover, as you might have seen somewhere)!
One last thing on overnight cultures: When using reliable samples (high efficiency, certified and ordered plasmids from a supplier), you can use slower speeds for the shaker. For samples that are less reliable to grow well (such as these new lab-transformed plasmids), faster shaker speeds are desirable.
3. Glycerol Stocks
That’s exactly how volatile the markets can be.
These culture tubes now contain a massive amount of bacteria and DNA, much of which we will use to extract our plasmid DNA from. However, things can go very badly in the future (experiments go wrong very easily in science) and we may lost our DNA. Therefore, instead of repeating all these steps from the beginning of Week 2, we’ll simply make some bacterial backups. These backups are in the form of glycerol stocks that are kept for long-term, decade-long, storage. Like they say - a stitch in time saves nine!
So, how do we make these bacterial backups? Well, using four key ingredients: glycerol, water, bacteria, and cold. Lots of cold - and this is how we do it:
1. Create glycerol-water mixture We will be placing our bacteria in a solution of glycerol and water. The solution recipe is simple: 50/50 glycerl-water, which means that you will mix equal volumes of glycerol and water.
Do this by obtaining special glycerol stock tubes. Ours have orange screw-top caps, as shown below. You cannot use simple centrifuge tubes as these would crack under the extremely cold temperatures we’ll be using (-80°C).
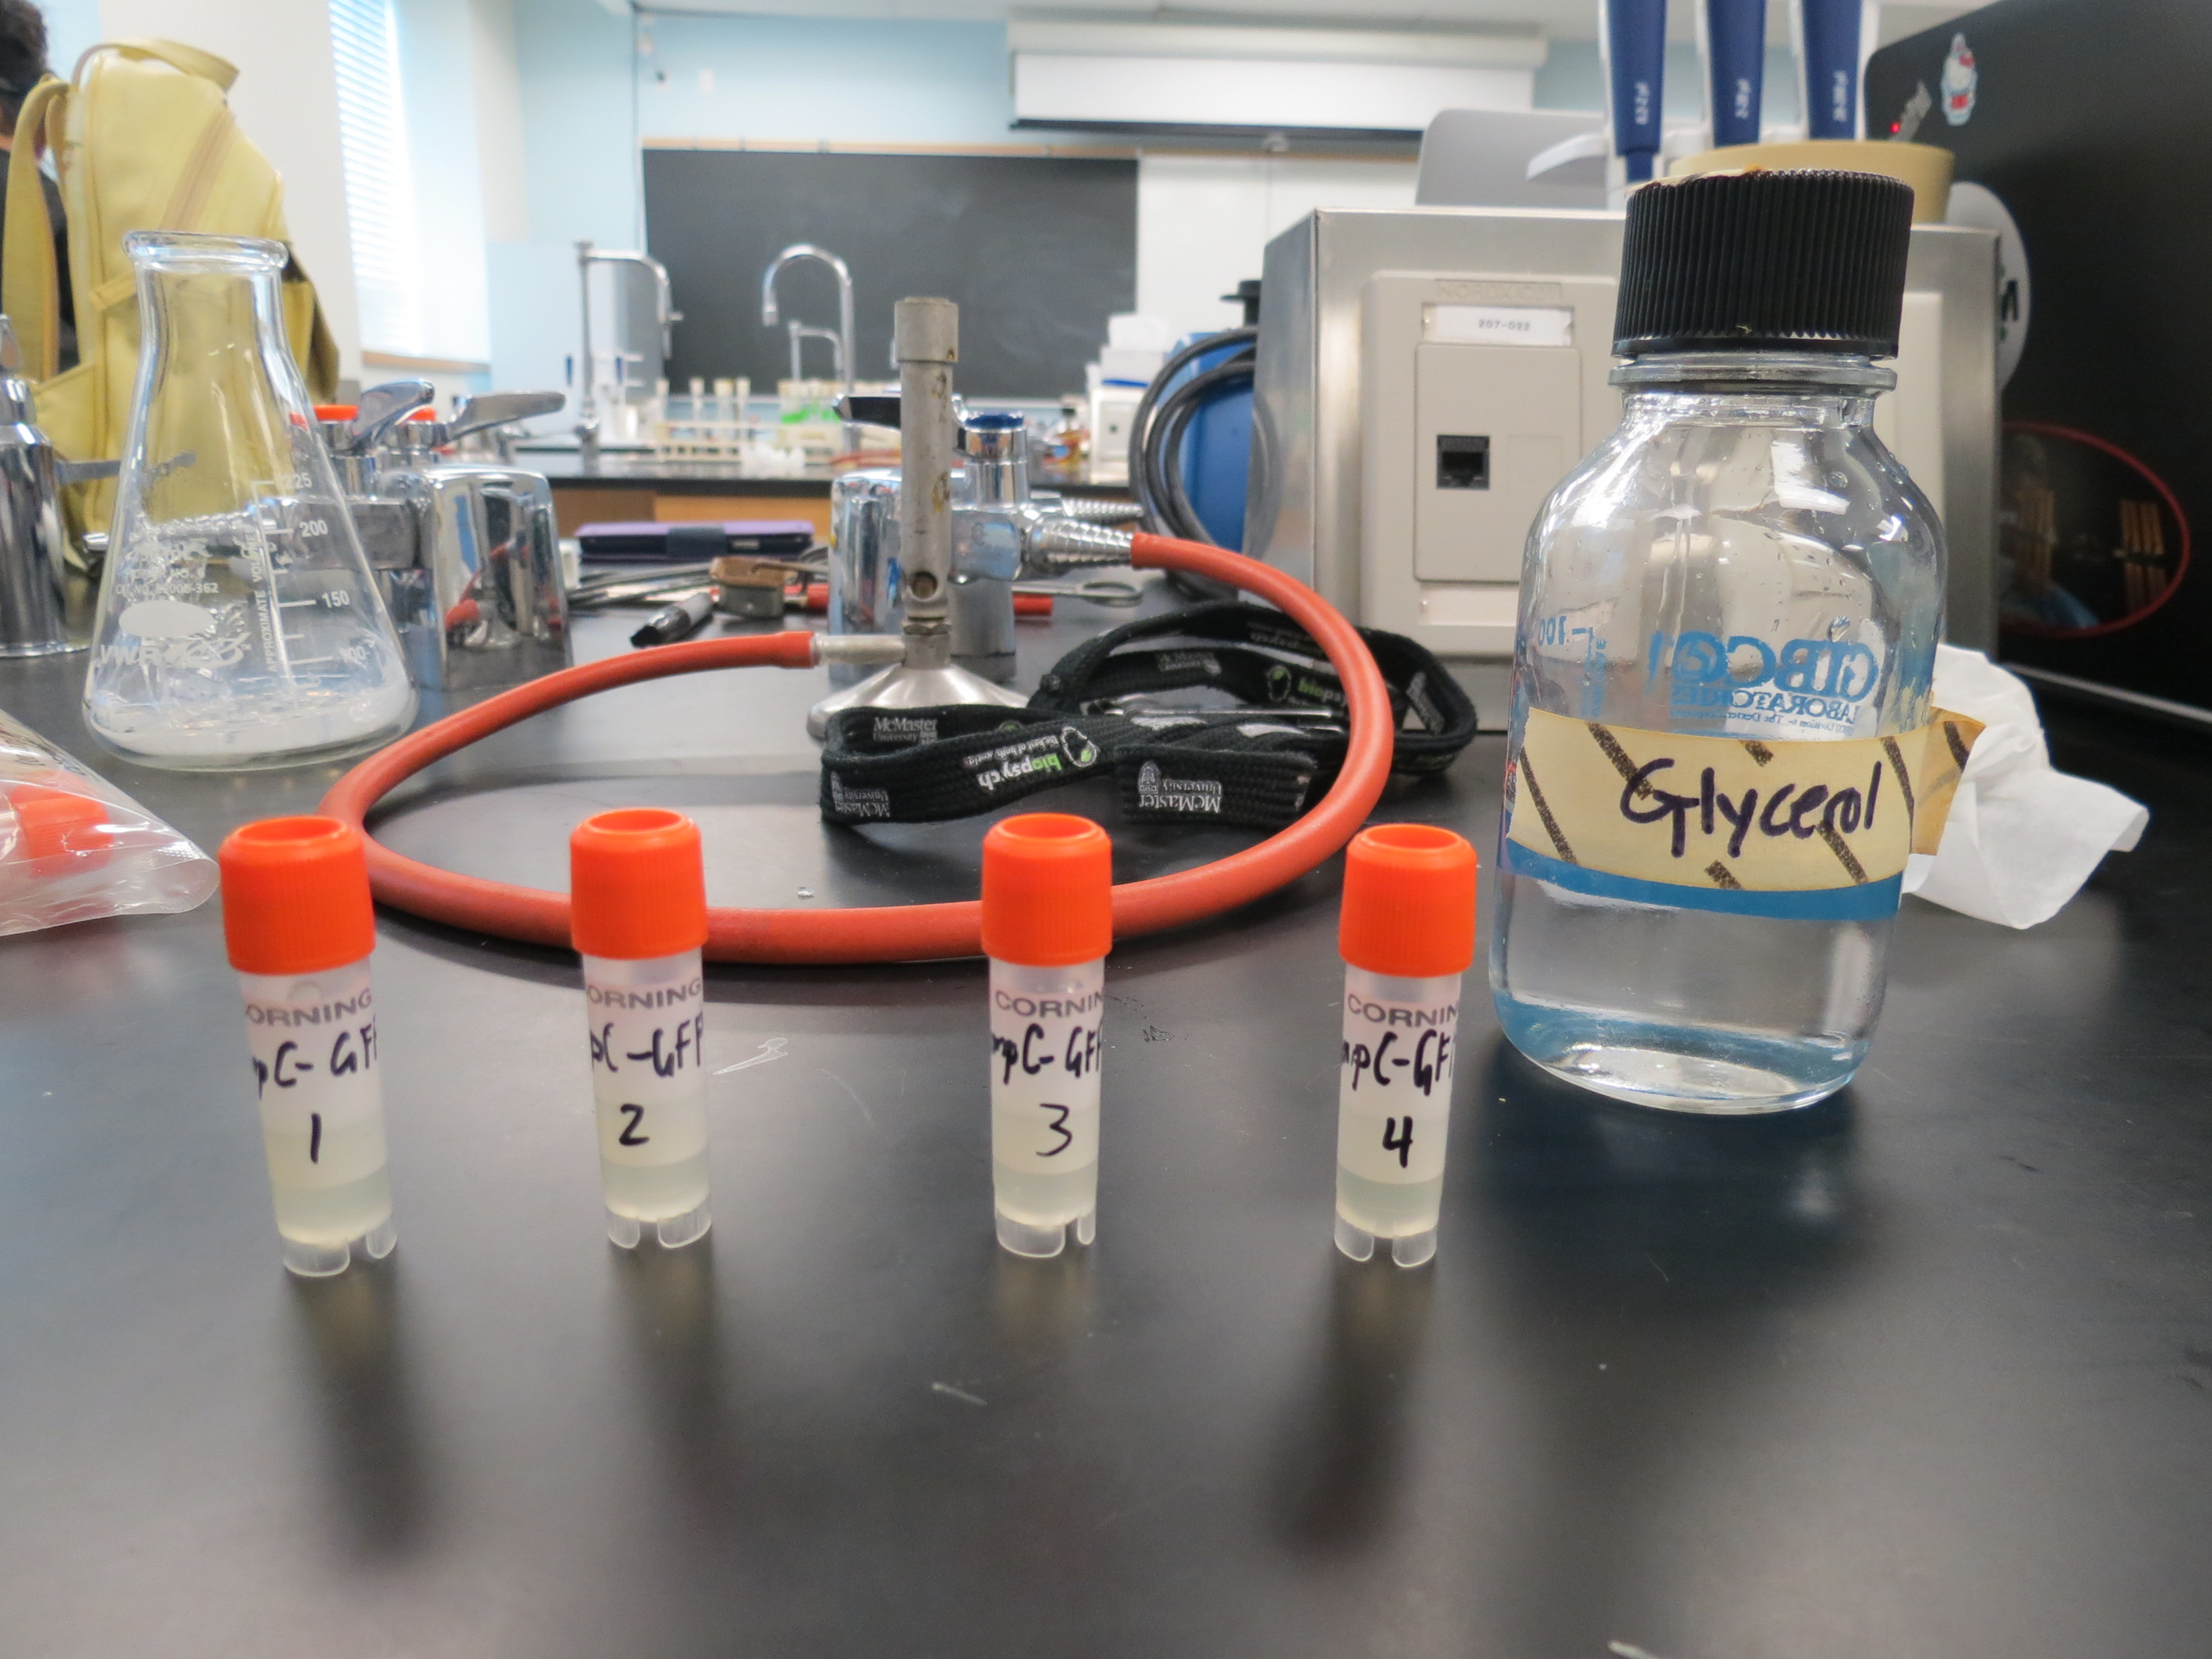
Using a large pipette tip, add 250 μL of dH2O (nuclease-free water) to the tube. Take a new large tip and cut a bit off its end. Glycerol is very viscous and will not be sucked up easily with only a small opening (it will, but it can take some time). Then add 250 μL of 100% glycerol to the tube. Close the tube and shake-invert the tube a few times to ensure homogeneous mixing. This will create 500μL of 50% glycerol in the stock tube.
However, please note that glycerol can be a tricky substance to work with! Unlike water, which is happy to stay in the micropipette tip, glycerol is very impatient and will immediately begin to seep out of the pipette. So you must act quickly!
2. Adding the bacteria Add 500μL of the overnight culture to the tube with 500μL 50% glycerol. Close the tube and gently invert and couple of times to mix the solution.
3. Store and do not forget Place the tubes promptly into the glycerol tube holder in the -80°C freezer. Do not forget about them! Although this isn’t like some sandwich that will grow mold in a few days, it’s important to note what has been stored in the freezer, both on the tube (permanent marker) as well as in the lab notebook, and even on the freezer inventory list if available. Once you’ve stored and written them down, you can now rest peacefully with the knowledge that your backups are stored well (at least for a couple of years).

Summary
Wooaah that was a long post! Kudos if you read it all! If you skimmed over it, no problem, here’s a summary table to compile all the most important bits:
-
Streaking
Zone of sterility Sterilize inocultion loop Cool loop Pick bacterial speck Streak Incubate -
Overnight Cultures
Add fluid to tube Insert single colony Incubate for 24h -
Glycerol Stocks
 Create/obtain 500μL of 50% glycerol
 Add 500μL of overnight culture bacteria stock
 Store at -80°C