Difference between revisions of "Team:Freiburg/Project/System"
| (64 intermediate revisions by 11 users not shown) | |||
| Line 2: | Line 2: | ||
{{Freiburg/Menubar}} | {{Freiburg/Menubar}} | ||
| − | {{Freiburg/ | + | {{Team:Freiburg/wiki_content_start_bubble}} |
<html> | <html> | ||
<style> | <style> | ||
| Line 18: | Line 18: | ||
} | } | ||
/*========= END: style for navigation bar ==========*/ | /*========= END: style for navigation bar ==========*/ | ||
| + | |||
| + | .link_button { | ||
| + | /*margin: 0px auto;*/ | ||
| + | padding: 0px 5px 0px 10px; | ||
| + | width: 200px; | ||
| + | line-height: 16px; | ||
| + | text-align: center; | ||
| + | background-color: #888; | ||
| + | font-size: 14pt; | ||
| + | border-radius: 2px; | ||
| + | color: #FFF; | ||
| + | opacity: 0.8; | ||
| + | box-shadow: 1px 1px 1px 2px #777; | ||
| + | } | ||
| + | |||
| + | .link_button a:hover { | ||
| + | text-decoration: underline; | ||
| + | } | ||
| + | |||
| + | .link_button a { | ||
| + | color: #FFF; | ||
| + | } | ||
| + | |||
| + | .link_button_arrow{ | ||
| + | background-image: url("https://static.igem.org/mediawiki/2015/f/ff/Freiburg_submenu_arrow.png"); | ||
| + | background-repeat: no-repeat; | ||
| + | background-position: 3% 50%; | ||
| + | background-size: 10px 13px; | ||
| + | } | ||
| + | |||
| + | |||
| + | /* ========== Style for animated box ========== */ | ||
| + | |||
| + | .hovertext{ | ||
| + | visibility: hidden; | ||
| + | opacity: 0; | ||
| + | position: absolute; | ||
| + | font-size: 120%; | ||
| + | font-weight: 500; | ||
| + | color: #0051A2; | ||
| + | transition: opacity 0.5s ease-in; | ||
| + | } | ||
| + | |||
| + | #DNA:hover + #DNA_label { | ||
| + | transform: translateY(-2.6em); | ||
| + | opacity: 1; | ||
| + | visibility: visible; | ||
| + | } | ||
| + | |||
| + | #cellfree:hover + #cellfree_label { | ||
| + | transform: translateY(-2.6em); | ||
| + | opacity: 1; | ||
| + | visibility: visible; | ||
| + | } | ||
| + | |||
| + | #protpur:hover + #protpur_label { | ||
| + | transform: translateY(-2.6em); | ||
| + | opacity: 1; | ||
| + | visibility: visible; | ||
| + | } | ||
| + | |||
| + | #surchem:hover + #surchem_label { | ||
| + | transform: translateY(-2.6em); | ||
| + | opacity: 1; | ||
| + | visibility: visible; | ||
| + | } | ||
| + | |||
| + | #irif:hover + #irif_label { | ||
| + | transform: translateY(-2.6em); | ||
| + | opacity: 1; | ||
| + | visibility: visible; | ||
| + | } | ||
| + | |||
| + | #DNA{ | ||
| + | left: 380px; | ||
| + | top: 0; | ||
| + | } | ||
| + | |||
| + | #cellfree{ | ||
| + | left: 340px; | ||
| + | top: 90px; | ||
| + | } | ||
| + | |||
| + | #protpur{ | ||
| + | left: 80px; | ||
| + | top: 100px; | ||
| + | } | ||
| + | |||
| + | #surchem{ | ||
| + | left: 230px; | ||
| + | top: 150px; | ||
| + | } | ||
| + | |||
| + | #irif{ | ||
| + | left: 80px; | ||
| + | top: 215px; | ||
| + | } | ||
| + | |||
| + | .circle:hover{ | ||
| + | -webkit-transition: all ease-in 0.1s; | ||
| + | -moz-transition: all ease-in 0.1s; | ||
| + | -o-transition: all ease-in 0.1s; | ||
| + | transition: all ease-in 0.1s; | ||
| + | |||
| + | background-color: rgba(255,255,255, 0.5); | ||
| + | } | ||
| + | |||
| + | .circle{ | ||
| + | -webkit-transition: all ease-in 0.1s; | ||
| + | -moz-transition: all ease-in 0.1s; | ||
| + | -o-transition: all ease-in 0.1s; | ||
| + | transition: all ease-in 0.1s; | ||
| + | |||
| + | width: 60px; | ||
| + | height: 60px; | ||
| + | border-radius: 50px; | ||
| + | border: 3px solid #0051A2; | ||
| + | position: absolute; | ||
| + | } | ||
| + | |||
| + | .link_image{ | ||
| + | position: relative; | ||
| + | } | ||
| + | |||
| + | .flexbox p{ | ||
| + | margin-bottom: 0; | ||
| + | } | ||
| + | |||
| + | /* ========== END: Style for animated box ========== */ | ||
| + | |||
</style> | </style> | ||
| + | |||
| + | <script type="text/javascript"> | ||
| + | //===================BEGIN:Amazing Bubble Sidebar========================== | ||
| + | |||
| + | $(document).ready(function(){ | ||
| + | // CHANGE THE FOLLOWING ATTRIBUTES // | ||
| + | var href_text1='https://2015.igem.org/Team:Freiburg/Project/Overview', | ||
| + | // Text2 needs no href as it is the actual page // | ||
| + | img_url='https://static.igem.org/mediawiki/2015/7/76/Freiburg_icon_project_white_03.png', | ||
| + | href_text3='https://2015.igem.org/Team:Freiburg/Design', | ||
| + | // Text1 needs no text as it is a pic // | ||
| + | text2='Project Overview'; | ||
| + | // Text3 needs no text as its always 'next' // | ||
| + | // HOLD ON CHANGING THINGS --JABBERWOCK // | ||
| + | |||
| + | $('#bubble1').attr('href',href_text1); | ||
| + | $('#bubble1_img').attr('src', img_url); | ||
| + | $('#bubble3').attr('href',href_text3); | ||
| + | |||
| + | $('#bubble2').text(text2); | ||
| + | }); | ||
| + | |||
| + | //===================END:Amazing Bubble Sidebar========================== | ||
| + | </script> | ||
| + | <script type="text/javascript"> | ||
| + | |||
| + | $(window).scroll(resizeslider); | ||
| + | $(window).resize(resizeslider); | ||
| + | |||
| + | function resizeslider(event){ | ||
| + | |||
| + | var assemblyImage = document.getElementById("assembly_image"); | ||
| + | var assembly_width = assemblyImage.clientWidth; | ||
| + | var assembly_height = assemblyImage.clientHeight; | ||
| + | |||
| + | var assembly_DNA_circ = document.getElementById("DNA"); | ||
| + | var assembly_cellfree_circ = document.getElementById("cellfree"); | ||
| + | var assembly_protpur_circ = document.getElementById("protpur"); | ||
| + | var assembly_surchem_circ = document.getElementById("surchem"); | ||
| + | var assembly_irif_circ = document.getElementById("irif"); | ||
| + | |||
| + | |||
| + | console.log('assembly_width'+assembly_width); | ||
| + | |||
| + | assembly_DNA_circ.style.left = 380*assembly_width/470 + "px"; | ||
| + | assembly_DNA_circ.style.top = 0*assembly_height/293 + "px"; | ||
| + | |||
| + | assembly_cellfree_circ.style.left = 340*assembly_width/470 + "px"; | ||
| + | assembly_cellfree_circ.style.top = 90*assembly_height/293 + "px"; | ||
| + | |||
| + | assembly_protpur_circ.style.left = 80*assembly_width/470 + "px"; | ||
| + | assembly_protpur_circ.style.top = 100*assembly_height/293 + "px"; | ||
| + | |||
| + | assembly_surchem_circ.style.left = 230*assembly_width/470 + "px"; | ||
| + | assembly_surchem_circ.style.top = 150*assembly_height/293 + "px"; | ||
| + | |||
| + | assembly_irif_circ.style.left = 80*assembly_width/470 + "px"; | ||
| + | assembly_irif_circ.style.top = 215*assembly_height/293 + "px"; | ||
| + | |||
| + | $(".circle").css("width", ""+assembly_width/9); | ||
| + | $(".circle").css("height", ""+assembly_width/9); | ||
| + | $(".circle").css("border-radius", "100px"); | ||
| + | |||
| + | $('.hovertext').css({"font-size": 120*assembly_width/470 + "%"}); | ||
| + | } | ||
| + | |||
| + | </script> | ||
| + | |||
| + | |||
| − | |||
<div class="content_box"> | <div class="content_box"> | ||
| + | |||
| + | <h1>The DiaCHIP - Overview</h1> | ||
| − | < | + | <p> |
| − | + | Our DiaCHIP is a novel diagnostic device that offers the possibility for broadband screening of hundreds of diseases simultaneously. It is made up of an antigen array in a microfluidic chamber and can detect diseases via binding of corresponding antibodies. The antigens are fused to a tag and are produced with a cell-free expression mix, using a DNA array as template. The expressed antigens are arranged in an array structure, using a specific surface to stick them to a glass slide. Binding of antibodies can be detected with an optical method, thus providing the possibility of a label-free and real-time analysis. | |
| − | + | </p> | |
| − | <div class=" | + | <h2>The Backgrounds of the DiaCHIP </h2> |
| − | + | ||
| − | + | <div class="flexbox" style="margin-top: 3.5em;"> | |
| − | + | <div id="Projectgroups" class="link_image"> | |
| − | + | <a href="https://2015.igem.org/Team:Freiburg/Project/DNA_Engineering" id="DNA" class="circle"></a> | |
| − | - | + | <div class="hovertext" id="DNA_label">DNA Engineering</div> |
| − | + | <a href="https://2015.igem.org/Team:Freiburg/Project/Cellfree_Expression" id="cellfree" class="circle"></a> | |
| − | + | <div class="hovertext" id="cellfree_label">Cell-free Expression</div> | |
| − | + | <a href="https://2015.igem.org/Team:Freiburg/Project/Protein_Purification" id="protpur" class="circle"></a> | |
| − | + | <div class="hovertext" id="protpur_label">Protein Purification</div> | |
| − | + | <a href="https://2015.igem.org/Team:Freiburg/Project/Surface_Chemistry" id="surchem" class="circle"></a> | |
| + | <div class="hovertext" id="surchem_label">Surface Chemistry</div> | ||
| + | <a href="https://2015.igem.org/Team:Freiburg/Project/iRIf" id="irif" class="circle"></a> | ||
| + | <div class="hovertext" id="irif_label">iRIf</div> | ||
| + | <img id="assembly_image" src="https://static.igem.org/mediawiki/2015/0/0f/Freiburg_homepage_chip_blood.png" width="100%"> | ||
| + | </div> | ||
</div> | </div> | ||
| + | |||
| + | |||
| + | |||
| + | <div> | ||
| + | <h2>Step 1: Basic Setup of the DiaCHIP</h2> | ||
| + | |||
| + | <div class="image_box right"> | ||
| + | |||
| + | <div class="thumb2 trien" style="width:310px"> | ||
| + | |||
| + | <div class="thumbinner"> | ||
| + | |||
| + | <a href="https://static.igem.org/mediawiki/2015/5/55/Freiburg_generaloverview_RJ.jpeg" class="lightbox_trigger"> | ||
| + | |||
| + | <img src="https://static.igem.org/mediawiki/2015/f/f0/Freiburg_generaloverview_RJ_preview.jpeg" width="300px"> | ||
| + | |||
| + | <div class="thumbcaption"> | ||
| + | |||
| + | </a> | ||
| + | |||
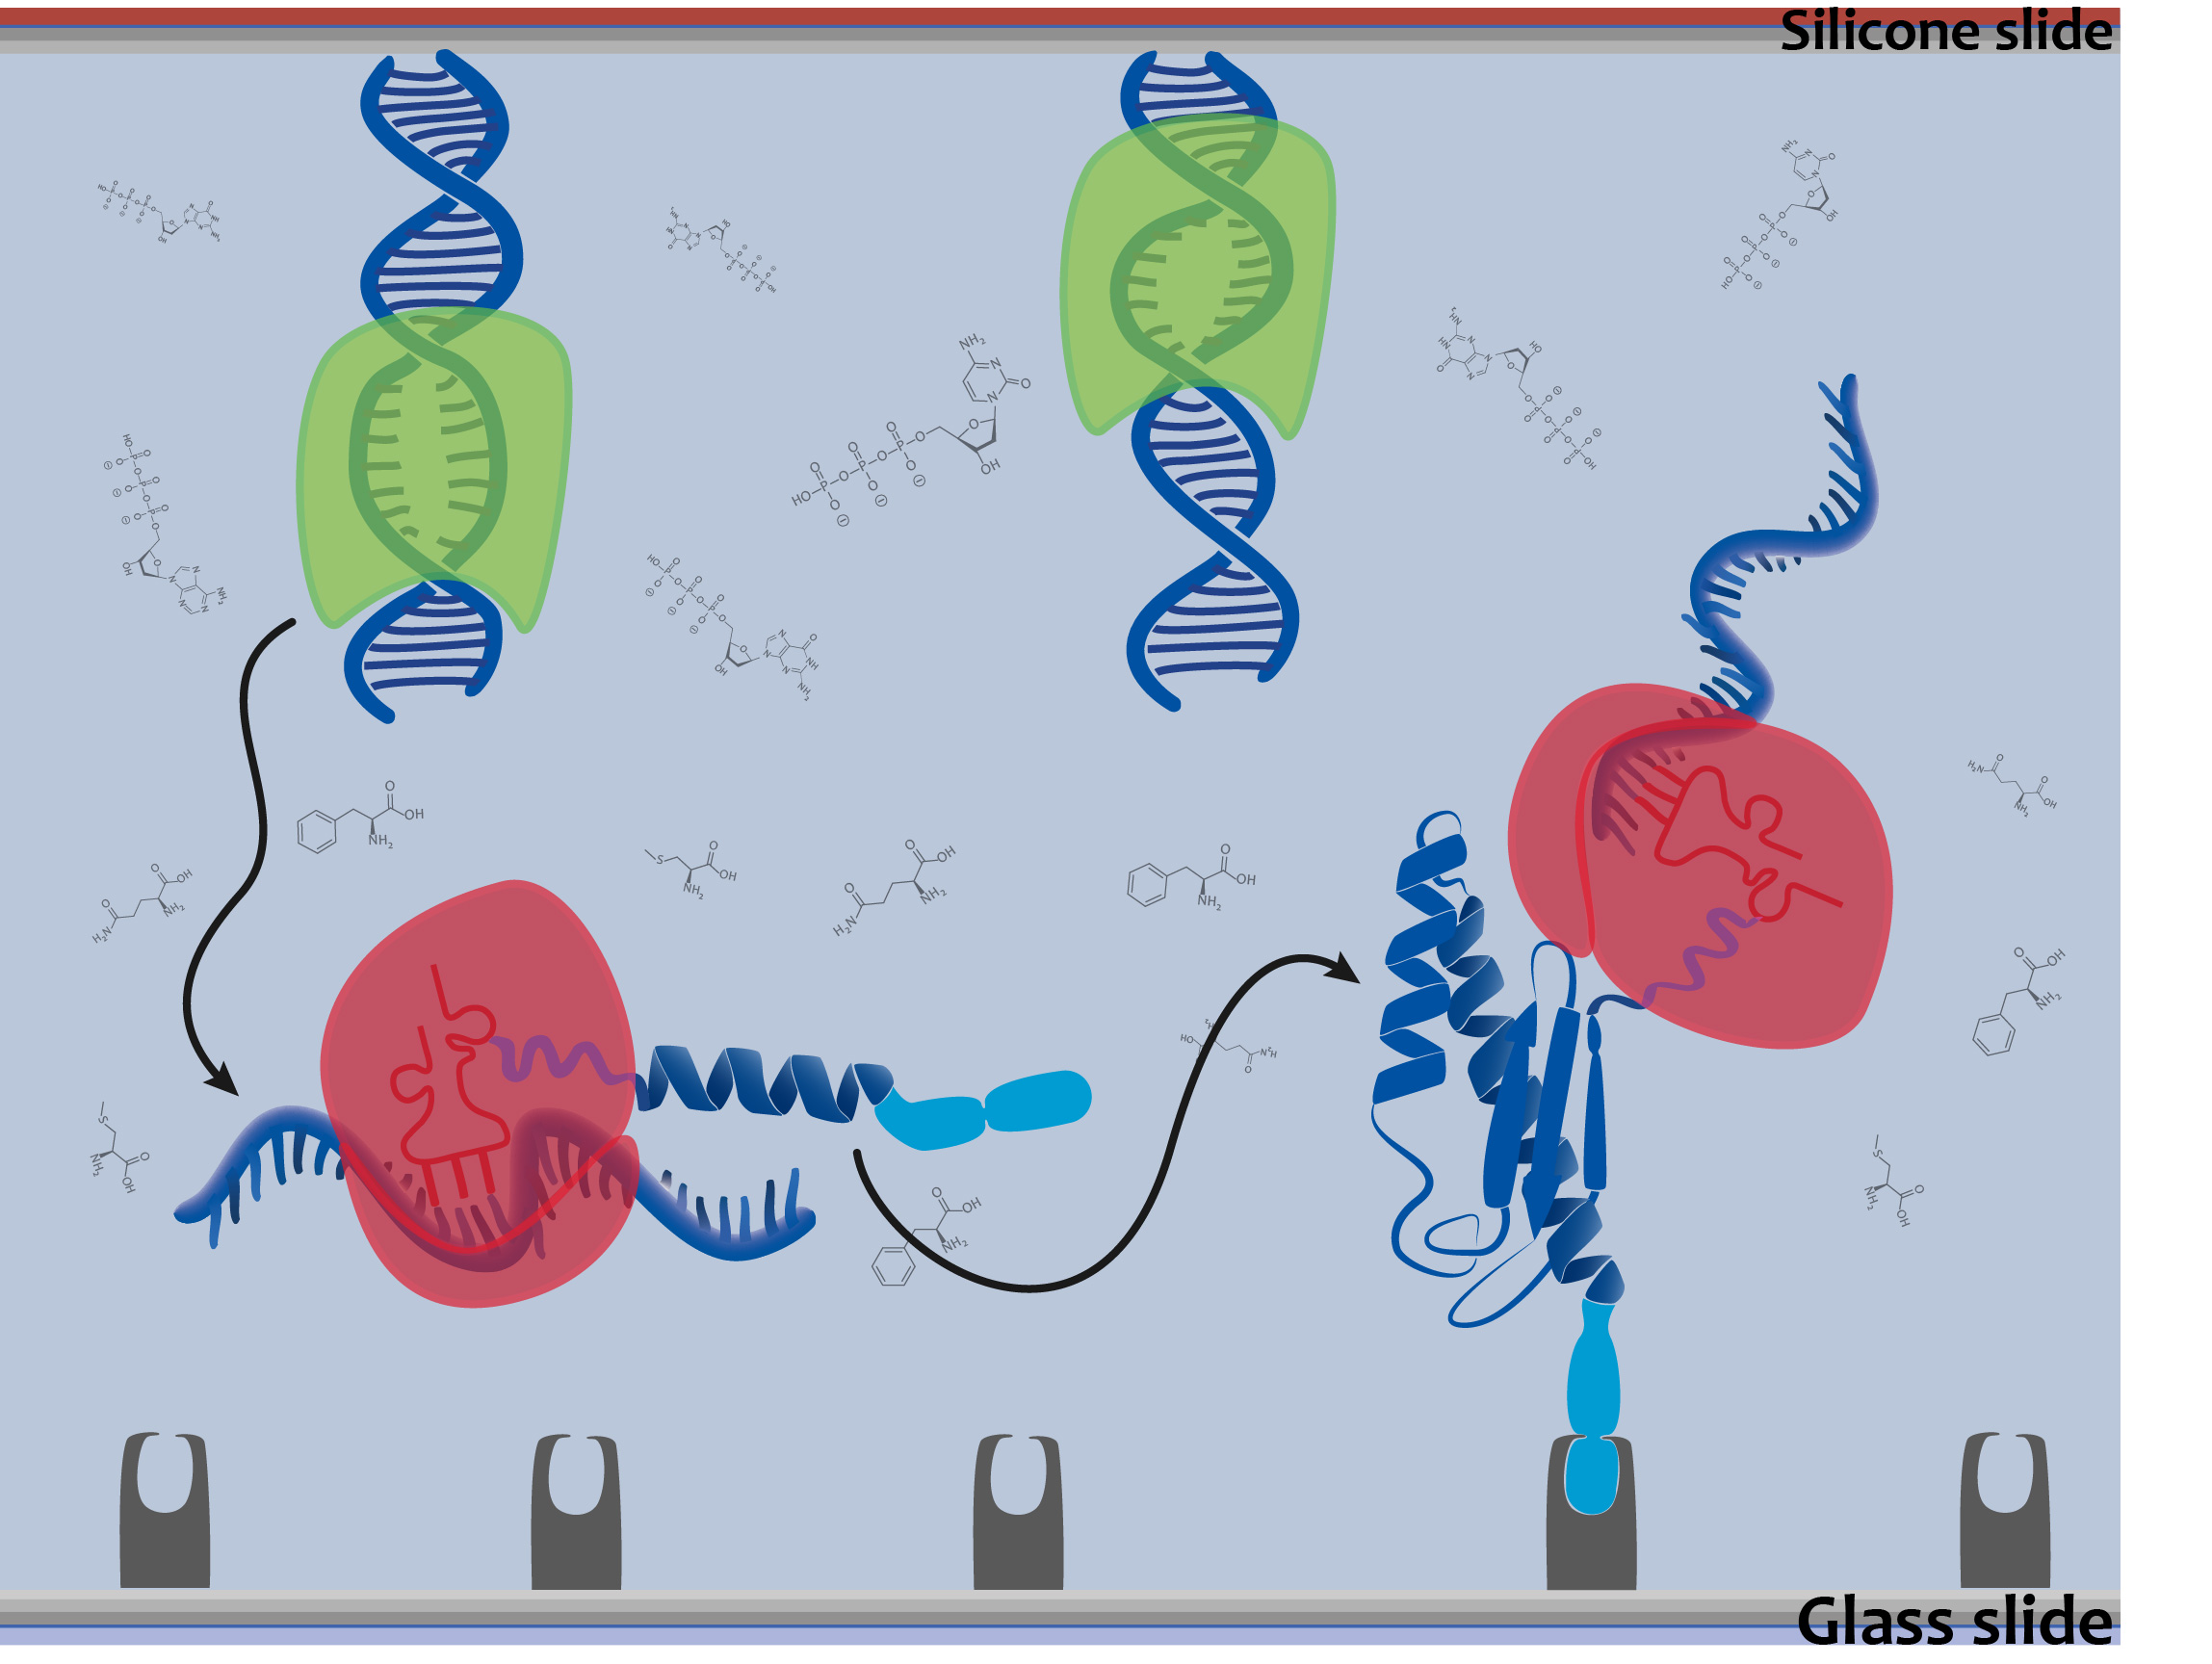
| + | <p><strong>Figure 1: The DiaCHIP is based on antigenic peptides derived from viruses and bacteria.</strong> DNA is immobilized on a silicone slide. These sequences are coding for antigens specific for several pathogens. The antigens are expressed by cell-free expression and immobilized on the glass slide.</p> | ||
| + | |||
| + | </div> | ||
| + | |||
| + | </div> | ||
| + | </div> | ||
| + | </div> | ||
| + | |||
<p> | <p> | ||
| − | + | The aim of our DiaCHIP is to screen simultaneously for hundreds of different infectious diseases. We based our system on the <b>detection of antibodies</b> specifically interacting with antigens derived from viruses and bacteria (figure 1). The antigens are produced by <b>using a DNA array</b> as template. The binding of antibodies to their corresponding antigens can be detected with a <b>label-free detection</b> method. | |
| − | + | ||
| − | + | Our setup is based on two components: a <b>silicone slide</b> where DNA coding for distinct antigenic peptides is immobilized and a <b>glass slide</b> with a <b>specific surface</b> to bind antigens. Both are about the size of a microscopy slide and form a microfluidic chamber. The antigens are expressed on demand by cell-free expression from the DNA array. | |
| − | + | ||
| − | + | ||
| − | + | ||
| − | + | ||
</p> | </p> | ||
| + | </div> | ||
| + | |||
| + | <div class="float_barrier"></div> | ||
| + | |||
| + | <div> | ||
| + | <h2>Step 2: Cell-Free Expressed Proteins</h2> | ||
| + | |||
| + | <div class="image_box right"> | ||
| + | |||
| + | <div class="thumb2 trien" style="width:310px"> | ||
| + | |||
| + | <div class="thumbinner"> | ||
| + | |||
| + | <a href="https://static.igem.org/mediawiki/2015/e/ee/Freiburg_overviewcellfree_RJ.jpg" class="lightbox_trigger"> | ||
| + | |||
| + | <img src="https://static.igem.org/mediawiki/2015/e/e5/Freiburg_overviewcellfree_RJ_preview.jpg" width="300px"> | ||
| + | |||
| + | <div class="thumbcaption"> | ||
| + | |||
| + | </a> | ||
| + | |||
| + | <p><strong>Figure 2: The expression of the antigens is achieved by our cell-free expression mix.</strong> This mix is based on a bacterial lysate and contains all components required for transcription and translation of the DNA sequences.</p> | ||
| + | |||
| + | </div> | ||
| + | |||
| + | </div> | ||
| − | |||
| − | |||
</div> | </div> | ||
| − | |||
| − | |||
| − | |||
</div> | </div> | ||
| − | <b> | + | <p> |
| − | <div class=" | + | To enable the production of a <b>protein array</b> consisting of multiple antigens on demand, their expression is mediated by cell-free expression from a <a href="https://2015.igem.org/Team:Freiburg/Results/protpur"target="_blank">template DNA array</a>. This expression system is based on bacterial lysate and makes the need for genetically engineered organisms to produce every single antigen redundant. |
| − | + | The protein array is generated by flushing <a href="https://2015.igem.org/Team:Freiburg/Results/Cellfree"target="_blank">our cell-free expression mix</a> through the microfluidic setup. Expressed antigens diffuse inside the system and immobilize on the opposite site of the DNA template (figure 2). Expressing the antigens from the DNA template, the protein array is adaptable to individual requirements exhibiting the same pattern for both arrays. | |
| + | </p> | ||
| + | |||
| + | <div class="flexbox"> | ||
| + | <div class="link_button link_button_arrow left"> | ||
| + | <p class="left"><a href="https://2015.igem.org/Team:Freiburg/Project/Cellfree_Expression" title="cell-free expression Overview">Details on Cell-Free</a></p> | ||
| + | </div> | ||
| + | |||
| + | <div class="link_button link_button_arrow right"> | ||
| + | <p class="right"><a href="https://2015.igem.org/Team:Freiburg/Results/Cellfree" title="System Overview">Cell-Free Results</a></p> | ||
| + | </div> | ||
</div> | </div> | ||
| + | </div> | ||
| + | |||
| + | <div class="float_barrier"></div> | ||
<p> | <p> | ||
| − | + | <h2>Step 3: A Specific Surface is Binding the Expressed Protein</h2> | |
| − | + | ||
| − | + | <div class="image_box right"> | |
| − | + | ||
| − | + | <div class="thumb2 trien" style="width:250px"> | |
| − | + | ||
| − | + | <div class="thumbinner"> | |
| − | + | ||
| + | <a href="https://static.igem.org/mediawiki/2015/7/79/Freiburg_specific_surface_RJ.jpg" class="lightbox_trigger"> | ||
| + | |||
| + | <img src="https://static.igem.org/mediawiki/2015/0/03/Freiburg_specific_surface_RJ_preview.jpg" width="300px"> | ||
| + | |||
| + | <div class="thumbcaption"> | ||
| + | |||
| + | </a> | ||
| + | |||
| + | <p><strong>Figure 3: Specific protein immobilization.</strong> To prevent unspecific binding of components of the cell-free expression mix on the glass slide, we established a surface that specifically binds our target proteins, the antigens.</p> | ||
| + | |||
| + | </div> | ||
| + | |||
| + | |||
| + | </div> | ||
| + | </div> | ||
| + | </div> | ||
| + | |||
</p> | </p> | ||
<p> | <p> | ||
| − | + | After cell-free expression not only our desired antigens are present within the chamber, but also all <b>other components</b> of the cell-free mix including ribosomes, polymerases and amino acids (figure 3). | |
| − | + | All these components could <b>bind unspecifically</b> to the glass slide, thereby obstructing the binding of the antigens. To bind proteins specifically, we fused them with affinity tags. We designed our DNA constructs in a way that each antigen can easily be fused to specific tags. Testing different tag systems, we identified the Ni-NTA-His-tag system to be working best for our purposes. (A basic protocol for this <a href="https://2015.igem.org/Team:Freiburg/Results/Surface"target="_blank">specific surface</a> was optimized by us to reduce unspecific binding.) | |
| − | + | ||
| − | + | ||
| − | + | ||
| − | + | <div class="flexbox"> | |
| + | <div class="link_button link_button_arrow"> | ||
| + | <p><a href="https://2015.igem.org/Team:Freiburg/Project/Surface_Chemistry">Specific Surfaces</a></p> | ||
| + | </div> | ||
| + | |||
| + | <div class="link_button link_button_arrow"> | ||
| + | <p><a href="https://2015.igem.org/Team:Freiburg/Results/Surface">Binding on Surface</a></p> | ||
| + | </div> | ||
| + | </div> | ||
</p> | </p> | ||
| + | |||
| + | |||
| + | <div class="float_barrier"></div> | ||
| + | <p> | ||
| + | <h2>Step 4: The Measurement of Binding Events</h2> | ||
| + | |||
| + | <div class="image_box right"> | ||
| + | <div class="thumb2 trien" style="width:310px"> | ||
| + | |||
| + | <div class="thumbinner"> | ||
| + | |||
| + | <a href="https://static.igem.org/mediawiki/2015/5/56/Freiburg_iRiF_overview_RJ.jpg" class="lightbox_trigger"> | ||
| + | |||
| + | <img src="https://static.igem.org/mediawiki/2015/9/9a/Freiburg_iRiF_overview_RJ_preview.jpg" width="300px"> | ||
| + | |||
| + | <div class="thumbcaption"> | ||
| + | |||
| + | </a> | ||
| + | |||
| + | <p><strong>Figure 4: Optical detection method.</strong> The detection system mainly consists of a camera and an LED and is called <a href="https://2015.igem.org/Team:Freiburg/Project/iRIf"target="_blank">iRIf</a> (imaging Reflectometric Interference). Antigen-Antibody interactions can be detected label-free and in real-time. An optical output of such binding events is generated by a minimal change in the thickness of the layer on the slide right at the corresponding antigen spot.</p> | ||
| + | </div> | ||
| + | |||
| + | </div> | ||
| + | </div> | ||
| + | </div> | ||
| + | </p> | ||
| + | |||
| + | <p> | ||
| + | The binding of antibodies to the corresponding surface causes a minimal <b>change in the thickness</b> of the layer on the slide just at the corresponding antigen spot. This binding can be detected label-free and in real-time using a novel technique called <a href="https://2015.igem.org/Team:Freiburg/Project/iRIf"target="_blank">iRIf</a> (imaging Reflectometric Interference) without the need for further labeling. Its main components are a camera, an LED and two lenses. | ||
| + | See how we reconstructed the system in a low-budget device. | ||
| + | |||
| + | <div class="flexbox"> | ||
| + | <div class="link_button link_button_arrow"> | ||
| + | <p><a href="https://2015.igem.org/Team:Freiburg/Project/iRIf" title="Basics behind irif">The Basics behind iRIf</a></p> | ||
| + | </div> | ||
| + | |||
| + | |||
| + | <div class="link_button link_button_arrow"> | ||
| + | <p><a href="https://2015.igem.org/Team:Freiburg/Results/Own_Device" title="Building our device">Building Our Device</a></p> | ||
| + | </div> | ||
| + | </div> | ||
| + | </p> | ||
| + | |||
| + | |||
| + | <div class="float_barrier"></div> | ||
| + | <p> | ||
| + | <h2>Step 5: Changing Perspectives - How are Antibody-Antigen Interactions Visualized? </h2> | ||
| + | |||
| + | <div class="image_box right"> | ||
| + | <div class="thumb2 trien" style="width:310px"> | ||
| + | <div class="thumbinner"> | ||
| + | <a href="https://static.igem.org/mediawiki/2015/9/93/Freiburg_changeperspective.jpeg" class="lightbox_trigger"> | ||
| + | <img src="https://static.igem.org/mediawiki/2015/8/8f/Freiburg_changeperspective_preview.jpg" width="300px"> | ||
| + | </a> | ||
| + | <div class="thumbcaption"> | ||
| + | <p><strong>Figure 5: Illustration of the perspective during a measurement.</strong> After the DiaCHIP system was introduced by looking at the chip from the side, the perspective is switched to a top view for studying the results. </p> | ||
| + | </div> | ||
| + | </div> | ||
| + | </div> | ||
| + | </div> | ||
| + | </p> | ||
| + | |||
| + | <p> | ||
| + | When illustrating the basic principle of the DiaCHIP, we mainly looked at it <b>from the side</b>. Now it is time to <a href="https://2015.igem.org/Team:Freiburg/Results">explore our results</a> and see what we actually achieved. Therefore, it is important to have in mind that you are observing the chip from the camera's position, so basically <b>from the top</b> (figure 5). This perspective remains the same in all the <a href="https://2015.igem.org/Team:Freiburg/Results/Diagnostics">iRIf measurements</a> we are showing in the results section. | ||
| + | </p> | ||
| + | |||
| + | <div> | ||
| + | <p> | ||
| + | After months of engineering and optimizing the different components of the DiaCHIP, we reached the highlight of our project with the successful <a href="https://2015.igem.org/Team:Freiburg/Results">detection of antibodies in our own blood!</a> | ||
| + | </p> | ||
| + | </div> | ||
| + | |||
</div> <!-- end level1 --> | </div> <!-- end level1 --> | ||
</div> <!-- end content_box --> | </div> <!-- end content_box --> | ||
Latest revision as of 01:45, 19 September 2015


The DiaCHIP - Overview
Our DiaCHIP is a novel diagnostic device that offers the possibility for broadband screening of hundreds of diseases simultaneously. It is made up of an antigen array in a microfluidic chamber and can detect diseases via binding of corresponding antibodies. The antigens are fused to a tag and are produced with a cell-free expression mix, using a DNA array as template. The expressed antigens are arranged in an array structure, using a specific surface to stick them to a glass slide. Binding of antibodies can be detected with an optical method, thus providing the possibility of a label-free and real-time analysis.
The Backgrounds of the DiaCHIP

Step 1: Basic Setup of the DiaCHIP

The aim of our DiaCHIP is to screen simultaneously for hundreds of different infectious diseases. We based our system on the detection of antibodies specifically interacting with antigens derived from viruses and bacteria (figure 1). The antigens are produced by using a DNA array as template. The binding of antibodies to their corresponding antigens can be detected with a label-free detection method. Our setup is based on two components: a silicone slide where DNA coding for distinct antigenic peptides is immobilized and a glass slide with a specific surface to bind antigens. Both are about the size of a microscopy slide and form a microfluidic chamber. The antigens are expressed on demand by cell-free expression from the DNA array.
Step 2: Cell-Free Expressed Proteins
To enable the production of a protein array consisting of multiple antigens on demand, their expression is mediated by cell-free expression from a template DNA array. This expression system is based on bacterial lysate and makes the need for genetically engineered organisms to produce every single antigen redundant. The protein array is generated by flushing our cell-free expression mix through the microfluidic setup. Expressed antigens diffuse inside the system and immobilize on the opposite site of the DNA template (figure 2). Expressing the antigens from the DNA template, the protein array is adaptable to individual requirements exhibiting the same pattern for both arrays.
Step 3: A Specific Surface is Binding the Expressed Protein

After cell-free expression not only our desired antigens are present within the chamber, but also all other components of the cell-free mix including ribosomes, polymerases and amino acids (figure 3). All these components could bind unspecifically to the glass slide, thereby obstructing the binding of the antigens. To bind proteins specifically, we fused them with affinity tags. We designed our DNA constructs in a way that each antigen can easily be fused to specific tags. Testing different tag systems, we identified the Ni-NTA-His-tag system to be working best for our purposes. (A basic protocol for this specific surface was optimized by us to reduce unspecific binding.)
Step 4: The Measurement of Binding Events

Figure 4: Optical detection method. The detection system mainly consists of a camera and an LED and is called iRIf (imaging Reflectometric Interference). Antigen-Antibody interactions can be detected label-free and in real-time. An optical output of such binding events is generated by a minimal change in the thickness of the layer on the slide right at the corresponding antigen spot.
The binding of antibodies to the corresponding surface causes a minimal change in the thickness of the layer on the slide just at the corresponding antigen spot. This binding can be detected label-free and in real-time using a novel technique called iRIf (imaging Reflectometric Interference) without the need for further labeling. Its main components are a camera, an LED and two lenses. See how we reconstructed the system in a low-budget device.
Step 5: Changing Perspectives - How are Antibody-Antigen Interactions Visualized?

Figure 5: Illustration of the perspective during a measurement. After the DiaCHIP system was introduced by looking at the chip from the side, the perspective is switched to a top view for studying the results.
When illustrating the basic principle of the DiaCHIP, we mainly looked at it from the side. Now it is time to explore our results and see what we actually achieved. Therefore, it is important to have in mind that you are observing the chip from the camera's position, so basically from the top (figure 5). This perspective remains the same in all the iRIf measurements we are showing in the results section.
After months of engineering and optimizing the different components of the DiaCHIP, we reached the highlight of our project with the successful detection of antibodies in our own blood!


