|
|
| Line 1: |
Line 1: |
| | {{Freiburg/CSS}} | | {{Freiburg/CSS}} |
| | {{Freiburg/Menubar}} | | {{Freiburg/Menubar}} |
| − | {{Freiburg/wiki_content_start}}
| |
| − | <!-- wiki content goes in here -->
| |
| | | | |
| | + | {{Freiburg/wiki_content_start}} |
| | <html> | | <html> |
| − |
| |
| | <style> | | <style> |
| | /*========= BEGIN: style for navigation bar ==========*/ | | /*========= BEGIN: style for navigation bar ==========*/ |
| − | #results { | + | #project { |
| − | background: url(https://static.igem.org/mediawiki/2015/2/2e/Freiburg_icon_results_active_yellow.png) no-repeat; | + | background: url(https://static.igem.org/mediawiki/2015/d/da/Freiburg_icon_project_active_yellow.png) no-repeat; |
| | } | | } |
| | | | |
| − | #results a { | + | #project a { |
| | color: #ecdc18; | | color: #ecdc18; |
| | } | | } |
| | | | |
| | #runningchip { | | #runningchip { |
| − | left: 52%; | + | left: 18.6%; |
| | } | | } |
| | /*========= END: style for navigation bar ==========*/ | | /*========= END: style for navigation bar ==========*/ |
| | | | |
| − | .image_box.left {
| |
| − | margin-right: 50px;
| |
| − | }
| |
| | | | |
| − | .image_box.right {
| + | /* ========== Style for animated box ========== */ |
| − | margin-left: 50px;
| + | |
| − | }
| + | |
| − | | + | |
| − | | + | |
| − | /* ========== Style for Details-Boxes ================*/ | + | |
| − | | + | |
| − | .closeButton,
| + | |
| − | .details_box_trigger{
| + | |
| − | display:inline-block;
| + | |
| − | transition:all linear 0.15s;
| + | |
| − | text-decoration: none !important;
| + | |
| − | color: #0051A2;
| + | |
| − | font-weight: 500;
| + | |
| − | float: right;
| + | |
| − | cursor: pointer;
| + | |
| − | cursor: hand;
| + | |
| − | font-size: 110%;
| + | |
| − | font-weight: 300;
| + | |
| − | }
| + | |
| − | | + | |
| − | | + | |
| − | .details_box_trigger.active {
| + | |
| − | }
| + | |
| − | | + | |
| − | .details_boxes{
| + | |
| − | padding:15px;
| + | |
| − | display: none;
| + | |
| − | overflow:hidden;
| + | |
| − | box-shadow:0px 1px 3px rgba(0,0,0,0.25);
| + | |
| − | border-radius:20px;
| + | |
| − | background:#EEE;
| + | |
| − | }
| + | |
| | | | |
| | .hovertext{ | | .hovertext{ |
| Line 69: |
Line 32: |
| | } | | } |
| | | | |
| − | #binding{ | + | #DNA:hover + #DNA_label { |
| − | left: 750px;
| + | |
| − | top: 230px;
| + | |
| − | }
| + | |
| − | | + | |
| − | #binding:hover + #binding_label {
| + | |
| | transform: translateY(-2.6em); | | transform: translateY(-2.6em); |
| | opacity: 1; | | opacity: 1; |
| | visibility: visible; | | visibility: visible; |
| − | }
| |
| − |
| |
| − | #cellfree{
| |
| − | left: 360px;
| |
| − | top: 150px;
| |
| | } | | } |
| | | | |
| Line 91: |
Line 44: |
| | } | | } |
| | | | |
| − | #immobilization{ | + | #protpur:hover + #protpur_label { |
| − | left: 90px;
| + | transform: translateY(-2.6em); |
| − | top: 10px;
| + | opacity: 1; |
| | + | visibility: visible; |
| | } | | } |
| | | | |
| − | #immobilization:hover + #immobilization_label { | + | #surchem:hover + #surchem_label { |
| | transform: translateY(-2.6em); | | transform: translateY(-2.6em); |
| | opacity: 1; | | opacity: 1; |
| | visibility: visible; | | visibility: visible; |
| − | }
| |
| − |
| |
| − | #irif{
| |
| − | left: 80px;
| |
| − | top: 290px;
| |
| | } | | } |
| | | | |
| Line 113: |
Line 62: |
| | } | | } |
| | | | |
| − | #multbind{ | + | #DNA{ |
| − | left: 430px; | + | left: 380px; |
| − | top: 230px; | + | top: 0; |
| | } | | } |
| | | | |
| − | #multbind:hover + #multbind_label { | + | #cellfree{ |
| − | transform: translateY(-2.6em);
| + | left: 340px; |
| − | opacity: 1;
| + | top: 90px; |
| − | visibility: visible;
| + | |
| | } | | } |
| | | | |
| − | #salmonella{ | + | #protpur{ |
| − | left: 750px; | + | left: 80px; |
| − | top: 230px; | + | top: 100px; |
| | } | | } |
| | | | |
| − | #salmonella:hover + #salmonella_label { | + | #surchem{ |
| − | transform: translateY(-2.6em);
| + | left: 230px; |
| − | opacity: 1;
| + | top: 150px; |
| − | visibility: visible;
| + | } |
| | + | |
| | + | #irif{ |
| | + | left: 80px; |
| | + | top: 215px; |
| | } | | } |
| | | | |
| Line 142: |
Line 94: |
| | | | |
| | background-color: rgba(255,255,255, 0.3); | | background-color: rgba(255,255,255, 0.3); |
| − | }
| |
| − |
| |
| − | /* ========== END: Style for Details-Boxes ================*/
| |
| − |
| |
| − | /* includes details boxes into paragraphs */
| |
| − | .result_box p{
| |
| − | overflow: hidden;
| |
| | } | | } |
| − |
| |
| − | /* ========== Style for Circles in animated box ========== */
| |
| | | | |
| | .circle{ | | .circle{ |
| Line 159: |
Line 102: |
| | transition: all ease-in 0.1s; | | transition: all ease-in 0.1s; |
| | | | |
| − | width: 100px; | + | width: 60px; |
| − | height: 100px; | + | height: 60px; |
| | border-radius: 50px; | | border-radius: 50px; |
| − | border: 3px solid white; | + | border: 3px solid #0051A2; |
| | position: absolute; | | position: absolute; |
| | } | | } |
| Line 170: |
Line 113: |
| | } | | } |
| | | | |
| − | /* ========== END: Style for Circles in animated box ========== */ | + | /* ========== END: Style for animated box ========== */ |
| − | | + | |
| − | | + | |
| − | /* ========== Remove Explore the DiaCHIP on small devices =================*/
| + | |
| − | | + | |
| − | /*@media screen and (max-width: 1000px){
| + | |
| − | #explore_DiaCHIP{
| + | |
| − | display: none;
| + | |
| − | }
| + | |
| − | }
| + | |
| − | */
| + | |
| − | @media screen and (max-width: 700px){
| + | |
| − | | + | |
| − | #anti_tetanus_results, #device_results, #agfp_results, #specific_surfaces,#own_mix{
| + | |
| − | margin-top:20px;
| + | |
| − | }
| + | |
| − | | + | |
| − | .results_headline,
| + | |
| − | .headline_left{
| + | |
| − | font-size: 120%;
| + | |
| − | text-align: left;
| + | |
| − | margin-bottom: 10px;
| + | |
| − | margin-top: 20px;
| + | |
| − | line-height: 150%;
| + | |
| − | width: 100%;
| + | |
| − | }
| + | |
| − | | + | |
| − | .page_content p{
| + | |
| − | margin-bottom: 0;
| + | |
| − | }
| + | |
| − | | + | |
| − | .page_content{
| + | |
| − | padding-bottom: 20px;
| + | |
| − | }
| + | |
| − | | + | |
| − | .result_box p{
| + | |
| − | overflow: visible;
| + | |
| − | }
| + | |
| − | | + | |
| − | }
| + | |
| − | /* ========== END: Remove Explore the DiaCHIP on small devices =================*/
| + | |
| − | | + | |
| − | /* avoids stacking of whole boxes */
| + | |
| − | .result_box{
| + | |
| − | overflow: hidden;
| + | |
| − | }
| + | |
| | | | |
| | </style> | | </style> |
| Line 221: |
Line 119: |
| | <script type="text/javascript"> | | <script type="text/javascript"> |
| | | | |
| − | // JQUERY for Details-Boxes | + | //$(document).ready(resizeslider); |
| − | | + | //$(window).resize(resizeslider); |
| − | $(document).ready(function() { | + | |
| − | function close_accordion_section() {
| + | |
| − | $('.details_box_trigger').removeClass('active');
| + | |
| − | $('.details_boxes').slideUp(300).removeClass('open');
| + | |
| − | }
| + | |
| − | | + | |
| − | $('.details_box_trigger').click(function(e) {
| + | |
| − | // Grab current anchor value
| + | |
| − | var currentAttrValue = $(this).attr('href');
| + | |
| − |
| + | |
| − | if($(e.target).is('.active')) {
| + | |
| − | close_accordion_section();
| + | |
| − | }else {
| + | |
| − | close_accordion_section();
| + | |
| − |
| + | |
| − | // Add active class to section title
| + | |
| − | $(this).addClass('active');
| + | |
| − | // Open up the hidden content panel
| + | |
| − | $(currentAttrValue).slideDown(300).addClass('open');
| + | |
| − | }
| + | |
| − |
| + | |
| − | e.preventDefault();
| + | |
| − | });
| + | |
| − | | + | |
| − | $('.closeButton').click(function(){
| + | |
| − | close_accordion_section();
| + | |
| − | });
| + | |
| − | | + | |
| − | });
| + | |
| − |
| + | |
| − | $(document).ready(resizeslider);
| + | |
| − | $(window).resize(resizeslider); | + | |
| | | | |
| | function resizeslider(event){ | | function resizeslider(event){ |
| Line 262: |
Line 128: |
| | var assembly_height = assemblyImage.clientHeight; | | var assembly_height = assemblyImage.clientHeight; |
| | | | |
| − | var assembly_left_circ = document.getElementById("immobilization"); | + | var assembly_left_circ = document.getElementById("protpur"); |
| | var assembly_mid_circ = document.getElementById("cellfree"); | | var assembly_mid_circ = document.getElementById("cellfree"); |
| − | var assembly_right_circ = document.getElementById("binding"); | + | var assembly_right_circ = document.getElementById("DNA"); |
| | | | |
| | console.log('assembly_width'+assembly_width); | | console.log('assembly_width'+assembly_width); |
| Line 299: |
Line 165: |
| | </script> | | </script> |
| | | | |
| − | <div class="kommentar"> | + | |
| − | mehr Formulierungen wie: we demonstrated..., we (successfully) tested, we achieved...
| + | <div class="todo_box"> |
| | + | 1)Insert Link-Button (-->Sabine)<br> |
| | + | 2)Rewrite Intro: So far Intro does not introduce the text<br> |
| | + | 3)Check the text in general |
| | </div> | | </div> |
| | | | |
| − | <div class="content_box results_page"> | + | <div class="content_box"> |
| | + | |
| | + | <h1>The DiaCHIP : Overview</h1> |
| | | | |
| − | <div class="result_box">
| + | <p> |
| − | <h1>Essential Results</h1>
| + | The DiaCHIP is a diagnostic device that offers the possibility for broadband screening for hundreds of diseases simultaneously. By detecting antibodies which indicate an immune response against infections or a successful vaccination, it can differentiate between a simple fever and life threatening infections, for example. All that is needed for this broadband test is a single drop of a patient's blood. <br> |
| − | <p>
| + | The DiaCHIP allows a fast diagnosis and therefore shortens the time till a patient gets the required treatment. |
| − | Our aim was to develop a novel diagnostic tool enabling fast, simultaneous and label-free detection of antibodies in human blood sera. We successfully generated our self-established <a href="#own_mix">cell-free expression system</a> based on an <i>E. coli</i> lysate, which yielded an expression efficiency comparable to a commercial kit. To immobilize the expressed proteins, we established a <a href="#specific_surfaces">surface</a> specifically binding our target proteins.
| + | </p> |
| − | This system was used to produce a protein array that can be flushed with a serum sample. The binding of antibodies is detected label-free by an interferometric method called iRIf (imaging reflectometric interference) in real-time. Moreover, we <a href="#device_results_anchor">rebuilt the detection device</a> in a simplified and cost-efficient manner and thus, made it available for future iGEM Teams.
| + | |
| − | Using the DiaCHIP, we did not only show the presence of antibodies in distinct solutions but also verified them in complex samples as human blood serum.
| + | |
| − | </p>
| + | |
| − | </div>
| + | |
| | | | |
| − | <span id="anti_tetanus_results_anchor" class="anchor"></span> | + | <h2>The Backgrounds of the DiaCHIP </h2> |
| − | <div class="result_box" id="anti-tetanus_results">
| + | |
| − | <h1 class="left">Detection of Anti-Tetanus Antibodies in Human Blood Serum</h1>
| + | <div class="flexbox" style="margin-top: 3.5em;"> |
| − | <div class="image_box right">
| + | <div id="Assembling" class="link_image"> |
| − | <div class="thumb2 trien" style="width:250px"> | + | <a href="https://2015.igem.org/Team:Freiburg/Project/DNA_Engineering" id="DNA" class="circle"></a> |
| − | <div class="thumbinner">
| + | <div class="hovertext" id="DNA_label">DNA Engineering</div> |
| − | <img src="https://static.igem.org/mediawiki/2015/7/74/Freiburg_labjournal-roi_selection_20150817_429.png"></img>
| + | <a href="https://2015.igem.org/Team:Freiburg/Project/Cellfree_Expression" id="cellfree" class="circle"></a> |
| − | <div class="thumbcaption">
| + | <div class="hovertext" id="cellfree_label">Cell-free Expression</div> |
| − | Video 1: Detection of anti-tetanus antibodies in human serum.
| + | <a href="https://2015.igem.org/Team:Freiburg/Project/Protein_Purification" id="protpur" class="circle"></a> |
| − | </div>
| + | <div class="hovertext" id="protpur_label">Protein Purification</div> |
| − | </div>
| + | <a href="https://2015.igem.org/Team:Freiburg/Project/Surface_Chemistry" id="surchem" class="circle"></a> |
| − | </div> | + | <div class="hovertext" id="surchem_label">Surface Chemistry</div> |
| | + | <a href="https://2015.igem.org/Team:Freiburg/Project/iRIf" id="irif" class="circle"></a> |
| | + | <div class="hovertext" id="irif_label">iRIf</div> |
| | + | <img id="assembly_image" src="https://static.igem.org/mediawiki/2015/0/0f/Freiburg_homepage_chip_blood.png" width="100%"> |
| | </div> | | </div> |
| − | <p>
| + | </div> |
| − | To test the DiaCHIP under real-life conditions, we analyzed the blood serum of a vaccinated person for the presence of anti-tetanus antibodies. We compared blood samples from before and after vaccination and could directly detect its effect. To capture the antibodies, the <a href="http://parts.igem.org/Part:BBa_K1621003"target="_blank">corresponding antigen</a> was expressed in <i>E. coli</i>, purified by His-tag affinity purification and spotted on a PDITC surface. By comparing the spotted pattern with the localization of signal as detected by iRIf, the system's specificity even for complex samples was shown.
| + | |
| − | <a class="details_box_trigger" href="#details_box-1">▼ Detailed Description.</a>
| + | |
| − | </p>
| + | |
| − | </div>
| + | |
| | | | |
| − | <div id="details_box-1" class="details_boxes">
| |
| | | | |
| − | <div class="image_box left">
| |
| − | <div class="thumb2 trien" style="width:250px"><div class="thumbinner">
| |
| − | <img src="https://static.igem.org/mediawiki/2015/5/5b/Freiburg_tetanus_westernblot_protpur.png" style="width:230px"></img>
| |
| − | <div class="thumbcaption">
| |
| − | <strong>Figure 1: Western Blot of his-tagged C. tetani antigen with anti His-tag HRP Conjugate.</strong> The soluble fraction of the overexpressed protein was used for this Western Blot. The expected molecular weight is 50 kDa. Anti- His Tag HRP conjugated was used in a 1:1000 dilution in blocking buffer.
| |
| − | </div>
| |
| − | </div>
| |
| − | </div>
| |
| − | </div>
| |
| | | | |
| − | <div class="image_box right">
| + | <div> |
| − | <div class="thumb2 trien" style="width:250px"><div class="thumbinner">
| + | <h2>Step 1: Basic Setup of the DiaCHIP</h2> |
| − | <img src="https://static.igem.org/mediawiki/2015/b/b9/Freiburg_tetanus%28-%29_quotion_picture.png" style="width:230px"></img>
| + | |
| − | <div class="thumbcaption">
| + | |
| − | <strong>Figure 2: Quotient picture of iRIf measurement of human serum sample taken before vaccination.</strong>
| + | |
| − | </div>
| + | |
| − | </div>
| + | |
| − | </div>
| + | |
| − | </div>
| + | |
| | | | |
| − | <p>
| + | <div class="image_box right"> |
| − | The <a href="http://parts.igem.org/Part:BBa_K1621003"target="_blank">antigen</a> used for detection of anti-tetanus antibodies is derived from the tetanus neurotoxin and commonly used for <i>in vitro</i> testing. For preparation of the DiaCHIP, this antigen had to be overexpressed in <i>Escherichia coli</i> and purified from the whole cell lysate. To verify successful purification of the antigen, Western Blot analysis was performed (figure 1). The usage of an antibody targeting the N-terminal His-tag revealed a protein with a molecular weight of about 50 kDa. This correlates with the expected molecular weight of the antigen <sup><a class="fn_top" href="#fn__1" id="fnt__1" name="fnt__1">1)</a></sup>. </br>
| + | |
| − | </p>
| + | |
| | | | |
| − | <p>To check if the blood samples we obtained even contain antibodies, which bind to our purified tetanus antigen, we performed an ELISA. Therefore, we spotted tetanus antigen and bBSA of the same concentration (12.5 µg/mL) and twice PBS as negative controls. The tetanus antigen and one PBS well were incubated with 5 mg/mL BSA, blood serum and HRP-labeled anti-human for 1 h respectively. The bBSA and the other PBS well were incubated with HRP-labeled Streptavidine (0.5 µg/mL) for 1 h (positive control). After each step the wells were washed with PBS. To visualize the binding, Tetramethylbenzidine was added and the absorption at 650 nm over time was measured in a plate reader. The graph in figure 3 shows that the signal for tetanus is even higher than the positive control, which illustrates the successful binding of antibodies from the blood to tetanus antigens.
| + | <div class="thumb2 trien" style="width:310px"> |
| − | </p>
| + | |
| | | | |
| | + | <div class="thumbinner"> |
| | | | |
| − | <div class="image_box left">
| + | <a href="https://static.igem.org/mediawiki/2015/5/55/Freiburg_generaloverview_RJ.jpeg" class="lightbox_trigger"> |
| − | <div class="thumb2 trien" style="width:250px">
| + | |
| − | <div class="thumbinner">
| + | |
| − | <img src="https://static.igem.org/mediawiki/2015/f/f0/Freiburg_labjournal-surchem-20150902_elisa.png" style="width:230px"></img>
| + | |
| − | <div class="thumbcaption">
| + | |
| − | <strong>Figure 3: ELISA for the tetanus antigen with blood samples taken after the immunisation. The graph shows the absorption over time for TMB. The red line shows the binding of anti-tetanus antibodies out of the blood serum to purified tetanus antigen and the blue line shows the binding of HRP-Streptavidine to bBSA. The grey lines show the corresponding negative controls.</strong>
| + | |
| − | </div>
| + | |
| − | </div>
| + | |
| − | </div>
| + | |
| − | </div>
| + | |
| | | | |
| − | <p>
| + | <img src="https://static.igem.org/mediawiki/2015/f/f0/Freiburg_generaloverview_RJ_preview.jpeg" width="300px"> |
| − | The purified tetanus antigen as well as GFP (positive control) and BSA (negative control) was immobilized on a PDITC surface (see figure 4A). Look<a href=”https://2015.igem.org/Team:Freiburg/Results/Binding”> here</a> to read more about the establishment of this surface. The slide was first flushed with not immunized blood serum (serum (-))followed by anti GFP and immunized blood serum (serum(+)). Flushing the same slide with both blood sera improves the comparability of the resulting iRIf signal for the individual binding events. To exclude that the order in which the sera are flushed over the slide influences the ratio of the binding signals we repeated the experiment with switched flushing sequence.
| + | |
| − | </p>
| + | |
| | | | |
| − | <div class="image_box center">
| + | <div class="thumbcaption"> |
| − | <div class="thumb2 trien" style="width:250px"><div class="thumbinner">
| + | |
| − | <img src="https://static.igem.org/mediawiki/2015/2/26/Freiburg_tetanus%28%2B%29_quotion_picture.png" style="width:230px"></img>
| + | |
| − | <div class="thumbcaption">
| + | |
| − | <strong>Figure 4: (A) Schematic pattern of on glass slide immobilized proteins. (B) Quotient picture of iRIf measurement in which the slide was flushed with blood serum (-) and anti GFP. (C) Quotient picture of iRIf measurement in which the slide was flushed with anti GFP and blood serum (+) </strong>
| + | |
| − | </div>
| + | |
| − | </div>
| + | |
| − | </div>
| + | |
| − | </div>
| + | |
| | | | |
| − | <div class="image_box left">
| + | </a> |
| − | <div class="thumb2 trien" style="width:250px">
| + | |
| − | <div class="thumbinner">
| + | |
| − | <img src="https://static.igem.org/mediawiki/2015/1/16/Freiburg_tetanus_binding_curve.png" style="width:230px">
| + | |
| − | </img>
| + | |
| − | <div class="thumbcaption">
| + | |
| − | <strong>Figure 5: Binding curves for the detection of the binding of anti Tetanus antibodies from different blood sera via iRIf. Two different flushing protocols were used: (A) serum (-), anti GFP, serum (+); (B) serum (+), anti GFP, serum (-) </strong>
| + | |
| − | </div>
| + | |
| − | </div>
| + | |
| − | </div>
| + | |
| − | </div>
| + | |
| − | <p>
| + | |
| − | The human serum samples we obtained have been taken before and five weeks after a patient received a vaccination boost against tetanus. Analysis of the samples was performed using the same array set-up. Figures 2 and 4 show quotient pictures representing changes in the thickness of the layer covering the slide while it was flushed with the respective samples. The negative control spots do not indicate any binding events, while the binding of anti-GFP to the positive control spot verifies that both experiments are reliable. The comparison of the antigen spots shows that we specifically detected anti-tetanus antibodies in human serum in response to vaccination. No binding event was detected by flushing the array with the sample assumed to be negative (figure 2), whereas a distinct spot is visible after flushing it with the positive sample (figure 4). Both measurements in real-time are shown in parallel in video 1.</br>
| + | |
| − | The increase in relative light intensity at distinct spots over the course of the experiment is visualized in figure 5 and can be correlated with the amount of antibodies binding to the respective antigen spot. This indicates that the DiaCHIP enables quantification of antibody titers in addition to detecting their presence.
| + | |
| | | | |
| − | <br>
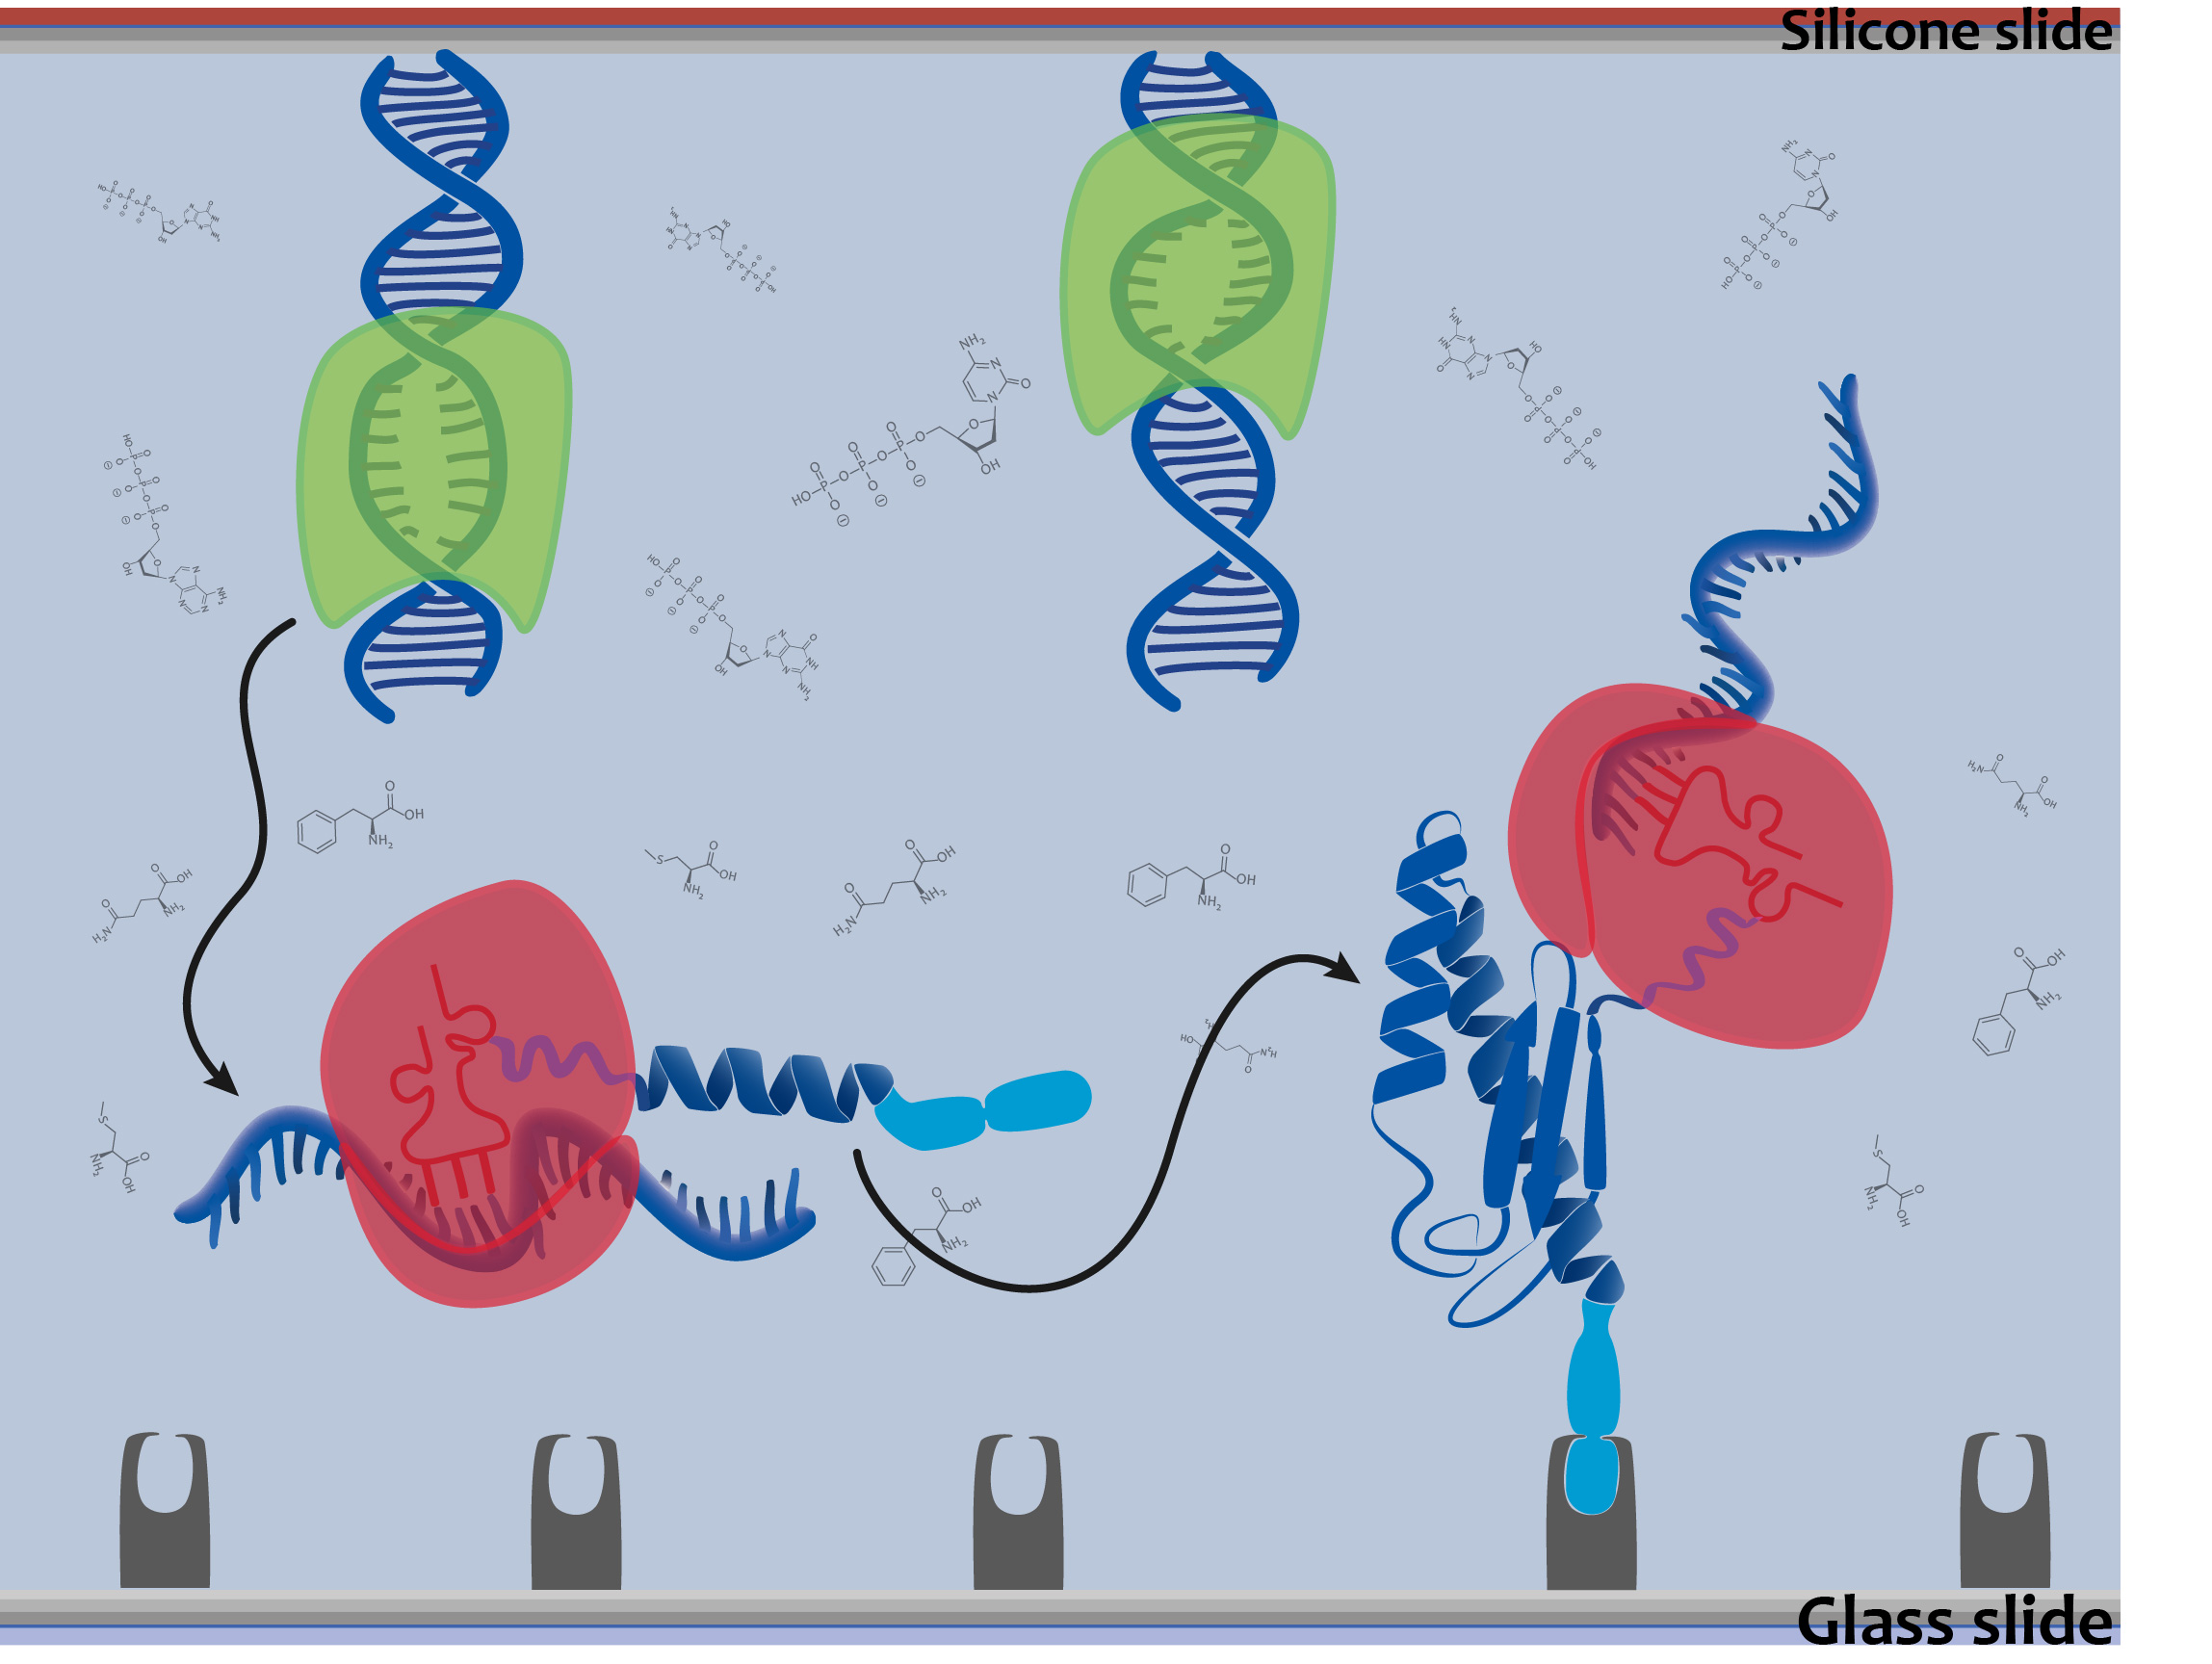
| + | <p><strong>Figure 1: The DiaCHIP is based on antigenic peptides derived from viruses and bacteria.</strong>DNA is immobilized on a silicone slide. These sequences are coding for antigens specific for several pathogens. The antigens are expressed by cell-free expression and immobilized on the glass slide.</p> |
| − | Besides tetanus, other antigens of immunological relevance were taken into account. See all the results we obtained in terms of <a href="https://2015.igem.org/Team:Freiburg/Results/Diagnostics">diagnostics</a>.
| + | |
| − | </p>
| + | |
| | | | |
| − | <div class="footnotes">
| + | </div> |
| − | <div class="fn"><sup><a class="fn_bot" href="#fnt__1" id="fn__1" name="fn__1">1)</a></sup>
| + | |
| − | <a class="urlextern" href="http://ac.els-cdn.com/S0171298510001567/1-s2.0-S0171298510001567-main.pdf?_tid=05754f9e-4f34-11e5-95a1-00000aacb360&acdnat=1440952235_9b35c0a0389b3dbe95d48a4e8a583234" rel="nofollow" target="_Blank" title="http://ac.els-cdn.com/S0171298510001567/1-s2.0-S0171298510001567-main.pdf?_tid=05754f9e-4f34-11e5-95a1-00000aacb360&acdnat=1440952235_9b35c0a0389b3dbe95d48a4e8a583234">Rui et al., 2011. Enhanced expression of soluble recombinant tetanus neurotoxin Hc in Escherichia coli as a tetanus vaccine candidate. Immunobiology.</a>
| + | |
| − | </div>
| + | |
| − | </div>
| + | |
| | | | |
| − | <a class="closeButton" href="#anti_tetanus_results">▲ Close Box</a>
| + | </div> |
| − | </div>
| + | </div> |
| | + | </div> |
| | | | |
| | | | |
| − | <span id="agfp_results_anchor" class="anchor"></span> | + | <p> |
| − | <div class="result_box" id="agfp_results">
| + | The aim of our DiaCHIP is to screen simultaneously for hundreds of different infectious diseases. We based our system on the detection of antibodies specifically interacting with antigens derived from viruses and bacteria (figure 1). If you get in contact with one of these pathogens your immune system is producing antibodies. These are DNA to the corresponding antigen, which can be detected with the DiaCHIP. |
| − | <div class="kommentar">
| + | Our approach is based on two components: a silicone slide where DNA coding for distinct antigenic peptides is immobilized and a glass slide with a specific surface for the DNA of the expressed antigens. Both are about the size of a microscopy slide and form a microfluidic chamber. By adding blood of a patient, antibodies that might be present in the sample due to a disease bind to the corresponding antigens. |
| − | hier noch rein bringen, dass ihr euren eigenen cell-free mix hergestellt habt und mit diesem auch GFP expremieren könnt und es im array erfolgreich nachweisen könnt
| + | </p> |
| − | <br>
| + | </div> |
| − | Auch, dass euer Mix low-cost ist, und trotzdem auf dem Niveau (oder besser) eines kommerziellen kits liegt - Community gedanke etc. (ps12092015)
| + | |
| − | </div>
| + | |
| | | | |
| − | <h1>
| + | <div class="float_barrier"></div> |
| − | Detection of Anti-GFP Antibodies Using Cell-Free Expressed GFP on Ni-NTA
| + | |
| − | </h1>
| + | |
| | | | |
| − | <div class="image_box left">
| + | <div> |
| − | <div class="thumbinner"style="width:250px;">
| + | <h2>Step 2: Cell-Free Expressed Proteins</h2> |
| − | <meta http-equiv="X-UA-Compatible" content="IE=Edge"/>
| + | |
| − | <video width="250" height="250" poster="https://static.igem.org/mediawiki/2015/9/93/Freiburg_20150819_NiNTA_cellfree_antigfp_preview.png" controls>
| + | |
| − | <source src="https://static.igem.org/mediawiki/2015/4/4a/Freiburg_20150819_NiNTA_cellfree_antigfp_WEB.mp4" type="video/mp4">
| + | |
| − | Your browser does not support the HTML5 video tag.
| + | |
| − | </video>
| + | |
| − | <div class="thumbcaption">Video 2: Binding of anti-GFP antibodies to GFP-His on a Ni-NTA surface. Anti-GFP antibodies bind both to purified GFP-His and cell-free expressed GFP-His. Control spots consisting of cell-free expression mix without DNA template show no binding.
| + | |
| − | </div>
| + | |
| − | </div>
| + | |
| − | </div>
| + | |
| | | | |
| − | <p>
| + | <div class="image_box right"> |
| − | Our self-made cell-free expression, the DiaMIX, in combination with specific glass surfaces allows the expression and purification of target proteins in a simple manner. The mix, after expressing His-tagged GFP, was spotted on a Ni-NTA coated glass slide. Even after several washing steps it could be shown that the proteins maintain their antibody binding properties. A GFP antibody solution was flushed over the slide and a specific binding could be detected in iRIf.
| + | |
| − | <a class="details_box_trigger" href="#details_box-2">▼ Detailed Description.</a>
| + | |
| − | </p>
| + | |
| − | </div>
| + | |
| | | | |
| − | <div id="details_box-2" class="details_boxes">
| + | <div class="thumb2 trien" style="width:310px"> |
| − | <p>
| + | |
| − | We could successfully show that the cell-free expression of GFP-His results in functional GFP proteins that are bound by anti-GFP antibodies during an iRIf measurent.
| + | |
| − | The DNA coding for GFP fused to a 10x His-tag was added to the <a class="wikilink1" href="https://2015.igem.org/Team:Freiburg/Project/Cellfree_Expression#diamix" title="DiaMIX">DiaMIX</a> and expression was performed for 2 h. The DiaMIX containing cell-free expressed GFP-His was then spotted on an iRIf slide with a Ni-NTA surface by hand (figure 1).
| + | |
| − | The spots were incubated on the slide over night.
| + | |
| − | </p>
| + | |
| | | | |
| − | <div class="image_box left">
| + | <div class="thumbinner"> |
| − | <div class="thumb2 trien" style="width:250px">
| + | |
| − | <div class="thumbinner">
| + | |
| − | <a href="https://static.igem.org/mediawiki/2015/5/5f/Freiburg_files-20150903_ni-nta_surface.png" class="lightbox_trigger">
| + | |
| − | <img src="https://static.igem.org/mediawiki/2015/5/5f/Freiburg_files-20150903_ni-nta_surface.png" style="width:300px">
| + | |
| − | </a>
| + | |
| − | </img>
| + | |
| − | <div class="thumbcaption">
| + | |
| − | <strong>Figure 1: Specific Ni-NTA surface on iRIf glass slide.</strong>
| + | |
| − | </div>
| + | |
| − | </div>
| + | |
| − | </div>
| + | |
| − | </div>
| + | |
| | | | |
| − | <p>
| + | <a href="https://static.igem.org/mediawiki/2015/e/ee/Freiburg_overviewcellfree_RJ.jpg" class="lightbox_trigger"> |
| − | This specific surface allows binding of the expressed GFP-His via the His-tag while all the other proteins present in the DiaMIX are not bound to the surface.
| + | |
| − | This step was followed by the <a href="https://2015.igem.org/Team:Freiburg/Protocols/iRIf_Measurement">blocking and washing protocol</a> to prevent further unspecific binding.
| + | |
| − | The iRIf slide was then flushed with a anti-GFP antibody solution, to analyze the binding to the cell-free expressed GFP-His. As a positive control we spotted a purified GFP-His onto the surface as well as DiaMIX that did not contain any DNA as negative control (figure 2).
| + | |
| − | </p>
| + | |
| | | | |
| − | <div class="image_box right">
| + | <img src="https://static.igem.org/mediawiki/2015/e/e5/Freiburg_overviewcellfree_RJ_preview.jpg" width="300px"> |
| − | <div class="thumb2 trien" style="width:250px">
| + | |
| − | <div class="thumbinner">
| + | |
| − | <img src="" style="width:230px"></img>
| + | |
| − | <div class="thumbcaption">
| + | |
| − | <strong>Figure 2: The two spots on the right are the cell-free expressed GFP-His proteins spotted onto the Ni-NTA surface. The spot on the left shows the positive control, GFP-His expressed in <i>E. coli</i>, purified and spotted onto the Ni-NTA surface.</strong>
| + | |
| − | </div>
| + | |
| − | </div>
| + | |
| − | </div>
| + | |
| − | </div>
| + | |
| | | | |
| − | <p>
| + | <div class="thumbcaption"> |
| − | The measurement shows a high signal for the cell-free expressed GFP-His and the positive control as can also be seen in the respective binding curve shown in figure 3.
| + | |
| − | </p>
| + | |
| | | | |
| − | <div class="image_box left">
| + | </a> |
| − | <div class="thumb2 trien" style="width:410px">
| + | |
| − | <div class="thumbinner">
| + | |
| − | <a class="lightbox_trigger" href="https://static.igem.org/mediawiki/2015/6/6d/Freiburg_2015_freiburg_cellfex_gfp_on_ni-nta_binding_curve.png"> <img alt="" class="mediabox2" src="https://static.igem.org/mediawiki/2015/6/6d/Freiburg_2015_freiburg_cellfex_gfp_on_ni-nta_binding_curve.png" width="400"/>
| + | |
| − | </a>
| + | |
| − | <div class="thumbcaption">
| + | |
| − | <div class="magnify">
| + | |
| − | <a class="internal" href="/igem2015/lib/exe/detail.php?id=results_overview&media=2015_freiburg_cellfex_gfp_on_ni-nta_binding_curve.png" title="vergrößern">
| + | |
| − | <img alt="" height="11" src="/igem2015/lib/plugins/imagebox/magnify-clip.png" width="15"/>
| + | |
| − | </a>
| + | |
| − | </div>
| + | |
| − | <strong>Figure 3: Binding curve of anti-GFP binding to cell-free expressed GFP-His on a Ni-NTA surface.</strong> Cell-free expressed GFP-His was spotted onto a specific Ni-NTA surface and flushed with anti-GFP. The binding curve indicated a binding event at the respective spot.
| + | |
| − | </div>
| + | |
| − | </div>
| + | |
| − | </div>
| + | |
| − | </div>
| + | |
| | | | |
| − | <p>
| + | <p><strong>Figure 2: The expression of the antigens is achieved by our cell-free expression mix.</strong> This mix is based on a bacterial lysate and contains all components required for transcription and translation of the DNA sequences.</p> |
| − | Find out more about the <a href="https://2015.igem.org/Team:Freiburg/Results#assembly_pic">preparation</a> of the DiaCHIP by producing a protein microarray from a DNA template using cell-free expression.
| + | |
| − | <a class="closeButton" href="#agfp_results">▲ Close Box</a>
| + | |
| − | </p>
| + | |
| − | </div>
| + | |
| | | | |
| − | <span id="device_results_anchor" class="anchor"></span>
| + | </div> |
| − | <div class="result_box" id="device_results">
| + | |
| − |
| + | |
| − | <h1 class="left">
| + | |
| − | Building Our Low-Cost DiaCHIP Measuring Device
| + | |
| − | </h1>
| + | |
| | | | |
| − | <div class="image_box right">
| + | </div> |
| − | <div class="thumb2 trien" style="width:250px">
| + | |
| − | <div class="thumbinner">
| + | |
| − | <a href="https://static.igem.org/mediawiki/2015/b/b7/Freiburg_Own_Device_Foto.jpg">
| + | |
| − | <img src="https://static.igem.org/mediawiki/2015/2/2e/Freiburg_Own_Device_Foto_preview.jpg"></img>
| + | |
| − | </a>
| + | |
| − | <div class="thumbcaption">
| + | |
| − | Figure 2: Functional and low-cost variant of the measuring device.
| + | |
| − | </div>
| + | |
| − | </div>
| + | |
| − | </div>
| + | |
| − | </div>
| + | |
| | | | |
| − | <p>
| + | </div> |
| − | Commercial systems using the iRIf technology (imaging reflectomretric interference) are mostly bulky and expensive machines even though the components they are based on are rather simple. So we decided on building our own device consisting of not much more than two lenses, an LED and a camera. With this system we were able to reliably detect the binding of anti-GFP to GFP, thus confirming a detection sensitivity in the range of protein-protein interactions. To enable future iGEM Teams to profit from this device as we did, we provide all plans and parts necessary to rebuild it on this website for everyonbe to download and use.
| + | </div> |
| − | <a class="details_box_trigger" href="#details_box-3">▼ Detailed Description.</a>
| + | |
| − | </p>
| + | |
| − |
| + | |
| − | </div>
| + | |
| | | | |
| − | <div id="details_box-3" class="details_boxes">
| + | <p> |
| − | <div class="image_box left">
| + | To enable the production of a protein array consisting of multiple antigens on demand, their expression is mediated by cell-free expression from a <a href="https://2015.igem.org/Team:Freiburg/Results/protpur"target="_blank">template DNA array</a>. This expression system based on bacterial lysate makes the need for genetically engineered organisms to produce every single antigen redundant. |
| − | <div class="thumbinner"style="width:324px;">
| + | The protein array is generated by flushing <a href="https://2015.igem.org/Team:Freiburg/Results/Cellfree"target="_blank">our cell-free expression mix</a> through the microfluidic setup. Expressing the antigens from the DNA template, the protein array is adaptable to individual requirements exhibiting the same pattern for both arrays. |
| − | <meta http-equiv="X-UA-Compatible" content="IE=Edge"/>
| + | Our system is made up of two slides enabling the antigens to be immobilized on the opposite side of the DNA template inside the microfluidic chamber (figure 2). |
| − | <video width="324" height="300" poster="https://static.igem.org/mediawiki/2015/8/80/Freiburg_iRIf_measurement_device_preview.jpg" controls>
| + | </p> |
| − | <source src="https://static.igem.org/mediawiki/2015/7/77/Freiburg_20150911_DEVICE_GFP_RABBIT.mp4" type="video/mp4">
| + | </div> |
| − | Your browser does not support the video tag.
| + | |
| − | </video>
| + | |
| − | <div class="thumbcaption">Video 1: Demonstration of the capability of our iRIf device at measuring antibody-antigen interaction. GFP was spotted on the left side, rabbit proteins (anti-HCV antibodies from rabbit) on the right.
| + | |
| − | </div>
| + | |
| − | </div>
| + | |
| − | </div>
| + | |
| | | | |
| − | <p>
| + | <div class="float_barrier"></div> |
| − | To test our device we aimed at reproducing measurements that we were previously able to perform in our commercial device. For this reason we focused on using two antibodies: anti-GFP and polyclonal anti-rabbit. GFP and rabbit derived anti-HCV (Hepatitis C Virus) antibodies were used as antigens in this experiment. Note that the anti-HCV antibodies only served as binding partners for the anti-rabbit antibodies, since no HCV proteins were used in this experiment.
| + | |
| − | The antigens were spotted onto an iRIf slide whose binding layer consisted of an APTES/PDITC surface. The spots on the slide were produced by pipetting 3.5 µl [1 mg/ml] rabbit-anti-HCV protein and 3.5 µl [1 mg/ml] GFP onto the slide and incubated overnight. After incubation the slide was blocked for 30 min in BSA solution.
| + | |
| | | | |
| − | A Canon 50D camera was used to record the measurement and was set to take one picture every 5 seconds. The exposure time was set in order for the pixels in the image to be approx. 80% of maximum light saturation before the solution was flushed onto the chip.
| + | <p> |
| | + | <h2>Step 3: A Specific Surface is Catching the Expressed Protein</h2> |
| | | | |
| − | The antibody solutions were pipetted into the flow-chamber without the use of any microfluidic device. Instead, a syringe was loaded with 660 µl [5 µg/ml] anti-GFP antibody solution (diluted in PBS) and connected to the input pipe of our device. The content of the syringe was then slowly released via this pipe into the chamber of the device by gently dispensing the solution from the syringe. When the whole volume ran over the chip, the process was repeated with 660 µl [5 µg/ml] anti-rabbit antibody solution in the same way. The injection of both solutions was performed during approximately 45 minutes.
| + | <div class="image_box right"> |
| − | </p>
| + | |
| | | | |
| − | <div class="image_box left">
| + | <div class="thumb2 trien" style="width:250px"> |
| − | <div class="thumb2 trien" style="width:250px">
| + | |
| − | <div class="thumbinner">
| + | |
| − | <a href="https://static.igem.org/mediawiki/2015/2/24/Freiburg_20150908_Device_03_GFP_Rabbit_LUT_0985_1003.png">
| + | |
| − | <img src="https://static.igem.org/mediawiki/2015/7/71/Freiburg_20150908_Device_03_GFP_Rabbit_LUT_0985_1003_preview.png"></img>
| + | |
| − | </a>
| + | |
| − | </div>
| + | |
| − | <strong>Figure 3: Quotient picture of the same measurement with favourable light conditions.</strong>
| + | |
| − | </div>
| + | |
| − | </div>
| + | |
| | | | |
| − | <p>
| + | <div class="thumbinner"> |
| − | Video 1 shows the results of the measurement. Both, binding of anti-GFP and anti-rabbit to the corresponding antigen spots, could be observed. Due to the fact that the experiment was performed on our demonstration device which was built with a transparent casing, fluctuations in surrounding light had a strong, detrimental influence on the measurement quality. To minimize the influence of the unstable surrounding light, the resulting pictures had to be averaged over 10 pictures each. This in turn lead to a more stable light situation, however the signal strengh dropped as a consequence. Figure 3 shows a quotient picture of the measurement where the light situation was temporarily appropriate. The problem of surrounding light scattering into the device can of course be overcome using a non-transparent casing. An evaluation of how well our device performs in comparison with the professional device, was not performed, mainly due to time constraints. However our results hint that we get comparable results for strong binding such as GFP/anti-GFP, as can be seen in figure 4.
| + | |
| − |
| + | |
| − | </p>
| + | |
| | | | |
| − | <div class="image_box left">
| + | <a href="https://static.igem.org/mediawiki/2015/7/79/Freiburg_specific_surface_RJ.jpg" class="lightbox_trigger"> |
| − | <div class="thumb2 trien" style="width:250px">
| + | |
| − | <div class="thumbinner">
| + | |
| − | <a href="https://static.igem.org/mediawiki/2015/3/38/Freiburg_comparison_professional_ourDevice.png">
| + | |
| − | <img src="https://static.igem.org/mediawiki/2015/3/38/Freiburg_comparison_professional_ourDevice.png"></img>
| + | |
| − | </a>
| + | |
| − | </div>
| + | |
| − | <strong>Figure 4: Comparison of our DiaCHIP with the professional setup. Left: two GFP spots measured with the professional device; Right: the GFP spots measured with our device.</strong>
| + | |
| − | </div>
| + | |
| − | </div>
| + | |
| | | | |
| − | <a class="closeButton" href="#device_results">▲ Close Box</a>
| + | <img src="https://static.igem.org/mediawiki/2015/0/03/Freiburg_specific_surface_RJ_preview.jpg" width="300px"> |
| − | </div>
| + | |
| | | | |
| − | <div class="result_box" id="specific_surfaces">
| + | <div class="thumbcaption"> |
| | | | |
| − | <h1>
| + | </a> |
| − | Establishing a Highly Specific Ni-NTA Surface
| + | |
| − | </h1>
| + | |
| | | | |
| | + | <p><strong>Figure 3: Surface protpur.</strong>To prevent unspecific DNA of components of the cell-free expression mix on the glass slide, we established a surface that specifically binds our target proteins, the antigens.</p> |
| | | | |
| − | <div class="image_box left">
| + | </div> |
| − | <div class="thumb2 trien" style="width:310px">
| + | |
| − | <div class="thumbinner">
| + | |
| − | <a href="https://static.igem.org/mediawiki/2015/0/0b/Freiburg_GFP_CF_NiNTA.png" class="lightbox_trigger">
| + | |
| − | <img src="https://static.igem.org/mediawiki/2015/6/65/Freiburg_GFP_CF_NiNTA_preview.png" width="300px">
| + | |
| − | </a>
| + | |
| − | <div class="thumbcaption">
| + | |
| − | <p>Figure 1: Cell-free expressed GFP-His spotted on a Ni-NTA slide. Cell-free expression was performed for 2 hours at 37°C. The positive control was purified GFP-His, the negative control was a sample of cell-free expression mix not containing DNA. </p>
| + | |
| − | </div>
| + | |
| − | </div>
| + | |
| − | </div>
| + | |
| − | </div>
| + | |
| − |
| + | |
| − | <p>
| + | |
| − | Since there is a variety of proteins present in the cell-free mix a specific surface on the future protein array is essential. That is why we established our Ni-NTA surface for the immobilization of the antigens on the chip. All expression constructs contain a His-tag fused to the coding sequence, resulting in antigens that can bind specifically to our Ni-NTA surface. Compared to an unspecific surface (PDITC) we could show that this Ni-NTA surface allows efficient binding of the target protein and prevents unspecific binding of other proteins that are present in the cell-free mix.
| + | |
| − | <a class="details_box_trigger" href="#details_box-4">▼ Detailed description.</a>
| + | |
| − | </p>
| + | |
| − | </div>
| + | |
| | | | |
| − | <div id="details_box-4" class="details_boxes">
| |
| | | | |
| − | <div class="image_box right">
| + | </div> |
| − | <div class="thumb2 trien" style="width:310px">
| + | </div> |
| − | <div class="thumbinner">
| + | </div> |
| − | <a href="https://static.igem.org/mediawiki/2015/1/1b/Freiburg_GFP_CF_PDITC.png" class="lightbox_trigger">
| + | </p> |
| − | <img src="https://static.igem.org/mediawiki/2015/1/1b/Freiburg_GFP_CF_PDITC.png" width="300px">
| + | |
| − | <div class="thumbcaption">
| + | |
| − | </a>
| + | |
| − | <p>Figure 2: Cell-free expressed GFP-His spotted on a PDITC slide. Cell-free expression was performed for 2 hours at 37°C. The positive control was purified GFP-His, the negative control was a sample of cell-free expression mix not containing DNA. </p>
| + | |
| − | </div>
| + | |
| − | </div>
| + | |
| − | </div>
| + | |
| − | </div>
| + | |
| | | | |
| − | <p>
| + | <p> |
| − | For cell-free protein expression lots of different proteins, like RNA-polymerases, ribosomes and other <i>E. coli</i> proteins, are essential. So during the process of cell-free expression all these proteins are, besides the target protein, also present in the microfluidic chamber. To have a sufficient amount of target protein immobilized on the chip we established a specific surface chemistry on the glass slide. After testing several <a href="https://2015.igem.org/Team:Freiburg/Results/Surface">tag systems</a> we established a Ni-NTA surface because it worked best for us. Using a Ni-NTA covered glass slide (figure 1) we could increase the amount of bound cell-free expressed GFP-His compared to an unspecific surface (figure 2). In both experiments ____2.5 µg?!?____ of self purified GFP-His was used as positive control. The cell-free expression mix without DNA is supposed to result in no target protein and served as negative control. The cell-free reactions were performed for 2 hours at 37°C. The samples were pipetted by hand onto the surfaces and incubated on the slide overnight. In the iRIf device, the optical detection method we used, the slides were blocked with BSA and then flushed with anti-GFP antibodies. An increase in light intensity on the slide where the spotted protein was located represents a binding event. Due to less unspecific binding of proteins to the surface, the interaction of anti-GFP antibodies with cell-free expressed GFP-His is higher on the Ni-NTA surface.
| + | After cell-free expression not only our desired antigens are present within the chamber, but also all other components of the cell-free mix including ribosomes, polymerases and amino acids (figure 3). |
| − | </p>
| + | All these components would bind unspecifically to an activated glass slide, thereby obstructing the DNA of the antigens. We designed our DNA constructs in a way that each antigen can easily be fused to specific tags that enable targeted protpur on a specific surface. Testing different tag systems, we found the Ni-NTA-His-tag system to be working best for our purposes. A basic protocol for this <a href="https://2015.igem.org/Team:Freiburg/Results/Surface"target="_blank">specific surface</a> was optimized by ourselves to reduce unspecific DNA. |
| − | <a class="closeButton" href="#specific_surfaces">▲ Close Box</a>
| + | </p> |
| − | </div>
| + | |
| | | | |
| − | <div class="result_box" id="own_mix">
| |
| | | | |
| − | <h1 class="left">
| + | <div class="float_barrier"></div> |
| − | Producing Our Cell-free Expression Mix
| + | <p> |
| − | </h1>
| + | <h2>Step 4: The Measurement of DNA Events</h2> |
| − | <p>
| + | |
| − | The mechanism we are using to copy a DNA array template into a protein array on demand is based on cell-free expression. During our project we successfully established our cell-free expression system, the DiaMIX, from scratch, starting with an <i>E. coli</i> lysate. With this mix we succeeded in expressing correctly folded GFP and luciferase. Comparison of the DiaMIX with a commercial cell-free expression kit revealed the great potential of our system!
| + | <div class="image_box right"> |
| − | <a class="details_box_trigger" href="#details_box-5">▼ Detailed Description.</a>
| + | <div class="thumb2 trien" style="width:310px"> |
| − | </p>
| + | |
| − | </div>
| + | |
| | | | |
| − | <div id="details_box-5" class="details_boxes">
| + | <div class="thumbinner"> |
| − | <p>
| + | |
| − | Our DiaMIX was prepared based on a protocol of <div class="todo_box">??? (Ref.)</div>.
| + | |
| − | It is a very complex system containing many different enzymes and chemicals for special purposes. An overview of cell-free expression systems and its components can be found on the<a class=”wikilink1” href=https://2015.igem.org/Team:Freiburg/Project/Cellfree_Expression>methodology page</a>. <br/>
| + | |
| − | To investigate the efficiency of our self-prepared expression system we performed an experiment comparing it to a commercially available kit. In order to obtain reliable results we used the exact same vector, containing a sequence encoding GFP. Like this we were able to trace the amount of expressed GFP using a plate reader over a period of two hours. As a negative control, both mixes were treated equally in a second sample but did not contain any DNA. <br/>
| + | |
| − | The evaluation is shown in figure 1 and is based on triplicates. <b>The data was normalized to the mean value of the measurement of air. The uncertainty was calculated using the standard deviation. ÜBERARBEITEN JE NACH GRAPH</b> <br/>
| + | |
| | | | |
| − | picture; Figure 1: <b>Cell-free expression of GFP using the DiaMIX and a commercial kit.</b> The reaction was performed in a volume of 50 µl each and monitored every minute at 37°C over a period of two hours. Excitation at 480 nm, emission at 520 nm. <br/>
| + | <a href="https://static.igem.org/mediawiki/2015/5/56/Freiburg_iRiF_overview_RJ.jpg" class="lightbox_trigger"> |
| | | | |
| − | Both expression systems were shown to successfully express the applied vector. There is a clear enhancement of light emission observable at 520nm for both mixes in comparison to the respective negative control. The expression of GFP using the DiaMIX seems to be slightly better than by using the commercial kit. Still, one has to mention the actual purpose of the commercial kit to express linear templates. However, as the basis protocol for our mix was optimized for circular templates, we used a circular vector for the experiment. <br/>
| + | <img src="https://static.igem.org/mediawiki/2015/9/9a/Freiburg_iRiF_overview_RJ_preview.jpg" width="300px"> |
| − | Furthermore, as already shown above, we successfully verified the expression of GFP with our cell-free mix in an <a class="wikilink1" href="https://2015.igem.org/Team:Freiburg/Results#agfp_results" title="agfp_results">iRIf measurement</a>. <br/>
| + | |
| − | To obtain these final results, a lot of optimization and testing had to be done. If you want to know more about how we established the DiaMIX for the DiaCHIP, you can find detailed information about the most important experiments on the <a class=”wikilink1” href="https://2015.igem.org/Team:Freiburg/Results/Cellfree">cell-free expression results page</a>. <br/>
| + | |
| − | </p>
| + | |
| − | <a class="closeButton" href="#own_mix">▲ Close Box</a>
| + | |
| − | </div>
| + | |
| − | </div>
| + | |
| | | | |
| − | <span id="explore_DiaCHIP_anchor" class="anchor"></span>
| + | <div class="thumbcaption"> |
| − | <div class="content_box results_page" id="explore_DiaCHIP"> | + | |
| − | <h1>Explore the DiaCHIP</h1>
| + | |
| − | <p>
| + | |
| − | For establishing our device, we optimized all steps from the immobilization of DNA on the silicone of the flow-chamber to the specific binding of the target proteins on the glass slide. This way, we generated protein arrays we could use to detect different antibodies in human and rabbit serum with the iRIf detection method. <br> Click on the images below to explore our experiments from expression to detection!
| + | |
| − | </p>
| + | |
| | | | |
| − | <h2 id="assembly_pic">Assembling the DiaCHIP</h2>
| + | </a> |
| | | | |
| − | <div class="flexbox">
| + | <p><strong>Figure 4: Optical detection method.</strong> The detection system mainly consists of a camera and an LED and is called <a href="https://2015.igem.org/Team:Freiburg/Project/iRIf"target="_blank">iRIf</a> (imaging Reflectometric Interference). Antigen-Antibody interactions can be detected label-free and in real-time. An optical output of such DNA events is generated by a minimal change in the thickness of the layer on the slide right at the corresponding antigen spot.</p> |
| − | <div id="Assembling" class="link_image">
| + | </div> |
| − | <a href="https://2015.igem.org/Team:Freiburg/Results/Immobilization" id="immobilization" class="circle"></a>
| + | |
| − | <div class="hovertext" id="immobilization_label">DNA Immobilization</div>
| + | |
| − | <a href="https://2015.igem.org/Team:Freiburg/Results/Cellfree" id="cellfree" class="circle"></a>
| + | |
| − | <div class="hovertext" id="cellfree_label">Cell-free Expression</div>
| + | |
| − | <a href="https://2015.igem.org/Team:Freiburg/Results/Surface" id="binding" class="circle"></a>
| + | |
| − | <div class="hovertext" id="binding_label">Binding on Surface</div>
| + | |
| − | <img id="assembly_image" src="https://static.igem.org/mediawiki/2015/f/f9/Freiburg_150912_Resultsoverviewgrafik_quer_DNAonPDMS_CF_Surface_RJ.png" width="100%">
| + | |
| − | </div>
| + | |
| − | </div>
| + | |
| | | | |
| − | <h2>Diagnosis of Antigens</h2>
| + | </div> |
| | + | </div> |
| | + | </div> |
| | + | </p> |
| | | | |
| − | </script> | + | <p> |
| − | <div class="flexbox"> | + | After preparation of the DiaCHIP, a patient’s serum sample can be flushed over the protein array using the same microfluidic system. The DNA of antibodies to the corresponding surface causes a minimal change in the thickness of the layer on the slide right at the corresponding antigen spot. This DNA can be detected label-free and in real-time using a novel technique called <a href="https://2015.igem.org/Team:Freiburg/Project/iRIf"target="_blank">iRIf</a> (imaging Reflectometric Interference) without the need for further labeling. Its core components are a camera, an LED and two lenses. |
| − | <div id="Diagnosis" class="link_image">
| + | See how we reconstructed the system in a <a href="https://2015.igem.org/Team:Freiburg/Results/Own_Device"target="_blank">low-budget device</a>. |
| − | <a href="https://2015.igem.org/Team:Freiburg/Results/Diagnostics#agfp" id="multbind" class="circle"></a>
| + | </p> |
| − | <div class="hovertext" id="multbind_label">Specific Detection in rabbit serum</div>
| + | |
| − | <a href="https://2015.igem.org/Team:Freiburg/Results/Diagnostics#salmonella" id="salmonella" class="circle"></a>
| + | |
| − | <div class="hovertext" id="salmonella_label">Detection of anti-Salmonella</div>
| + | |
| − | <a href="https://2015.igem.org/Team:Freiburg/Results/Diagnostics" id="irif" class="circle"></a>
| + | |
| − | <div class="hovertext" id="irif_label">Imaging Reflectometric Interference</div>
| + | |
| − | <img id="diagnosis_image" src="https://static.igem.org/mediawiki/2015/5/55/Freiburg_150912_Resultsoverviewgrafik_Tet_Sal_GFP_RJ.png" width="100%">
| + | |
| − | </div>
| + | |
| − | </div>
| + | |
| | | | |
| − | <p> Click on one of the images to get a further insight on how we build our DiaCHIP </p>
| + | |
| | + | <div class="float_barrier"></div> |
| | + | <p> |
| | + | <h2>Step 5: Changing Perspectives - Off to our Results </h2> |
| | + | |
| | + | <div class="image_box right"> |
| | + | <div class="thumb2 trien" style="width:310px"> |
| | + | <div class="thumbinner"> |
| | + | <a href="https://static.igem.org/mediawiki/2015/9/93/Freiburg_changeperspective.jpeg" class="lightbox_trigger"> |
| | + | <img src="https://static.igem.org/mediawiki/2015/8/8f/Freiburg_changeperspective_preview.jpg" width="300px"> |
| | + | </a> |
| | + | <div class="thumbcaption"> |
| | + | <p><strong>Figure 5: Illustration of the perspective during a measurement.</strong> </p> |
| | + | </div> |
| | + | </div> |
| | + | </div> |
| | </div> | | </div> |
| | + | </p> |
| | | | |
| | + | <p> |
| | + | When illustrating the basic principle of the DiaCHIP, we mainly looked at it from the side. Now it is time to explore our results and see what we actually achieved. Therefore, it is important to have in mind that you are observing the chip from the camera's position, so basically from the top (figure 5). This persepective remains the same in all the <a href="https://2015.igem.org/Team:Freiburg/Results/Diagnostics">iRIf measurements</a> we are showing in the results section. |
| | + | </p> |
| | | | |
| − | </html> | + | <div> |
| | + | <p> |
| | + | After weeks of optimizing the different components of the DiaCHIP, we are proud to present our <a href="https://2015.igem.org/Team:Freiburg/Results">results</a>. We reached the highlight of our project with the successful <a href="https://2015.igem.org/Team:Freiburg/Results">detection of antibodies in our own blood!</a> |
| | + | </p> |
| | + | </div> |
| | | | |
| − | <!-- wiki content ends here --> | + | <a href="">Link zu Results</a> |
| | + | |
| | + | |
| | + | </div> <!-- end level1 --> |
| | + | </div> <!-- end content_box --> |
| | + | |
| | + | </html> |
| | + | <!-- content ends here --> |
| | {{Freiburg/wiki_content_end}} | | {{Freiburg/wiki_content_end}} |